



Contents: Checking the steering wheel play ⤓ Checking the steering angle of the…⤓ Checking the moment of the beginning…⤓ Checking the amount of effort…⤓ Checking the steering wheel's…⤓ Replacing the power steering fluid ⤓ Bleeding the Power Steering…⤓ Checking the maximum supply pressure…⤓ Checking the power steering…⤓ Checking the ball joint protective…⤓
Checking the steering wheel play
1. With the engine idling (power steering operating), align the front wheels parallel to the longitudinal axis of the vehicle.
2. By turning the steering wheel slightly in both directions until the front wheels begin to turn, measure the free play (play) of the steering wheel along its rim.
The maximum permissible value is 30 mm
3. If the steering wheel play exceeds the maximum permissible value, check for gaps in the steering shaft connections and steering rods. Repair or replace worn parts.
4. If the steering wheel play still exceeds the maximum permissible value as a result of the check in item (3), set the front wheels parallel to the longitudinal axis of the vehicle with the engine off. Apply a force of 5 N to the steering wheel rim and check the play.
Nominal value (with engine not running) - 10 mm or less
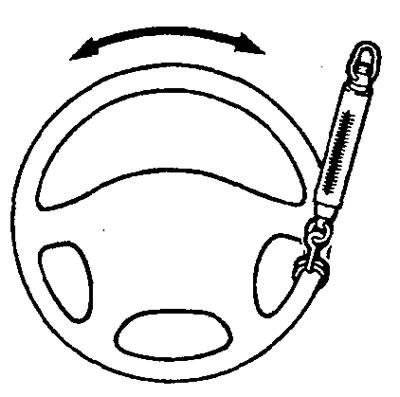
5. If the play exceeds the nominal value, remove the steering gear and check the total torque of the steering gear pinion.
Checking the steering angle of the steering wheels
1. Place the front wheels on a turning radius measuring stand and measure the turning angles of the steered wheels.
Nominal value:
- Inner wheel - 40°40' ±1°30'
- Outer wheel - 33°
2. If the steering angles do not correspond to the nominal values, then the front wheel toe-in is probably not adjusted. Adjust the toe-in and check the steering angles again.
Checking the moment of the beginning of rotation of the ball joint of the steering rod end
1. Disconnect the tie rod end from the steering knuckle using a puller.
Attention:
- To prevent the puller from bouncing off, it must first be tied with a cord.
- Just loosen the mounting nut on the ball joint pin, do not unscrew the nut completely.
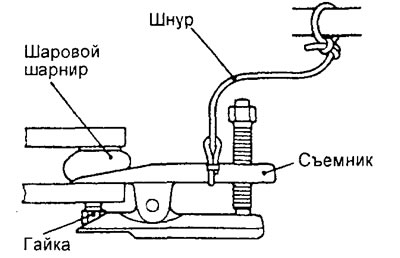
2. Move the ball joint pin several times and tighten the nut. Using a special tool, measure the moment the ball joint starts to rotate.
Nominal value: 0.5-2.5 Nm
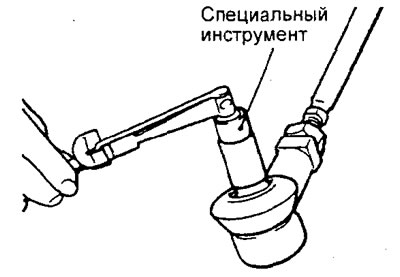
3. If the measured value exceeds the nominal value, replace the tie rod end.
4. If the measured value is less than the nominal value, check for increased clearances or jamming in the ball joint. If there are no such faults, the ball joint is suitable for operation.
Checking the amount of effort required to turn the steering wheel on a stationary vehicle
1. Place the vehicle on a level horizontal surface and position the front wheels parallel to the longitudinal axis of the vehicle.
2. Start the engine and set its operating mode to 1000±100 rpm.
Caution: After checking the set idle speed, set the idle speed to normal.
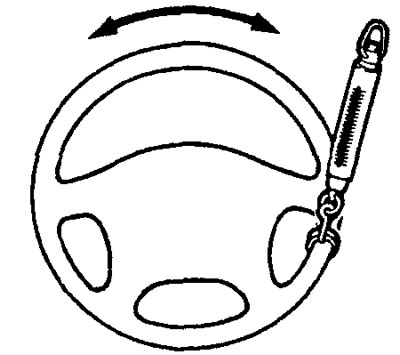
3. Mount a spring dynamometer on the steering wheel rim. Measure the turning force required to turn the steering wheel from a straight-ahead position to the left and right (1.5 turns). Also make sure that there are no significant deviations in the amount of force required on the steering wheel.
Nominal value: 29N or less
Allowable deviation is 5.9N or less
Checking the steering wheel's independent return to the center position
1. While driving, make several smooth and then sharp turns of the steering wheel to the right and left in order to check for any difference in steering wheel effort when turning left and right, as well as the presence of a return moment.
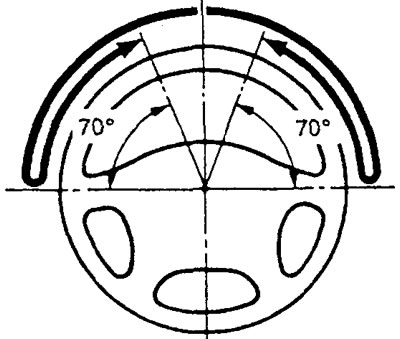
2. When driving at 35 km/h, turn the steering wheel 90° and release it after 1-2 seconds. If the steering wheel then turns 70° or more to the center position on its own, then such a return of the steering wheel is considered satisfactory.
Note: When turning sharply, there may be an immediate feeling of some "heaviness" of the steering wheel, but this is not considered a disadvantage (this feeling occurs due to the low performance of the power steering pump at low engine speeds).
Replacing the power steering fluid
1. Raise the front wheels of the car with a jack and place the car on sliding (safety) stands.
2. Disconnect the return hose.
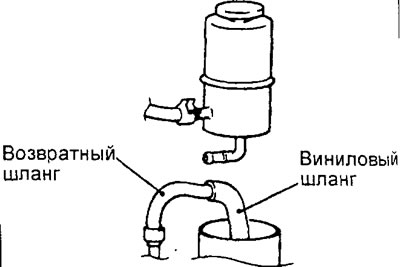
3. Connect the vinyl hose to the return hose and drain the working fluid into a suitable container.
4. Disconnect the high tension spark plug wires.
Caution: Do not place high tension spark plug wires near the fuel rail.
5. To completely drain the working fluid, make several short starts of the starter while constantly turning the steering wheel left and right.
6. Put the return hose back in place and secure it with a clamp.
7. Fill the reservoir with the recommended fluid to the bottom position of the filter, then bleed air from the power steering hydraulic system.
Recommended fluid - Mitsubishi ATF-SPII
Caution: Do not use ATF-SP II M and ATF-SP III fluid in the steering system.
Bleeding the Power Steering Hydraulic System
1. Raise the front wheels of the car with a jack and place the car on sliding (safety) stands.
2. Manually rotate the power steering pump pulley a few times.
3. Make 5 or 6 full turns of the steering wheel left and right.
4. Disconnect the spark plug wires or ignition coil wires.
Caution: Do not place high tension spark plug wires near the fuel rail.
5. Make several short crankings of the starter while constantly turning the steering wheel left and right (five or six times within 15-20 seconds).
Attention:
- While removing air, it is necessary to constantly add working fluid and ensure that its level does not fall below the lower position of the filter.
- If air is removed while the engine is running, air will be sucked in and enter the working fluid. Therefore, air must be removed from the hydraulic system only when the engine crankshaft is turned by the starter.
6. Connect the spark plug wires or ignition coil wires.
7. Turn the steering wheel right and left until the air bubbles in the power steering reservoir disappear.
8. Make sure that the working fluid is transparent, without cloudiness, and its level in the tank corresponds to the normal position on the dipstick.
9. Make sure that the difference in fluid levels when turning the steering wheel left and right is insignificant.
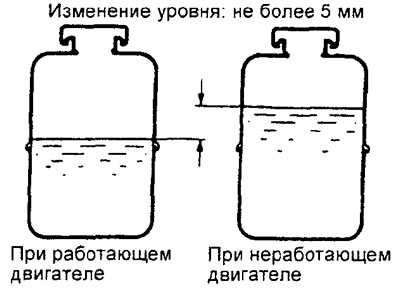
10. Make sure that the difference between the level of the working fluid in the tank when the engine is running and after the engine is stopped is within 5 mm.
11. If the difference in levels has reached 5 mm or more, it means that the air has not been completely removed from the hydraulic system, so the air removal operation should be repeated, starting from point 2.
Attention:
- If the fluid level rises sharply after the engine stops, it means that the air has not been completely removed from the hydraulic system.
- If the air in the power steering hydraulic system is not completely removed, extraneous noise will occur from the pump and control valve, which will lead to a reduction in the service life of the pump and other components of the hydraulic system.
Checking the maximum supply pressure of the power steering pump
1. Disconnect the pressure hose from the power steering pump and connect special tools.
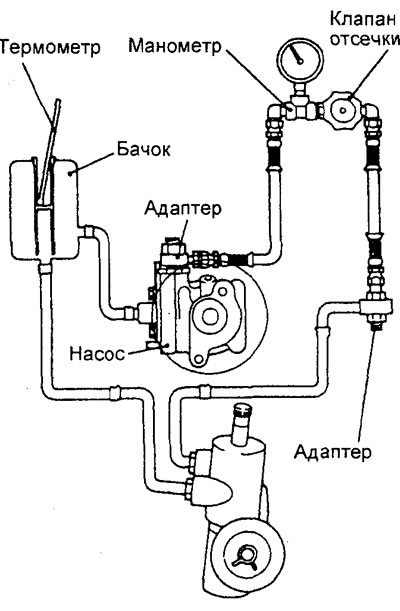
2. Remove air from the power steering hydraulic system. Then, with the vehicle stationary, turn the steering wheel several times until the fluid temperature rises to approximately 50-60°C.
(The original material is posted on the website MitsubishiMan)
3. Start the engine and set its operating mode to 1000±100 rpm.
4. Completely close the shut-off valve on the pressure gauge and measure the power steering pump supply pressure and check whether it corresponds to the nominal value.
Nominal value - 8.8 MPa
Caution: The shut-off valve should not be closed for more than 10 seconds.
5. If the measured pressure is not within the nominal value, disassemble and reassemble the power steering pump. Then re-measure the power steering pump feed pressure.
6. Check the pressure in the booster hydraulic system without load with the shut-off valve fully open.
Nominal value - 0.2-0.7 MPa
7. If the measured pressure value does not correspond to the nominal value, then the cause of the malfunction should be sought in the steering mechanism or hydraulic system hoses. After eliminating the malfunction, re-measure the pressure value.
8. Turn the steering wheel all the way to the left or right and measure the holding pressure of the steering gear.
Nominal value - 8.8 MPa
9. If the measured pressure is lower than the nominal value, disassemble and reassemble the steering gear. If the measured pressure is higher than the nominal value, disassemble and reassemble the fluid flow control valve in the pump. Then re-measure the pressure value.
10. Disconnect the measuring instruments, connect the delivery hose and tighten the hose fitting to the rated tightening torque.
Tightening torque: 57±7 Nm
11. Bleed the power steering hydraulic system.
Checking the power steering hydraulic fluid pressure switch
1. Disconnect the pressure hose from the power steering pump and connect special tools.
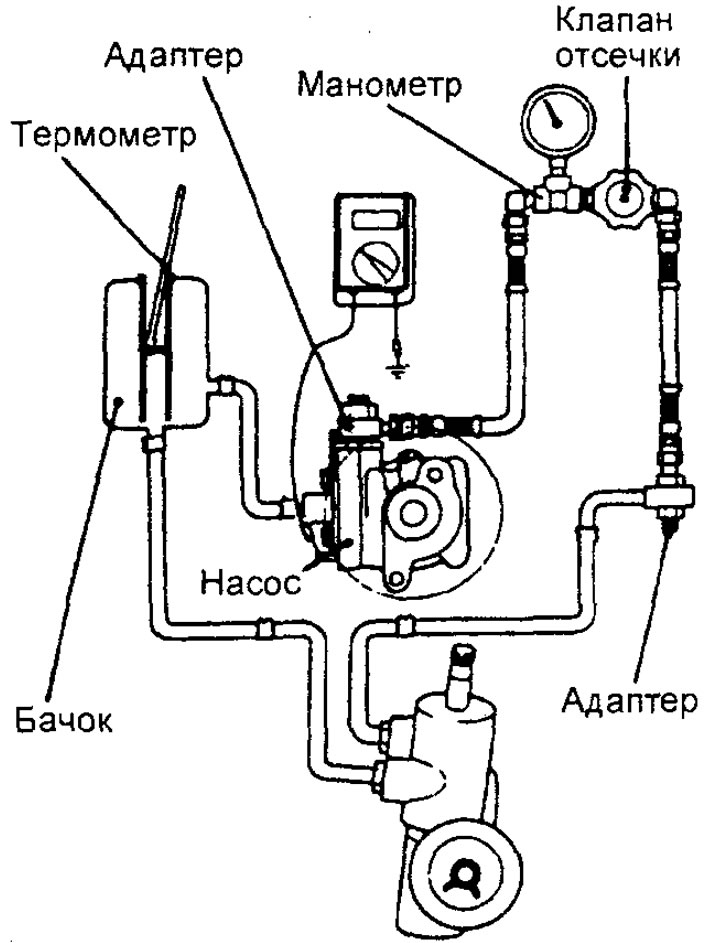
2. Remove air from the power steering system. With the vehicle stationary, turn the steering wheel left and right several times until the fluid temperature rises to approximately 50-60°C.
3. Start the engine and set it to idle mode.
4. Disconnect the connector of the pressure switch sensor for the working fluid in the hydraulic system of the booster and connect an ohmmeter to the connector.
5. Smoothly close the shut-off valve on the pressure gauge, increasing the working pressure. Check the value of the sensor-switch response pressure by the pressure of the working fluid in the hydraulic system.
Nominal value - 1.5-2.0 MPa
6. Smoothly open the shut-off valve on the pressure gauge, reducing the working pressure. Check the lower threshold of the pressure switch operation by the pressure of the working fluid in the hydraulic system.
Nominal value - 0.7-2.0 MPa
7. Disconnect the special tools, connect the delivery hose and tighten the hose fasteners to the specified tightening torque.
Tightening torque - 57 Nm
8. Bleed the power steering hydraulic system.
Checking the ball joint protective boot
1. Press your finger on the ball joint protective cover and check the cover for wear, damage, cracks, abrasions and deterioration in technical condition.
2. If mechanical damage to the protective cover is detected, replace the steering rod end.
Note:
- Cracks or damage to the protective boot may result in damage to the ball joint.
- If the protective cover has been damaged during maintenance work, it is necessary to replace the protective cover with a new one and repeat the check.