Removal
− Before you begin removing parts, perform the following operations:
- a) Remove the engine crankcase protective cover.
- b) Drain the engine oil.
- c) Remove the exhaust pipe.
− The parts are removed in the order of numbers shown in the figure "Removing the oil pan".
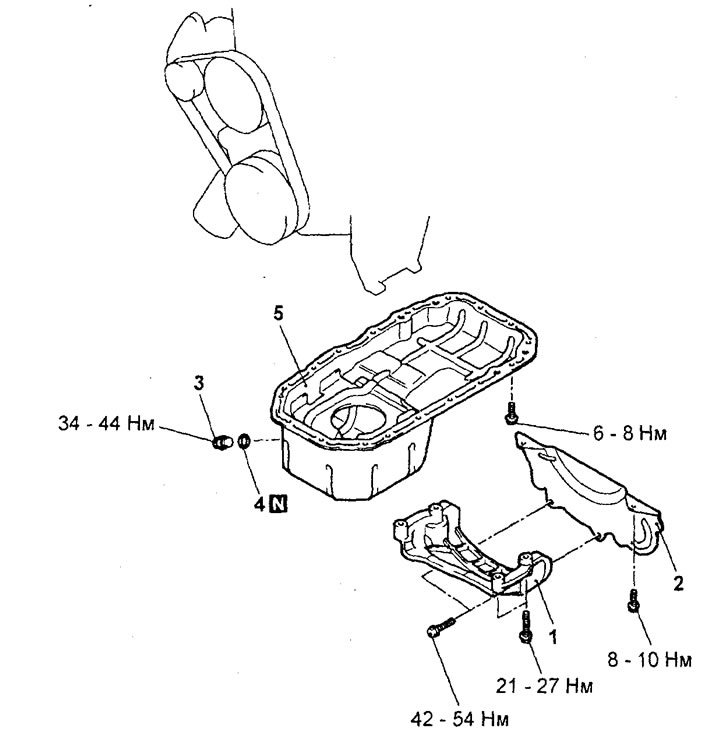
Removal the oil pan (engine 4G15). 1 - gearbox mounting bracket, 2 - gearbox housing protective cover, 3 - drain plug, 4 - gasket, 5 - oil pan.
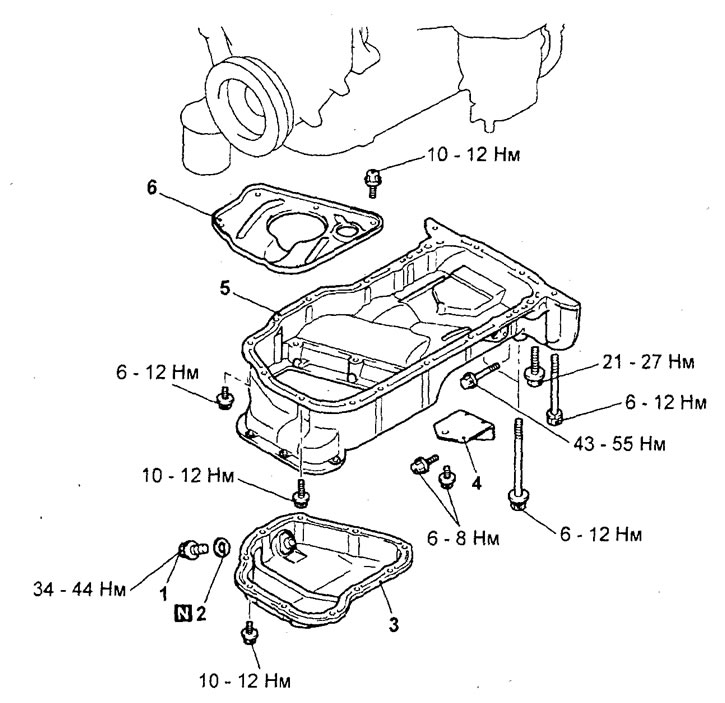
Removal the oil pan (engine 4G93).1 - drain plug, 2 - gasket, 3 - lower part of the oil pan, 4 - oil pan cover, 5 - upper part of the oil pan, 6 - oil deflector plate.
- When removing parts, pay attention to the following operations:
1. (Engine 4G15) Removing the oil pan.
a) Loosen the oil pan mounting bolts.
b) Insert a special oil pan puller between the oil pan and the cylinder block.
c) Move the special puller along the edge of the oil pan, hitting it at an angle to separate the pan.
Caution: Using a screwdriver or chisel instead of a dedicated oil pan remover may damage the gasket surface and cause oil leakage.
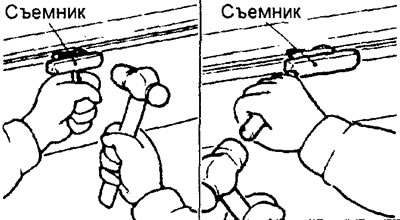
d) Remove the oil pan.
2. (Engine 4G93) Removing the lower part of the oil pan.
a) Unscrew the bolts securing the lower part of the oil pan.
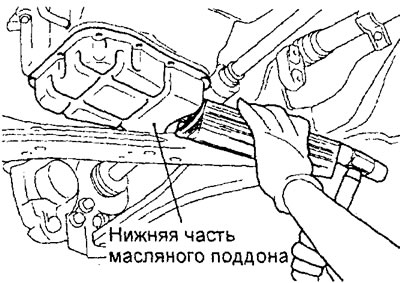
b) Place a wooden block on the side surface of the lower part of the oil pan as shown in the figure, and hit the block with a plastic hammer to separate the lower part of the oil pan from the upper part.
Caution: Using an oil pan puller may damage the aluminum top of the oil pan.
4. (Engine 4G93) Removing the upper part of the oil pan.
a) Loosen the bolts securing the upper part of the oil pan.
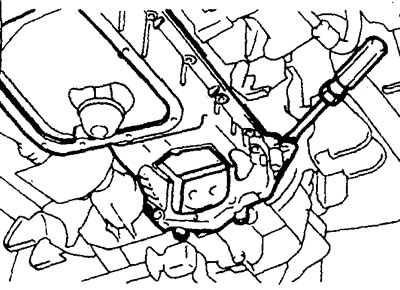
b) Insert a flat-blade screwdriver between the top of the oil pan and the cylinder block as shown in the figure and separate the top of the oil pan.
Caution: Using an oil pan puller may damage the oil pan, which is made of aluminum.
Examination
1. Check the oil pan for cracks.
2. Check the sealant or gasket surface on the oil pan for damage or deformation. Correct if possible.
3. Check the oil receiver for damage, clogging or damage to the screen and tube.
Installation
− Installation of parts is carried out in the reverse order of removal.
- When installing parts, pay attention to the following operations:
1. (Engine 4G 15) Installing the oil pan.
a) Remove old sealant from the mating surfaces of the cylinder block and oil pan.
b) Degrease the sealant application surface on the oil pan and the mating surface on the cylinder block.
c) Apply sealant to the oil pan surface as shown in the figure. The sealant should be applied in a continuous bead approximately 4 mm in diameter.
Sealant MITSUBISHI GENUINE Part # MD970389, Three Bond 1207F or equivalent
Note: Oil pan installation must be completed within the time specified in the sealant application instructions.
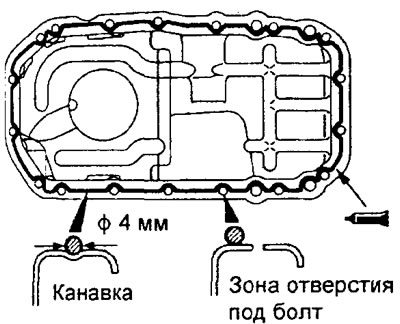
d) Install and tighten the oil pan mounting bolts to the specified torque. Tighten the oil pan mounting bolts gradually, in several steps, in a diagonal sequence.
Tightening torque: 9 ±3 Nm
Caution: After installing the oil pan, wait at least one hour before starting the engine.
2. (Engine 4G93) Installing the upper part of the oil pan.
a) Clean the mating surfaces of the cylinder block and oil pan flange from the remains of the old sealant. After cleaning, degrease the surfaces for applying the sealant.
b) Apply a continuous bead of sealant approximately 4mm in diameter around the entire flange of the top of the oil pan as shown in the figure.
Sealant MITSUBISHI GENUINE Part # MD970389, Three Bond 1207F or equivalent
Caution: Do not allow sealant to be squeezed out in the area of the pan on the gearbox side.
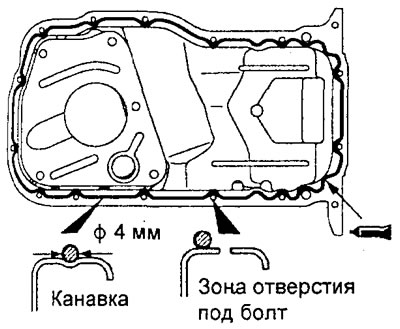
c) Install and secure the oil pan within 15 minutes after applying the sealant. Tighten the oil pan mounting bolts gradually, in several steps, in a diagonal sequence.
Attention:
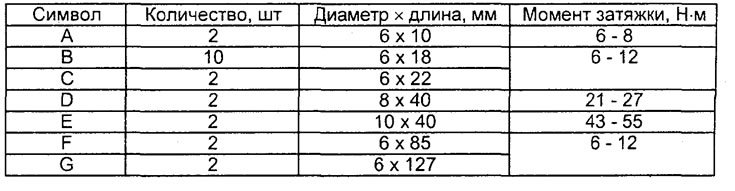
- Be careful, the length of the bolts and tightening torques differ depending on the installation location, do not mix up the locations of the bolts (see the table "Dimensions and tightening torques of the bolts for fastening the upper part of the oil pan").
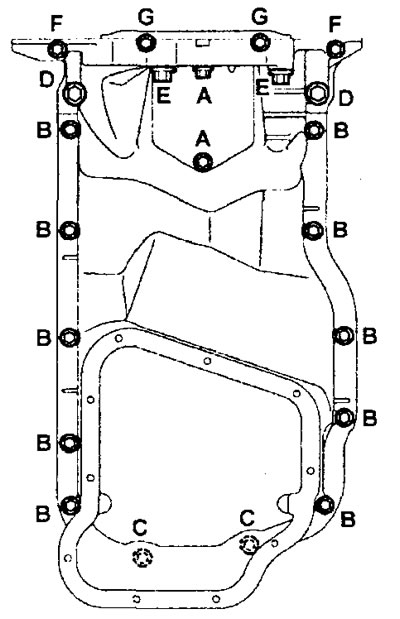
- After installing the oil pan, wait at least an hour before starting the engine.
3. (Engine 4G93) Installing the lower part of the oil pan.
a) Clean the mating surfaces of the flanges of the upper and lower parts of the oil pan from the remains of the old sealant. After cleaning, degrease the surfaces for applying the sealant.
b) Apply a continuous bead of sealant approximately 4mm in diameter around the entire flange of the lower part of the oil pan as shown in the figure.
Sealant MITSUBISHI GENUINE Part # MD970389, Three Bond 1207F or equivalent
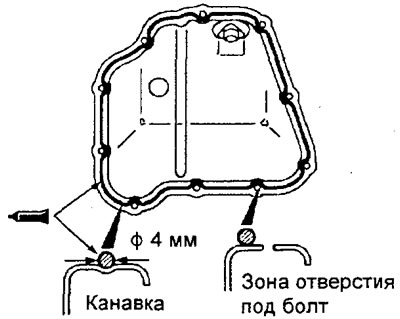
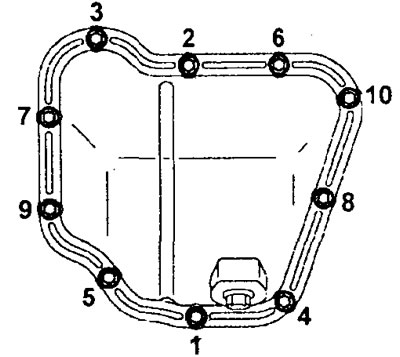
c) Install and secure the lower part of the oil pan within 15 minutes after applying the sealant. Tighten the oil pan mounting bolts in the sequence shown in the figure.
Tightening torques: 10-12 Nm
Caution: After installing the oil pan, wait at least one hour before starting the engine.
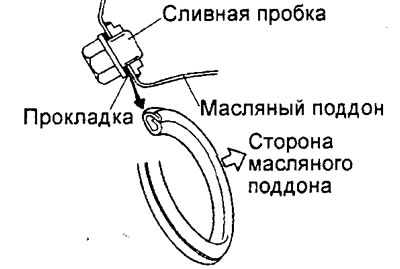
4. Installing the drain plug gasket Install a new drain plug O-ring gasket in the direction shown in the figure.
Note: Incorrect installation of the gasket may cause engine oil leaks.
- After completing the installation of the parts, perform the following operations:
- a) Install the exhaust pipe.
- b) Fill with engine oil.
- c) Install the engine crankcase protective cover.
Table. Dimensions and tightening torques of the upper oil pan mounting bolts (4G93 engine only).