
English Русский
Български
Беларускі
Український
Српски
Hrvatski
Română
Polski
Slovenský
Magyar
Articles Bookmark Contacts Sitemap   
Company Audi Company Ford Company Hyundai Company Kia Company Mazda Company Mercedes-Benz Company Nissan
MitsubishiMan.ru


Home Colt Lancer Galant L200 Outlander Pajero Others
Lancer 9 (2000-2007, petrol) Lancer 3 and 5 (1984-1992)

Sensors and valves (Mitsubishi Lancer 9)

  • Home
  • Lancer
  • 9 (2000-2007, petrol)
  • Power unit
  • Cooling and lubrication system
  • Sensors and valves
0
Contents: Checking the pressure reducing valve ⤓ Checking the engine oil pressure…⤓

Checking the pressure reducing valve


1. At high speeds, the amount of oil supplied by the oil pump is excessive compared to the amount required to lubricate the rubbing pairs. The pressure-reducing valve prevents excess oil supply. At low speeds, the pressure-reducing valve closes the bypass channel under the action of the spring. At high speeds, the oil pressure increases, the force of the oil pressure overcomes the force of the spring, the pressure-reducing valve opens, and excess oil returns through the bypass channel back to the sump.

2. Using a wooden rod, press the valve plunger and check that the plunger moves to its original position without sticking. If the valve plunger is found to be stuck, replace the valve.

Checking the engine oil pressure sensor


1. Check the engine oil level.

2. Disconnect the engine oil pressure sensor connector.
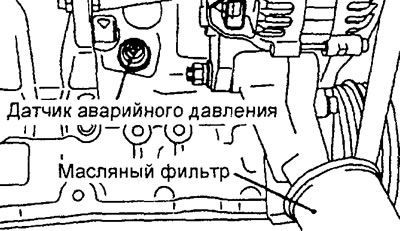


Engine 4G15.
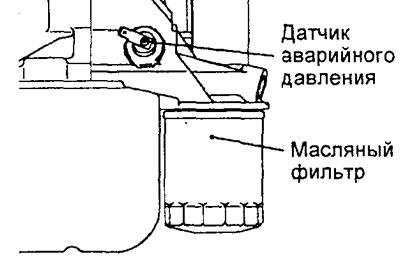


Engine 4G93.


3. Using a special key, remove the sensor.

Caution: The thread of the engine oil pressure sensor is sealed with sealant, be careful not to damage the sensor when removing it.
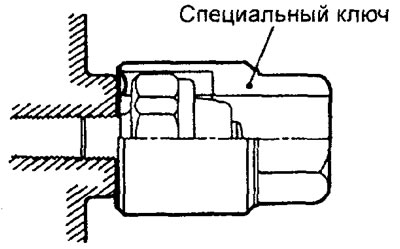


4. Connect the measuring device (pressure gauge) via the adapter.

5. Start the engine and let it idle (warm up).

6. After warming up the engine, check that the oil pressure corresponds to the nominal value.

Nominal value:
  • Idle speed - 29 kPa or more
  • 3500 rpm - 294 - 686 kPa

7. Disconnect the measuring device (pressure gauge).

8. Apply sealant to the threads of the engine oil pressure sensor.

Sealant Three Bond 1215 or equivalent

Caution: Be careful when applying the sealant so that it does not clog the oil passage.
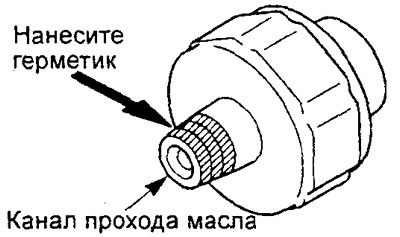


b) Install and tighten the sensor to the specified tightening torque.


Tightening torque:
  • Engine 4G15 — 16 - 22 Nm
  • Engine 4G93 - 8-12 Nm

Caution: After installing the oil pressure switch, wait at least one hour before starting the engine.


9. Connect the engine oil pressure sensor connector.
This article is available at: russian, bulgarian, belarusian, ukrainian, serbian, croatian, romanian, polish, slovak, hungarian
This article was reviewed by: Arseny Pavlov
Share with friends:
◀ Previous
Lancer 9: Cooling and lubrication system
Next ▶

General information about the lubrication system
Radiator and electric fan of the cooling system
Hoses and tubes of the cooling system
Coolant pump
Thermostat assembly
Oil pan
Oil pump housing
Similar materials for other Mitsubishi models

➤ Camshaft Drive Belt — Check, Tension (SOHC, 8 and 12 Valves) Mitsubishi Colt 4 and 5 (1991-2003)
➤ Information sensors and actuators Mitsubishi Galant 6 and 7 (1987-1998)
➤ Checking and adjusting camshafts and valves Mitsubishi L200 4 (2005-2014, diesel)
➤ Removal and installation wheel speed sensors Mitsubishi Outlander 1 (2003-2008)
➤ Engine sensors — removal and installation Mitsubishi Pajero 1 and 2 (1982-1999)
➤ DOHC Engine Camshaft and Crankshaft Position Sensors Mitsubishi Carisma (1995-2004)
Link in different formats to this article
Comments and feedback from visitors
No comments yet


Add up two numbers 36 + 43


Lancer 9 (2000-2007, petrol) 
  • General information
  • User manual
  • Maintenance
  • Power unit
  • Repair of MPI engines
  • Repair of GDI engines
  • Engine overhaul
  • Cooling and lubrication system
  • MPI fuel injection system
  • GDI fuel injection system
  • Intake and exhaust system
  • Starting and charging system
  • Transmission
  • Automatic gearbox
  • Variator (CVT)
  • Drive shafts and gearbox
  • Chassis and running gear
  • Front suspension
  • Rear suspension
  • Steering
  • Brake system
  • Body and interior
  • Doors, locks and windows
  • Exterior (external elements)
  • Interior (internal elements)
  • Electrical equipment
  • Heater and air conditioner
  • Security system SRS
  • Equipment and devices
  • Wiring diagrams (saloon)
  • Wiring diagrams (wagon)
Lancer 3 and 5 (1984-1992) 
  • General information
  • Maintenance
  • Power unit
  • Engine repair
  • Lubrication system
  • Cooling system
  • Ignition system
  • Fuel system
  • Carburetor
  • Fuel injection
  • Diesel power system
  • Exhaust system
  • Transmission
  • Clutch
  • Car gearbox
  • Chassis and running gear
  • Front suspension
  • Rear suspension
  • Steering
  • Brake system
  • Wheels and tires
  • Body and interior
  • Exterior (external elements)
  • Interior (internal elements)
  • Heating system
  • Electrical equipment
  • Equipment and devices
  • Power devices
  • Electrical circuits
MitsubishiMan.ru © 2018–2026 • Mobile version • Articles about Mitsubishi • Contacts • Sitemap: EN BG BY UA RS HR RO PL SK HU • Site search • Bookmark
Colt 2 and 3 (1983-1993) · Colt 4 and 5 (1991-2003) · Colt 5 (1995-2003) · Lancer 3 and 5 (1984-1992) · Lancer 9 (2000-2007) · Galant 5 (1983-1989) · Galant 6 and 7 (1987-1998) · L200 4 (2005-2014) · Outlander 1 (2003-2008) · Pajero 1 and 2 (1982-1999) · Pajero 4 (2006-2021) · Carisma (1995-2004) · Space Star (1998-2005) ·
This resource sets cookies 🍪 to avoid bothering you with repeated data entry.