
Removing
Before you start removing parts, do the following:
- A) Drain the coolant.
- b) (GDI engine) Remove the decorative engine cover.
- V) Remove the air filter.
- G) Remove the battery and battery tray.
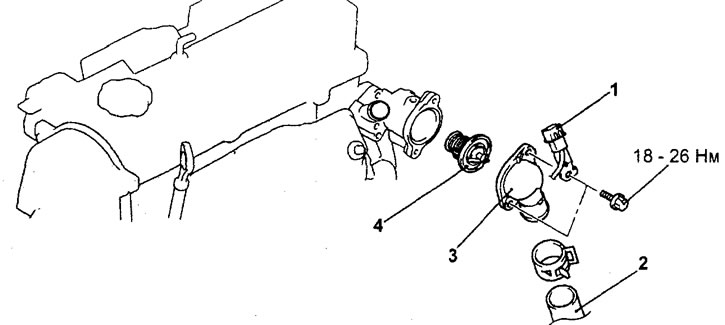
Removal of parts is carried out in the order of the numbers indicated in the figure "Thermostat".
When removing parts, pay attention to the operation to remove the lower radiator hose.
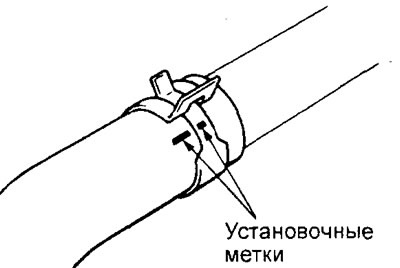
After aligning the relative position of the radiator hose and clamp, disconnect the radiator hose.
Attention: after disconnecting the hoses from the radiator, it is necessary to close the holes in the hose and radiator with plugs to prevent dust or foreign particles from entering them.
Examination
1. Check that the thermostat valve is tightly closed at room temperature (20°C).
2. Check the thermostat for defects or damage. If there are various deformations, visible damage or other defects, then replace the thermostat.
3. Check for rust or deposits on the thermostat valve. If rust or deposits are found, clean the valve.
4. Checking the operation of the thermostat.
A) Immerse the thermostat in a vessel of water and heat the water while stirring it.
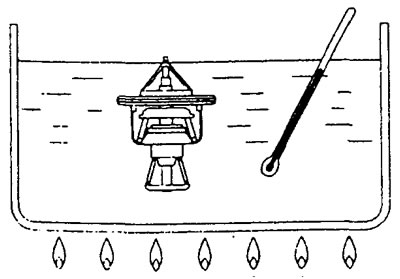
b) Check that the start temperature of the valve, the temperature of the full opening of the valve and the amount of travel of the valve when it is fully open correspond to the nominal values.
Rated values:
Valve opening start temperature
- 4G15 engine - 82±1.5°C
- Engine 4G93 - 85±1.5°С
Valve full opening temperature
- 4G15 engine - 95°C
- 4G93 engine - 98°C
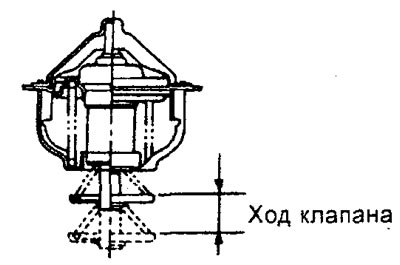
- Valve stroke when fully opened - 8.5 mm or more
Note: Measure the distance from the bottom of the valve to the thermostat housing when it is fully closed and then fully open, then calculate the valve travel.
Installation
Installation of details is made in an order, the return to removal.
When installing parts, pay attention to the following operations:
1. Installing a thermostat.
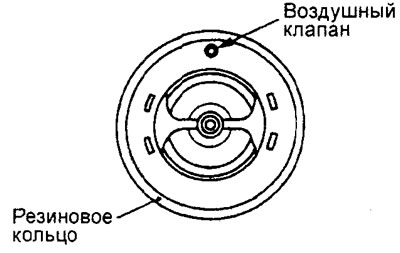
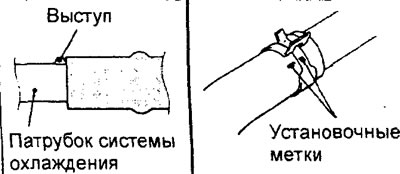
Install the thermostat so that the air valve is at the top, as shown in the illustration, and aligned with the appropriate mark on the thermostat housing.
Attention:
- It is necessary to make sure that there is no oil on the rubber sealing ring of the thermostat.
- Be careful not to kink or scratch the O-ring when installing.
2. Connecting the lower radiator hose.
A) When connecting the lower radiator hose, put the hose on the branch pipe until it stops against the protrusion of the branch pipe, then tighten the clamp
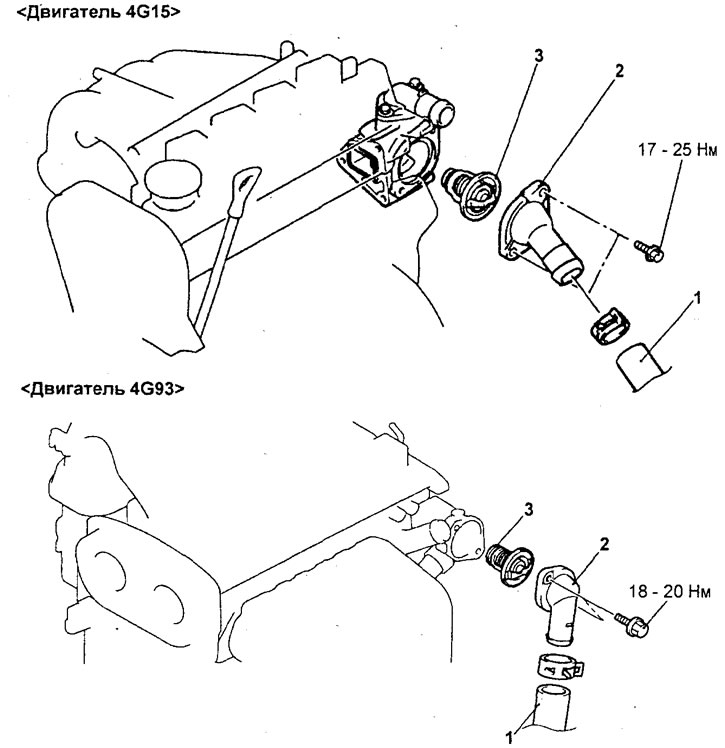
Thermostat (GDI engines). 1 - lower radiator hose connection 2 - cooling system inlet pipe, 3 - thermostat.
Thermostat (4G15-MPI engine). 1 - oxygen sensor connector, 2 - lower radiator hose connection, 3 - cooling system inlet pipe, 4 - thermostat.

Thermostat (engine 4G93-MPI). 1 - lower radiator hose connection, 2 - oxygen sensor connector, 3 - cooling system inlet pipe, 4 - thermostat.
b) The hose clamp should always be installed in the position in which the clamp was previously installed. Therefore, before installing the clamp, align the alignment marks on the hose clamp and radiator hose, then connect the hose.
After completing the installation of the parts, perform the following operations:
- A) Install the battery tray and battery.
- b) Install the air filter.
- V) (GDI engine) Install the decorative engine cover.
- G) Fill with coolant.