



Engine diagnostics
If after starting the engine an extraneous sound ("clacking") from the hydraulic compensators appears and does not disappear as the engine warms up, then perform the following check.
1. Check the oil level in the engine crankcase and its quality. Replace or add the required amount of oil if necessary.
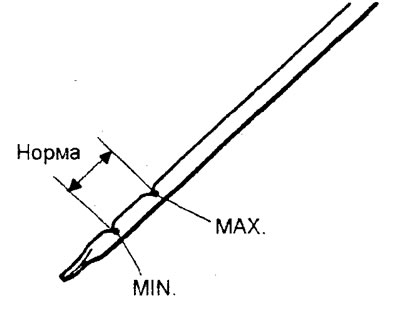
a) If the amount of oil in the engine crankcase is insufficient, air enters through the mesh filter of the oil receiver into the channel of the lubrication system.
b) If the amount of oil is greater than the norm, the oil foams excessively when the crankshaft rotates, and a large amount of air is mixed into the oil.
c) As the oil ages (the oil has lost its properties - degenerated), the air mixed into the oil cannot easily separate from it, and its quantity in the oil constantly increases.
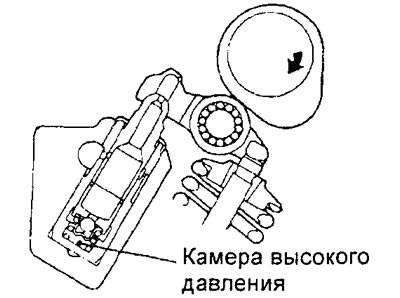
Attention: if, due to one of the above reasons, there is a large amount of air in the oil and it penetrates into the high-pressure chamber of the hydraulic compensator, the air inside the hydraulic compensator is compressed when the valve opens and the hydraulic compensator is also compressed (the plunger will "sag"), resulting in abnormal noise when the valve closes. That is, the same thing happens when too large a thermal clearance is mistakenly set in the valve mechanism drive. If the air is removed from the cavities of the hydraulic compensators, their operation is restored.
2. Check whether the noise appears immediately after the engine starts, and if there is noise, check that it changes in accordance with the change in engine speed.
Note:
- If the noise does not appear immediately after starting the engine, or if it does not change in accordance with the change in engine speed, then the malfunction is not caused by the hydraulic lifters, look for another cause of the malfunction.
- Moreover, if the noise does not change in accordance with the change in engine speed, then the cause of the malfunction is probably not the engine (in these cases, the hydraulic lifters are working normally).
3. With the engine idling, check that the noise level does not change when the engine load changes (for example, when shifting the selector from position "N" to position "D").
Note: If the noise level changes, the cause may be collision of parts due to wear of the crankshaft bearings or connecting rod bearing shells (in such cases, the hydraulic compensators operate normally).
4. After warming up the engine, let it idle. Then check for extraneous noise. If the noise has decreased or disappeared, the knocking of the hydraulic lifters may be caused by sediment (contamination) of the engine oil. In this case, replace the engine oil, and then clean the hydraulic lifters (see section "Rocker arms and camshafts" in chapter "Engine - General Repair Procedures"). If this does not lead to improvement (i.e. the extraneous noise does not disappear), then proceed to point "5".
5. If extraneous noise is present, perform the following check.
a) Turn off the engine and allow it to cool sufficiently.
b) Turn the engine crankshaft two full revolutions.
c) Perform a simple check of the hydraulic lifters.
- If during a simple check of the hydraulic lifters any rocker arms can be easily moved downwards, then replace the corresponding hydraulic lifters;
- If after a simple check it turns out that all hydraulic compensators are in normal condition (i.e. if none of the rocker arms can be moved down without force), then look for another cause of the malfunction.
Note: The condition of the hydraulic lifters can also be determined by checking their tightness (see the section "Valve rocker arms and camshafts" in the chapter "Engine - general repair procedures"), however, this requires removing them from the engine.
Caution: Before installing a new hydraulic compensator, make sure that all air is removed from it.
6. Remove air from the hydraulic lifters (without removing them from the engine).
7. If the noise does not disappear even after removing air from the hydraulic lifters, then perform a simple check of the hydraulic lifters.
a) If during a simple check of the hydraulic lifters any rocker arms can be easily moved downwards, replace the corresponding hydraulic lifters.
b) If during the check two or more rocker arms can be easily moved downwards, the cause may be a blockage of the oil passage leading to the cylinder head. Check for blockage of the oil passage. Clean the passage if it is blocked. If no blockage of the oil passage is detected, replace the hydraulic lifters.
c) If after a simple check it turns out that all hydraulic compensators are in normal condition (if none of the rocker arms can be easily moved down), then look for another cause of the malfunction.
Note: the condition of the hydraulic compensators can also be determined by checking their tightness (see section "Rocker arms and camshafts" in chapter "Engine - General Repair Procedures").
Caution: Before installing a new hydraulic compensator, make sure that all air is removed from it.
8. Start the engine and check that the extraneous noise has disappeared. If necessary, bleed the air from the hydraulic compensators.
Removing air from hydraulic lifters without removing them from the engine
Note: If any of the above situations occur, extraneous noise can be eliminated by removing air from the hydraulic lifters.
- If the vehicle has been parked on a slope for a long period of time, the amount of oil in the hydraulic lifters will decrease and air may enter the high-pressure chamber of the hydraulic lifters.
- If the car has not been used for a long time, the oil may also leak out of the oil channels, so some time is needed to fill the cavities of the hydraulic compensators with oil and remove air from them.
1. Check the engine oil level in the engine crankcase and its quality, replace or add the required amount if necessary.
2. Let the engine idle for 1-3 minutes to allow it to warm up.
3. Without putting any load on the engine, perform the engine acceleration-braking procedure shown in the figure several times until the abnormal noise disappears (usually the noise disappears after 10-30 cycles, but if the noise does not disappear even after 30 cycles, then the cause is not the presence of air in the hydraulic lifters).
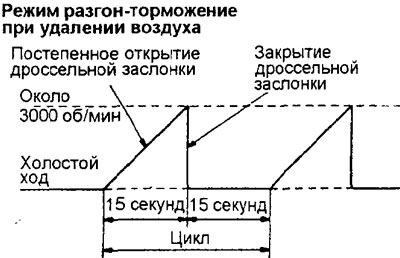
4. After the noise disappears, repeat this acceleration-braking procedure about 5 more times.
5. Let the engine idle for another 1-3 minutes to make sure there is no abnormal noise.