



Contents: Road tests (road test) ⤓ Checking the torque converter on a…⤓ Checking the pressure in the…⤓ Table. Checking nominal pressures in…⤓
Road tests (road test)
Before performing a road test, make sure that basic checks have been performed, including checking the level and condition of the CVT fluid and adjusting the CVT control cable.
1. Turn the ignition key from the "OFF" position to the "ON" position and check the serviceability of the CVT control relay (presence of on-board voltage).
2. With the ignition switch in the "ON" position and the engine not running, do the following:
- a) (Models with manual gear shifting mode) Move the CVT selector to positions "R", "N", "D", "Ds". Check the serviceability of the start prohibition switch (correspondence between the selector position and the switch signal).
- b) (Models without manual gear shifting mode) Move the CVT selector to positions "R", "N", "D", "Ds", "L". Check the serviceability of the start inhibit switch (correspondence between the selector position and the switch signal).
- c) Move the CVT selector lever to the "D" position and make sure that the manual mode select switch is in the "OFF" position, the UP switch is in the "OFF" position, and the DOWN switch is in the "OFF" position.
- d) Move the CVT selector to the position corresponding to the manual shift mode and make sure that the manual mode selector switch is in the "ON" position, the upshift switch (UP) is in the "OFF" position, and the downshift switch (DOWN) is in the "OFF" position.
- d) Move the CVT selector lever to the position corresponding to the upshift in manual shift mode and make sure that the manual mode select switch is in the "ON" position, the upshift switch (UP) is in the "ON" position, and the downshift switch (DOWN) is in the "OFF" position.
- e) Move the CVT selector lever to the position corresponding to the upshift in manual shift mode and make sure that the manual mode select switch is in the "ON" position, the upshift switch (UP) is in the "OFF" position, and the downshift switch (DOWN) is in the "ON" position.
3. With the ignition switch in the "ON" position, the engine not running and the CVT selector in the "P" position, perform the following steps:
Check the throttle position sensor for proper operation:
- - When the accelerator pedal is released (900 - 1100 mV).
- - When pressed to half the stroke (smoothly increases from the value of 900 mV).
- - When the accelerator pedal is fully depressed (4000 mV).
4. Move the variator selector to the "P" or "N" position. Set the ignition key to the "START" position (engine not running) and make sure that starting the engine (cranking the crankshaft with the starter) is only possible in the specified selector positions.
5. Drive the car for 15 minutes or more and check the serviceability of the CVT working fluid temperature sensor (the CVT working fluid temperature gradually increases to 45-100°C).
6. With the engine idling and the CVT selector in position "P", perform the following checks:
Check the nominal values with the accelerator pedal not pressed:
- - Crankshaft speed: 600 - 800 rpm.
- - Turbine shaft speed: 600 - 800 rpm.
- - Pressure in the main line (according to the readings of the pressure sensor in the main line): 0.6-1.5 MPa.
- - CVT working fluid pressure (according to the CVT working fluid sensor readings): 0-0.6 MPa.
- - Gear ratio: 2.313.
- - Solenoid valve for controlling pressure in the main line: 70 - 90%.
7. With the engine idling, perform the following checks:
- a) When moving the variator selector from position "N" to "D" and from "N"
- c) "R" make sure there are no faults when starting to move (there should be no sharp jolts when changing gears, the gear engagement time should not exceed 2 seconds).
- b) When moving the variator selector from position "N" to "D" and from "N" to "R", make sure that the electromagnetic pressure control valve (torque converter lock-up clutch) is in good working order: 100% -> 0%.
- c) When moving the CVT selector from position "N" to "D", check the torque converter lock-up clutch (speed: less than 2040 rpm).
8. Perform the checks when the CVT selector is in position "D":
- a) The vehicle is stationary (torque converter lock-up clutch electromagnetic valve - 0%) - the vehicle is moving on a flat horizontal surface at a speed of no more than 50 km/h (torque converter lock-up clutch electromagnetic valve - 35%).
- b) When driving on a flat horizontal surface at a speed of no more than 50 km/h, check the torque converter lock-up clutch (speed: less than 40 rpm).
- c) Check the electromagnetic valve for shift control: when the variator selector is moved from position "D" to "Ds", the duty cycle decreases while driving, and when moving from position "Ds" to "D", the duty cycle increases.
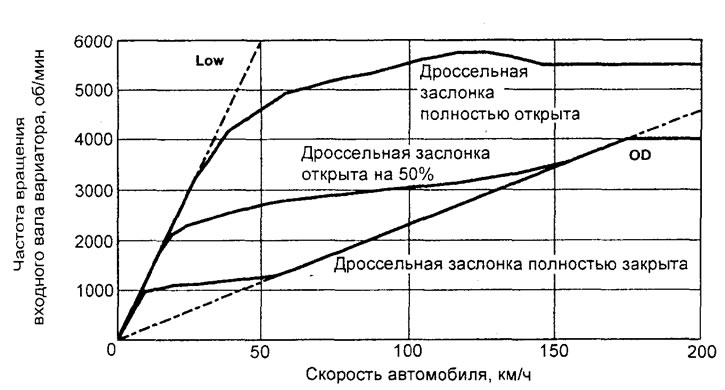
Diagram of the operation of the variator without manual gear shift mode of the sedan model from 05.2001 with the 4G15-GDI engine).
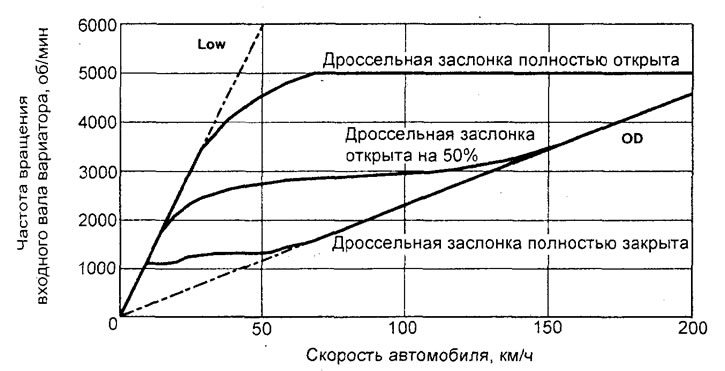
Diagram of the variator operation without manual gear shift mode (sedan models from 05.2001 with 4G93-MPI engine).
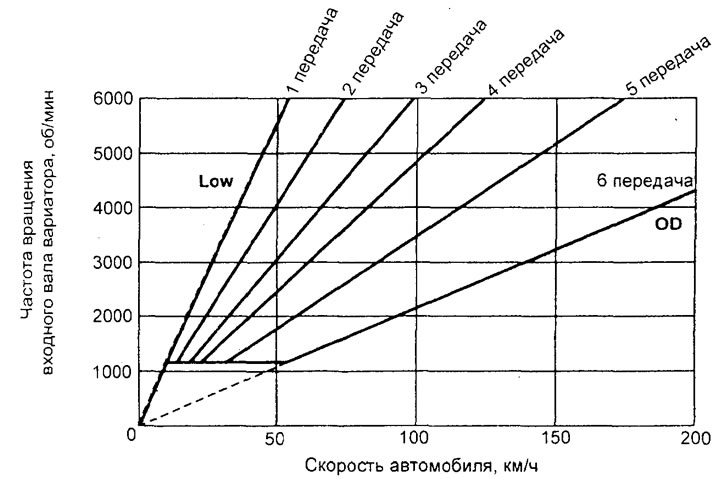
Diagram of operation of the variator with manual gear shift mode.
Checking the torque converter on a fully braked vehicle (stall test)
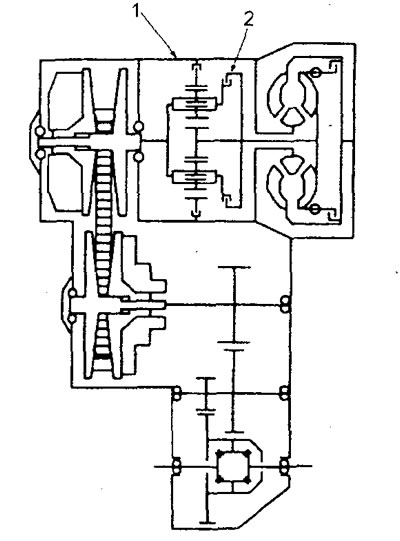
Variator diagram. 1 - reverse brake, 2 - forward clutch.
The purpose of this test is to measure the maximum engine crankshaft speed with the CVT output shaft fully braked in the "D" and "R" ranges. Its value can be used to determine the operability of the torque converter stator overrunning clutch and to check for slippage in the friction elements - clutches and brakes.
Note:
- - Do not allow anyone to be in front or behind the vehicle during this check.
- - The duration of each check should not exceed five seconds.
- - The test should be carried out by two technicians: one should observe the wheels outside the car, and the other should carry out the test itself inside the car.
1. Measuring the speed of a fully braked vehicle:
- a) Check the level and temperature of the working fluid in the variator, as well as the temperature of the engine coolant. The working fluid in the variator must be warmed up to normal operating temperature (70-90°C). The level of the working fluid must be in the "HOT" range of the dipstick. The engine coolant must also be warmed up to normal operating temperature (80-100°C).
- b) Place chocks under the rear wheels of the vehicle.
- c) Apply the parking brake and press the brake pedal all the way down.
- d) Start the engine.
- d) Move the selector to position "D". Press the accelerator pedal all the way down. Quickly read the tachometer readings and compare them with the nominal values.
Attention:
- During this test, do not hold the accelerator pedal fully depressed longer than necessary to determine maximum engine speed or more than eight seconds. - If this test is to be performed more than once, after each test, move the CVT selector lever to the "N" position and run the engine at 1000 rpm to cool the CVT fluid between tests.
Nominal value of engine crankshaft speed with the vehicle fully braked (selector in position "D"):
- models with 4G15 engine — 2100 - 2600 rpm
- models with 4G93 engine — 2200 - 2700 rpm
e) Repeat the test with the selector in the "R" range.
Nominal value of engine crankshaft speed with the vehicle fully braked (selector in position "R"):
- models with 4G15 engine - 1800-2300 rpm
- models with 4G93 engine - 1800-2300 rpm
2. Analysis of the test results on a fully braked vehicle.
a) If the engine crankshaft speed is higher than the nominal value when the selector is in position "D" or "R", the cause may be:
- solenoid valve block malfunction;
- wiring or connector fault;
- malfunction of the electronic control unit of the engine and variator.
b) If the engine crankshaft speed is greater than the nominal value when the selector is in position "D", the cause may be:
- forward clutch slippage.
c) If the engine crankshaft speed is less than the nominal value when the selector is in the "R" position, the cause may be:
- reverse brake slippage.
d) If the engine crankshaft speed is less than the nominal value when the selector is in position "D" or "R", the cause may be:
- - torque converter malfunction;
- - malfunction of the electronic engine control unit.
Checking the pressure in the hydraulic system of the variator control (hydraulic test)
Note: checking the pressure in the CVT control hydraulic system is the main one for determining the causes of CVT malfunction. Before doing it, perform basic checks and adjustments (check the level of the working fluid in the CVT and its condition, etc.). Checking the pressure in the hydraulic system should be carried out at normal temperature of the CVT working fluid (70 - 80°C).
1. Checking the pressure in the lines:
- a) Warm up the variator fluid to operating temperature (70 - 80°C).
- b) Place chocks under the rear wheels of the vehicle.
- c) Apply the parking brake and press the brake pedal all the way down.
- d) Start the engine.
- d) Connect the adapter to the appropriate hole, connect the tubes and pressure gauge.
Note: When checking pressure, use a pressure gauge with a measurement range of 3000 kPa.
- e) Make sure that the obtained data corresponds to the nominal values (see the table "Checking the nominal pressures in the CVT control hydraulic system").
Table. Checking nominal pressures in the CVT control hydraulic system.
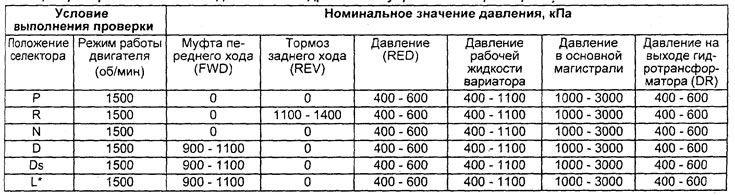
Note: - models without manual gear shift mode.
Note: The values of the CVT working fluid pressure and the pressure in the main line are provided for reference.
2. Analysis of the results of checking the pressure in the hydraulic system of the variator control.
a) High pressure in all lines can be caused by:
- pressure measurement error.
b) Low pressure in all lines can be caused by:
- - malfunction of the working fluid pump;
- - malfunction of the working fluid filter;
- - malfunction of the working fluid cooler;
- - malfunction of the electromagnetic valve;
- - incorrect installation of the electromagnetic valve block.
c) Forward drive clutch (FWD) line pressure that does not correspond to technical data may be caused by:
- - malfunction of the manual gear shift solenoid valve;
- - malfunction of the pressure control valve (torque converter lock-up clutch);
- - malfunction of the electromagnetic pressure control valve (RED) of the torque converter lock-up clutch;
- - malfunction of the electromagnetic pressure control valve (torque converter lock-up clutch);
- - clogging of the main line;
- - incorrect installation of the electromagnetic valve block.
d) Reverse brake line pressure (REV) that does not correspond to specifications may be caused by:
- - malfunction of the manual gear shift solenoid valve;
- - malfunction of the pressure control valve (torque converter lock-up clutch);
- - malfunction of the electromagnetic pressure control valve (RED) of the torque converter lock-up clutch;
- - malfunction of the electromagnetic pressure control valve (torque converter lock-up clutch);
- - clogging of the main line;
- - incorrect installation of the electromagnetic valve block.
d) Pressure out of specification (RED) may be caused by:
- - malfunction of the electromagnetic pressure control valve (RED);
- - clogging of the main line;
- - incorrect installation of the electromagnetic valve block.
e) Pressure in the main line that does not correspond to technical data may be caused by:
- - clogging of the main line;
- - malfunction of the electromagnetic pressure control valve (RED);
- - incorrect installation of the electromagnetic valve block.
g) The torque converter outlet pressure (DR) that does not correspond to the technical data may be caused by:
- - malfunction of the torque converter lock-up clutch control valve;
- - malfunction of the electromagnetic valve controlling the torque converter lock-up clutch;
- - malfunction of the pressure control valve in the torque converter;
- - clogging of the main line;
- - incorrect installation of the electromagnetic valve block;
- - malfunction of the torque converter.
c) Increased pressure in a faulty element may be caused by:
- - malfunction of the electromagnetic valve controlling the torque converter lock-up clutch;
- - malfunction of the manual gear shift solenoid valve;
- - incorrect installation of the electromagnetic valve block.