
English Русский
Български
Беларускі
Український
Српски
Hrvatski
Română
Polski
Slovenský
Magyar
Articles Bookmark Contacts Sitemap   
Company Audi Company Ford Company Hyundai Company Kia Company Mazda Company Mercedes-Benz Company Nissan
MitsubishiMan.ru


Home Colt Lancer Galant L200 Outlander Pajero Others
Pajero 4 (2006-2021) Pajero 1 and 2 (1982-1999)

Headlight beam adjustment (Mitsubishi Pajero 1)

  • Home
  • Pajero
  • 1 (1982-1999)
  • Electrical equipment
  • Headlights and lighting
  • Headlight beam adjustment
0
Contents: Vertical beam adjustment (1992-98) ⤓ Horizontal beam adjustment (1992-98) ⤓ Dimensions for determining the…⤓ Marked screen ⤓ Headlight adjustment screws ⤓ Position of the light ellipse with…⤓ Cars 1992-98. ⤓ Other cars ⤓

Vertical beam adjustment (1992-98)
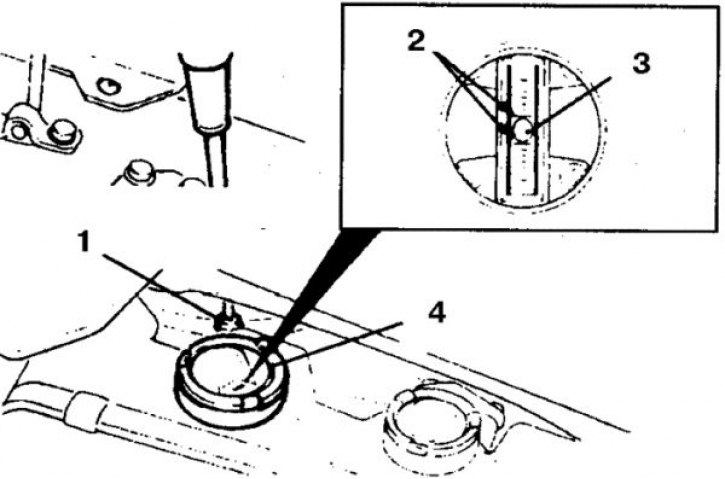


1. Screw; 2. Tags; 3. Bubble; 4. Vertical indicator scale


Horizontal beam adjustment (1992-98)
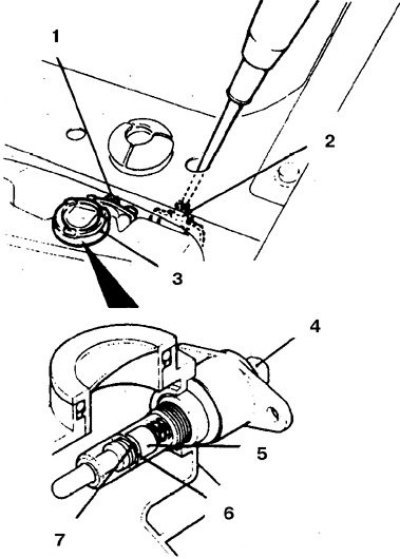


1, 4. Screw; 2. Adjustment; 3. Horizontal indicator scale; 5. Scale; 6. Black Mark; 7. Red mark


Dimensions for determining the center of the headlight
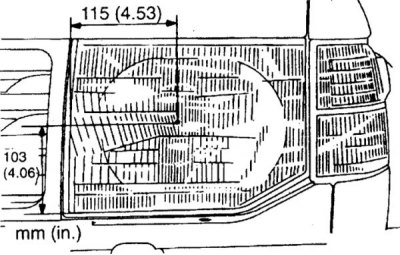


Marked screen


Headlight adjustment screws
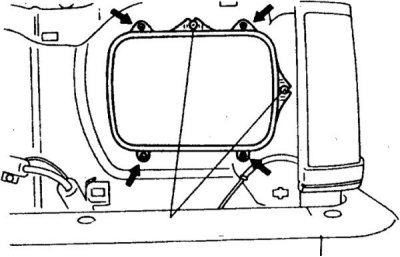


The arrows indicate the mounting screws.

Position of the light ellipse with the headlight adjusted
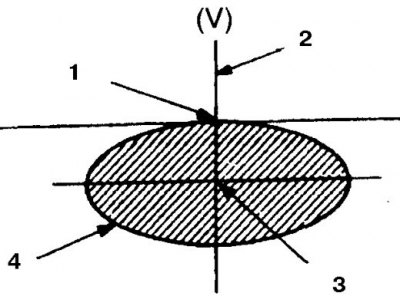


1. Headlight center horizontal; 2. Vertical center of the headlight; 3. Center of the ellipse; 4. High light zone


Cars 1992-98.


On these vehicles, the beam must be adjusted only after removing the headlight; this procedure is not mandatory and is not performed as part of routine maintenance.


1. Place the car on a level surface and pump the suspension.

2. Tire pressure must be correct and the tank must be full (simulation with a load at the rate of 0.8 kg/l of fuel is allowed), and the driver's seat is loaded with a mass of 70 kg.

3. Clean the headlights.

4. Adjust the vertical beam angle by turning the adjusting screw until the bubble of the vertical angle meter is positioned between the two adjustment marks. The vertical angle changes to 12 when turning by 1 division.

5. Adjust the beam horizontally by turning the adjusting screw until the red and black marks on the indicator are aligned. The horizontal angle when turning by 1 division changes to 23`.

6. If it is impossible to adjust the beam in this way, contact a car service center.

Other cars


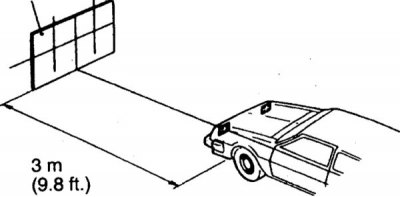
The beam is adjusted using a marked screen.

1. Place the car on a level surface 3 m from the screen, pump the suspension.

2. Tire pressure must be correct and the tank must be full (simulation with a load at the rate of 0.8 kg/l of fuel is allowed), and the driver's seat is loaded with a mass of 70 kg.

3. Clean the headlights.

4. Determine the center of the headlight using the markings and draw (stick) crosshairs, the centers of which are located opposite the centers of the headlights.

5. Turn the adjusting screws to set the low beam light ellipse as required. There is no need to adjust the high beam.

The original material is posted on the website: mitsubishiman
This article is available at: russian, bulgarian, belarusian, ukrainian, serbian, croatian, romanian, polish, slovak, hungarian
This article was reviewed by: Arseny Pavlov
Share with friends:
◀ Previous
Pajero 1 and 2: Headlights and lighting
Next ▶

Replacing a headlight bulb
Headlights — removal and installation
Direction indicators and repeaters
Additional brake light lamp (1992-98)
Interior lighting fixtures
License plate light
Similar materials for other Mitsubishi models

➤ Headlight adjustment Mitsubishi Colt 4 and 5 (1991-2003)
➤ Headlight adjustment Mitsubishi Lancer 3 and 5 (1984-1992)
➤ Front seat adjustment Mitsubishi Galant 6 and 7 (1987-1998)
➤ Headlight beam angle adjuster Mitsubishi L200 4 (2005-2014, diesel)
➤ Headlight corrector switch Mitsubishi Outlander 1 (2003-2008)
➤ Headlight adjustment Mitsubishi Carisma (1995-2004)
Link in different formats to this article
Comments and feedback from visitors
No comments yet


Add up two numbers 48 + 40


Pajero 4 (2006-2021) 
  • General information
  • User manual
  • Troubleshooting
  • Maintenance
  • Technical specifications
  • Power unit
  • Engine repair
  • Cooling system
  • Lubrication system
  • Fuel system
  • Engine management system
  • Intake and exhaust system
  • Engine electrical equipment
  • Transmission
  • Clutch
  • Manual gearbox
  • Automatic gearbox
  • Drive shafts
  • Chassis and running gear
  • Front suspension
  • Rear suspension
  • Brake system
  • Steering
  • Body and interior
  • Exterior (external elements)
  • Interior (internal elements)
  • Doors, locks and windows
  • Body dimensions
  • Electrical equipment
  • Safety system (SRS)
  • Air conditioner
  • Equipment and devices
  • Electrical diagrams
Pajero 1 and 2 (1982-1999) 
  • General information
  • User manual
  • Seats and seat belts
  • Instruments and controls
  • Driving and operation
  • Maintenance
  • Power unit
  • Gasoline engines
  • Diesel engines
  • Ignition system
  • Engine electrical equipment
  • Cooling and lubrication system
  • Power and exhaust system
  • Fuel system (gasoline)
  • Fuel system (diesel)
  • Transmission
  • Clutch
  • Mechanical gearbox
  • Automatic gearbox
  • Drive shafts and axles
  • Chassis and running gear
  • Front suspension
  • Rear suspension
  • Steering
  • Brake system
  • Body and interior
  • Exterior (external elements)
  • Interior (internal elements)
  • Doors, locks and windows
  • Electrical equipment
  • Equipment and devices
  • Heater and air conditioner
  • Cruise control
  • Headlights and lighting
  • Electrical circuits
MitsubishiMan.ru © 2018–2026 • Mobile version • Articles about Mitsubishi • Contacts • Sitemap: EN BG BY UA RS HR RO PL SK HU • Site search • Bookmark
Colt 2 and 3 (1983-1993) · Colt 4 and 5 (1991-2003) · Colt 5 (1995-2003) · Lancer 3 and 5 (1984-1992) · Lancer 9 (2000-2007) · Galant 5 (1983-1989) · Galant 6 and 7 (1987-1998) · L200 4 (2005-2014) · Outlander 1 (2003-2008) · Pajero 1 and 2 (1982-1999) · Pajero 4 (2006-2021) · Carisma (1995-2004) · Space Star (1998-2005) ·
This resource sets cookies 🍪 to avoid bothering you with repeated data entry.