
Preparation
Prepare a container for receiving drained working fluids;
Consider a method for labeling all detachable communication lines (wires, hoses, tubes, etc.);
Prepare clearly labeled containers for folding removable fasteners and small parts;
Consider a way to secure the transmission after it has been separated from the engine;
If necessary, discharge the refrigeration path of the air conditioning system in advance in a specialized workshop. If the system lines will not be disconnected, bolt and take aside the A/C compressor;
Think over the method of fixing the power unit while releasing the fasteners of its suspension supports (if the unit is equipped with eyelets for attaching rigging slings, it is best to use a winch);
Consider a way to fix the engine removed from the car (workbench, assembly stand, wooden blocks laid on the floor).
Remember that gasoline is a highly flammable liquid! Observe all applicable fire safety precautions when working on power system components. Do not smoke! Do not approach the place of work with an open flame or carrying an unprotected lampshade! Do not service the system in rooms equipped with natural gas-fired heaters equipped with a pilot flame (such as water heaters and clothes dryers). Do not forget that gasoline is classified as a carcinogen, i.e., substances that contribute to the development of cancer! Try to avoid getting fuel on open areas of the body, use rubber protective gloves, in case of accidental unexpected contact with fuel, thoroughly wash your hands with warm water and soap. Clean up spilled fuel immediately and do not store fuel-soaked rags near open flames. Remember that the fuel injection system of models equipped with fuel injection is constantly under pressure. Relieve any residual pressure in the system before attempting to disconnect the fuel lines. Wear safety goggles when servicing power system components. Keep a class B fire extinguisher handy at all times!
Removing
1. Relieve the pressure in the supply system (see chapter Power and exhaust systems).
2. Disconnect the negative cable from the battery.
If the stereo system installed in the car is equipped with a security code, before disconnecting the battery, make sure that you have the correct combination to activate the audio system!
3. If the vehicle is equipped accordingly, remove the crankcase protection elements.
4. Outline the loop slats with a marker, release the fasteners and remove the hood of the engine compartment.
5. Remove the air cleaner assembly with the air sleeves connected to it.
6. Empty the engine cooling system, disconnect the hoses and remove the radiator, expansion tank and, if equipped, the integrated turbocharger cooler assembly.
To avoid burns, proceed with the above work only after the system has completely cooled down! Do not allow antifreeze to come into contact with exposed areas of the body and painted surfaces of the car. Accidental splashes should be washed off immediately with plenty of water. Remember that antifreeze is a highly toxic liquid and getting it into the body, even in small quantities, is fraught with the most serious consequences (up to death). Never leave antifreeze stored in a loosely sealed container and clean up spilled coolant on the floor without delay. Remember that the sweet smell of antifreeze can attract the attention of children and animals. Consult any car service station about ways to dispose of used coolant. In many regions of the world, special points have been set up to receive various types of detention. Never drain old coolant down the drain and onto the ground!
7. Remove the transmission assembly and, if equipped, the transfer case.
8. Tag and disconnect the following communication lines:
- Throttle cable;
- Hoses of the interior heating system;
- Vacuum hoses of the brake booster servo;
- Fuel lines;
- Engine grounding bars;
- Electrical wiring for temperature and pressure sensors and engine oil;
- EGR system temperature sensor wiring;
- Wiring of the electric motor of the idle speed stabilization system;
- Electrical wiring of fuel injectors;
- Power transistor wiring;
- Wiring of the coil and ignition distributor;
- Generator wiring;
- Wiring of the sensor-switch of the hydraulic power steering fluid pressure;
- Electrical wiring of the A/C system;
- Wiring of the sensor-switch of the temperature of the refrigerant of the K / V system;
- Wiring of the condenser of the A/C system.
9. Remove the drive belt and remove the A/C compressor, take the assembly aside and secure it without disconnecting the refrigeration lines from it.
10. Remove the steering pump assembly, move it aside and secure without disconnecting the hydraulic lines.
11. Give nuts of fastening of a reception pipe of system of release of the fulfilled gases to a final collector. Separate a reception pipe and remove a sealing lining.
12. Attach winch slings to power unit lifting eyes (take care of the reliability of fixing the slings).
13. Hang the power unit on the winch, completely removing the load from its suspension mounts.
14. Remove the front and rear engine chocks.
15. Remove the left support of the power unit with its bracket.
16. Once again make sure that all communication lines are disconnected from the engine, then slowly remove the assembly from the engine compartment of the car.
Installation
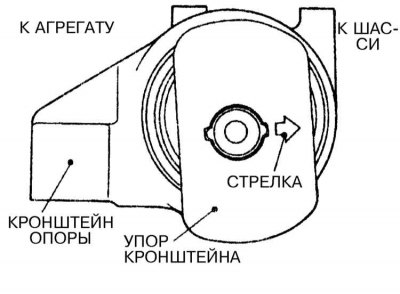
1. Lower the engine into the engine compartment of the car and screw in the fasteners of the brackets and suspension mounts of the power unit. Check for proper adjustment of the bracket stops.
2. Reinstall the transmission and, if equipped, the transfer case.
3. Further assembly is carried out in the reverse order to the dismantling of the components. Pay attention to the following points:
- Do not forget to replace the clamps and o-rings of the fitting connections of the fuel supply and return lines;
- Do not forget to replace the gasket of the connecting flange of the exhaust pipe of the exhaust system;
- Do not forget to fill the engine with the required amount of engine oil and coolant;
4. Finally, warm up the engine to normal operating temperature and check for signs of fluid leaks.
5. Check the correct setting of the ignition timing, if necessary, make the appropriate adjustment (see chapter Settings and ongoing maintenance).
6. Drive the vehicle, then check fluid levels again.