
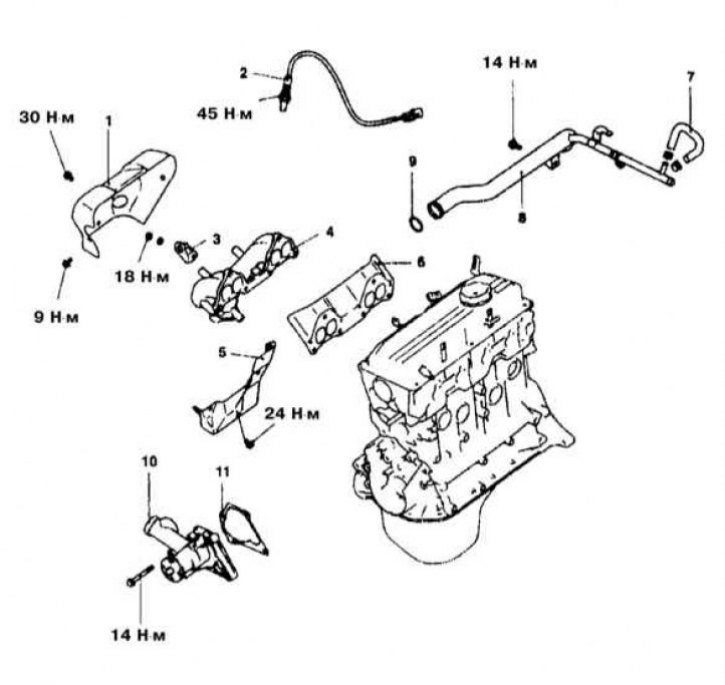
Exhaust manifold installation details on 1.5L models
1 - Cover A of the exhaust manifold; 2 - Oxygen sensor (federal models 1992 and 1993 issue); 3 - Lifting eye of the power unit; 4 - Exhaust manifold; 5 - Cover B of the exhaust manifold; 6 - Sealing gasket; 7 - Water path hose; 8 - Water inlet pipe; 9 - O-ring; 10 - Water pump; 11 - Sealing gasket

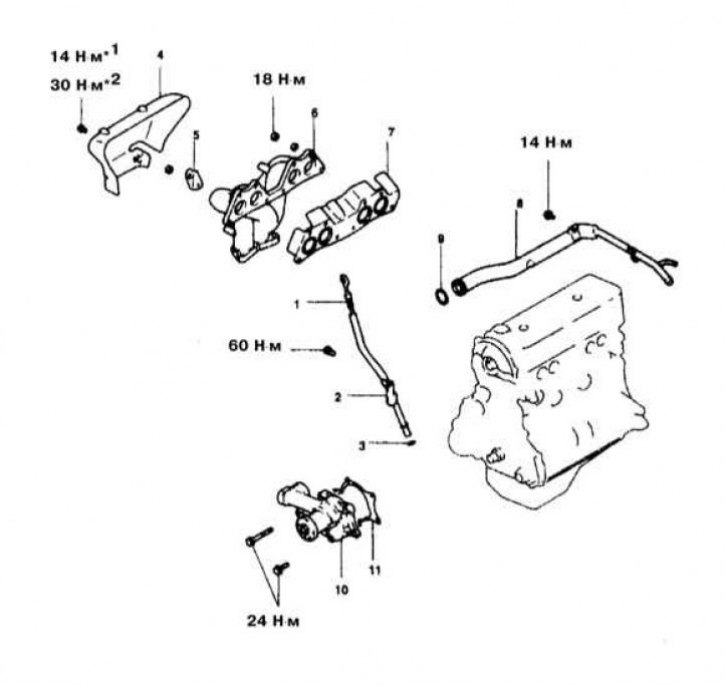
Exhaust manifold installation details on 1.8L models
1 - Oxygen sensor (federal models 1992 and 1993 issue); 2 - Cover A * exhaust manifold; 3 - Bracket B exhaust manifold (front-wheel drive models 1992 vol. (from November inclusive) *; 4 - Bracket A exhaust manifold (front-wheel drive models 1992 vol. (from November inclusive) *; 5 - Bracket exhaust manifold (front-wheel drive models 1992 vol. (to October inclusive); 6 - Exhaust manifold*; 7 - Cover B exhaust manifold (federal models 1992 and 1993 issue); 8 - Sealing gasket
*Shape may vary depending on model year
Exhaust Manifold Installation Details on 2.0L SOHC Models
1 - Dipstick for measuring the oil level; 2 - Guide tube of the measuring probe; 3 - O-ring; 4 - Thermal protection screen; 5 - Lifting eye of the power unit; 6 - Exhaust manifold; 7 - Sealing gasket; 8 - Water inlet pipe; 9 - O-ring; 10 - Water pump; 11 - Sealing gasket
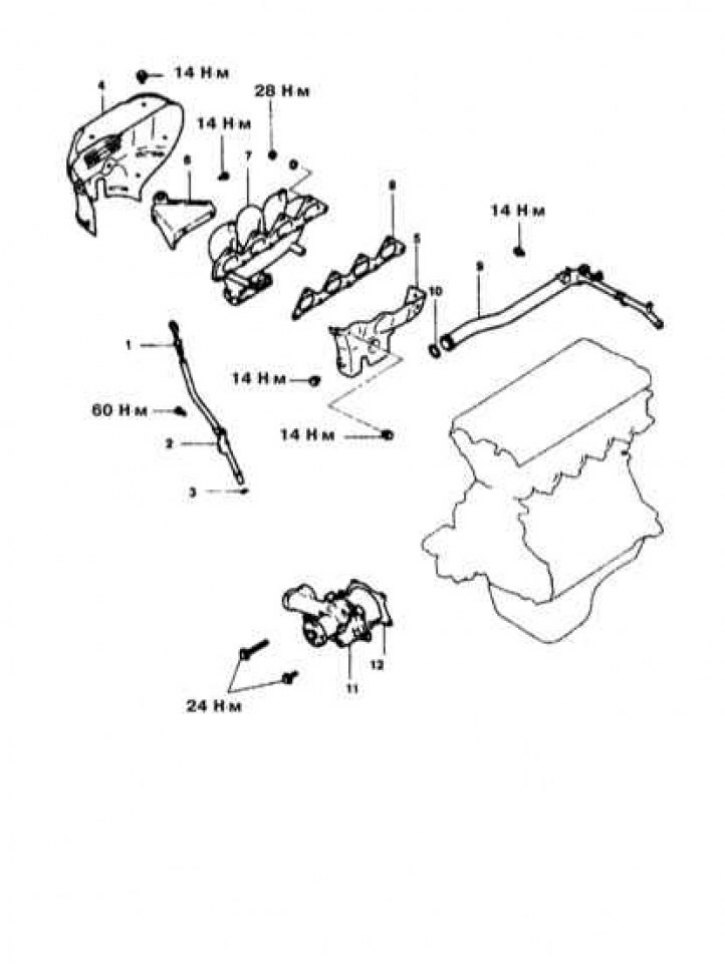
Exhaust Manifold Installation Details on 1.6L and 2.0L DOHC Non-Turbo Models
1 - Dipstick for measuring the oil level; 2 - Guide tube of the measuring probe; 3 - O-ring; 4 - Thermal screen A; 5 - Thermal screen B; 6 - Lifting eye of the power unit; 7 - Exhaust manifold; 8 - Sealing gasket; 9 - Water inlet pipe; 10 - O-ring; 11 - Water pump; 12 - Sealing gasket
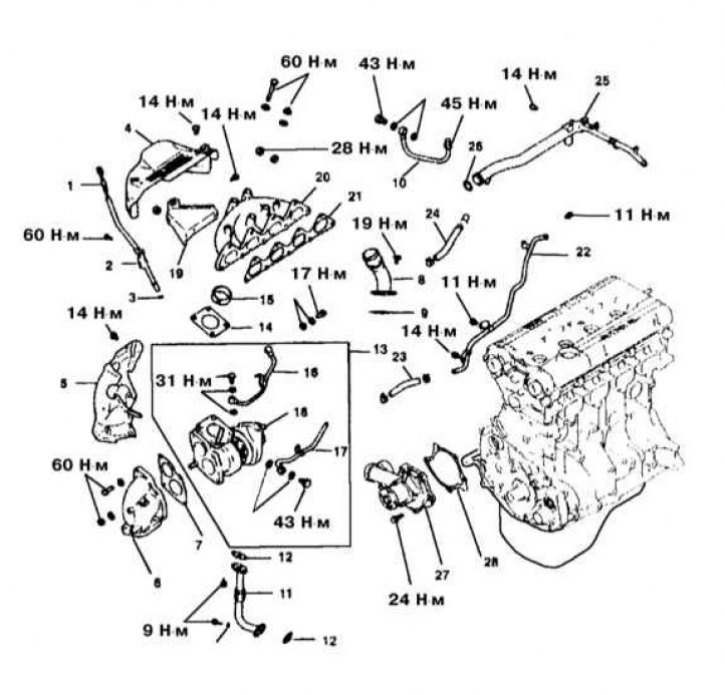
Exhaust Manifold Installation Details on 2.0L DOHC Turbo Models
1 - Dipstick for measuring the oil level; 2 - Guide tube of the measuring probe; 3 - O-ring; 4 - Thermal screen A; 5 - Thermal screen B; 6 - Outlet pipe; 7 - Sealing gasket; 8 - Air outlet; 9 - Sealing gasket; 10 - Water pipe B; 11 - Oil return tube; 12 - Sealing gasket; 13 - Assembling the turbocharger; 14 - Sealing gasket; 15 - Ring; 16 - Oil pipeline; 17 - Water pipe; 18 - Turbocharger; 19 - Lifting eye of the power unit; 20 - Exhaust manifold; 21 - Sealing gasket; 22 - Water pipe; 23 - Water hose; 24 - Water hose; 25 - Water inlet pipe; 26 - O-ring; 27 - Water pump; 28 - Sealing gasket
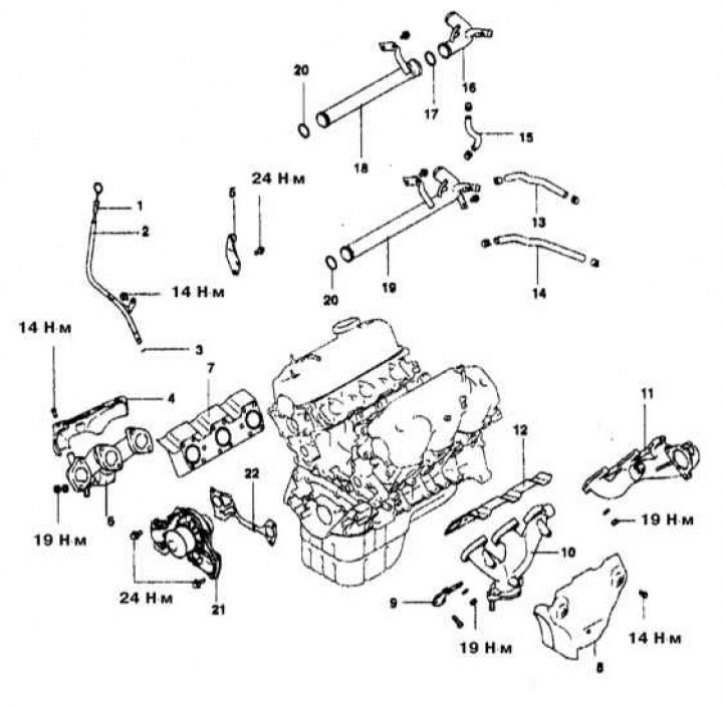
Exhaust Manifold Installation Details on 3.0L SOHC Models
1 - Dipstick for measuring the oil level; 2 - Guide tube of the measuring probe; 3 - O-ring; 4 - Thermal protection screen; 5 - Right lifting eye of the power unit; 6 - Right exhaust manifold; 7 - Sealing gasket; 8 - Left thermal shield (California models through 1993 vol. and federal models for 1994, no.); 9 - Bracket; 10 - Left exhaust manifold (California models through 1993 vol. and federal models for 1994, no.); 11 - Left exhaust manifold (California models since 1994 issue. and federal models since 1995 vol.); 12 - Sealing gasket; 13 - Water path hose; 14 - Water path hose; 15 - Bypass hose of the water path; 16 - Water inlet B (models with manual transmission); 17 - O-ring (models with manual transmission); 18 - Water inlet pipe A (models with AT); 19 - Water inlet (models with AT); 20 - O-ring; 21 - Water pump; 22 - Sealing gasket
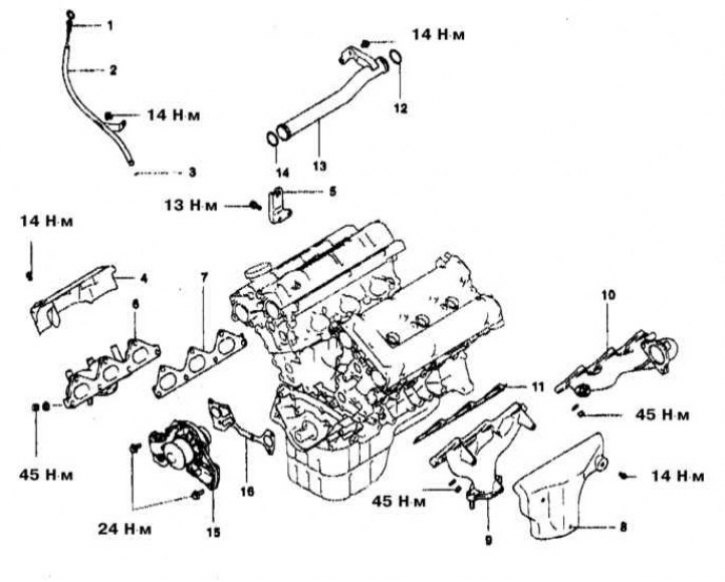
Exhaust Manifold Installation Details on 3.0L DOHC Models
1 - Dipstick for measuring the oil level; 2 - Guide tube of the measuring probe; 3 - O-ring; 4 - Right thermal screen; 5 - Right lifting eye of the power unit; 6 - Right exhaust manifold; 7 - Sealing gasket; 8 - Left thermal shield (Diamante - 1993 California Models and 1994 Federal Models, 3000GT - 1993 California Models issue); 9 - Left exhaust manifold; 10 - Left exhaust manifold (Diamante - 1994 California models and 1995 Federal models, 3000GT - 1993 California models. issue); 11 - Sealing gasket; 12 - O-ring; 13 - Water inlet pipe; 14 - O-ring; 15 - Water pump; 16 - Sealing gasket
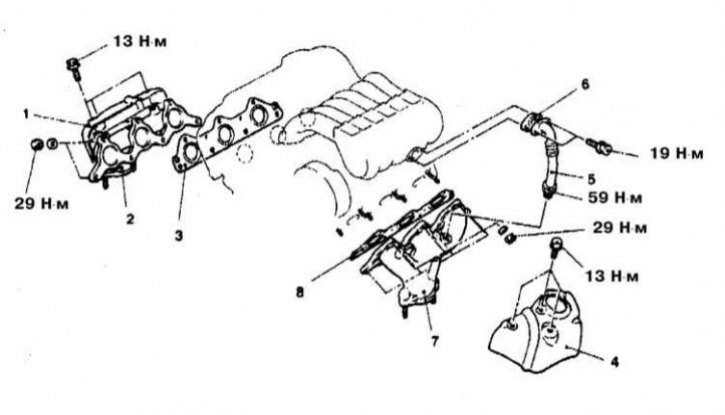
Exhaust Manifold Installation Details on 3.0L DOHC Models
Front row of cylinders:
1 - Thermal protection screen; 2 - Exhaust manifold; 3 - Sealing gasket
Rear row of cylinders:
4 - Thermal protection screen; 5 - EGR pipe; 6 - EGR tube gasket; 7 - Exhaust manifold; 8 - Sealing gasket
Models 1.5 l and 1.8 l
Removing
1. Details of the exhaust manifold installation on the 1.5L and 1.8L models are shown in the illustrations.
2. Disconnect the negative cable from the battery.
If the stereo system installed in the car is equipped with a security code, before disconnecting the battery, make sure that you have the correct combination to activate the audio system!
3. Jack up the car and put it on stands.
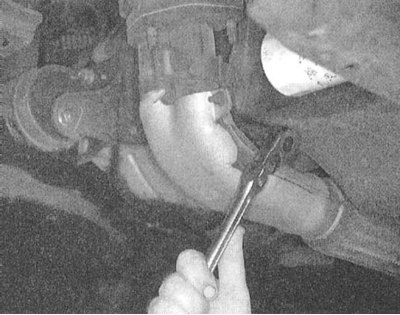
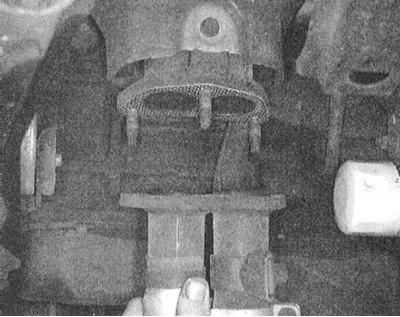
4. Give fixing nuts and separate a forward reception pipe of system of release of the fulfilled gases from a final collector. Remove the seal.
5. Lower the vehicle to the ground.
6. Remove the cooling fan assembly.
7. If the oxygen sensor is installed on the exhaust manifold, remove it.
8. Disconnect the relevant components of the exhaust gas recirculation system (EGR).
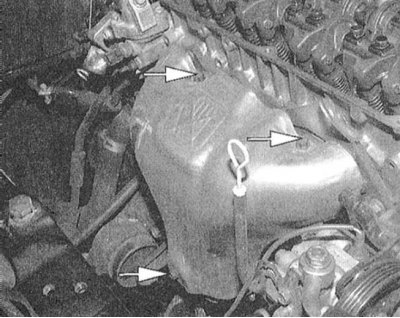
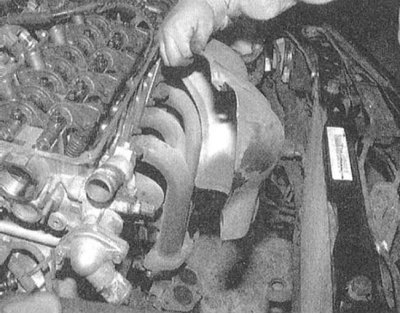
9. Remove the exhaust manifold outer heat shield and powertrain lifting eye. Disconnect the wiring from the oxygen sensor.
10. Turn out fixing bolts and remove an internal thermofilter and collector assembly.
Installation
1. Thoroughly clean the mating surfaces of the manifold and block, then wipe them with a rag soaked in acetone.
2. Place a new gasket on the manifold. Install the manifold in its regular place and tighten the fasteners with the required force (for 1.5 l engines: 18 Nm, for 1.8 l engines: inner nuts - 18 Nm, two outer (large) - 30 Nm).
Tighten evenly, diagonally.
3. Install heat shields.
4. Connect the EGR components.
5. If removed, replace the oxygen sensor.
6. Install the cooling fan assembly.
7. Connect to a final collector a reception pipe of system of release of the fulfilled gases.
8. Connect the negative cable to the battery and check the exhaust system for signs of leaks.
Engines 1.6 l and 2.0 l
Removing
1. Details of the exhaust manifold installation on the 1.6L and 2.0L models are shown in the illustrations.
2. Disconnect the negative cable from the battery.
If the stereo system installed in the car is equipped with a security code, before disconnecting the battery, make sure that you have the correct combination to activate the audio system!
3. Jack up the car and put it on stands.
4. Give fixing nuts and separate a forward reception pipe of system of release of the fulfilled gases from a final collector. Remove the seal.
5. Lower the vehicle to the ground.
6. On models equipped with an air conditioning system, remove the system fan assembly.
7. Using special tool MD998703, or equivalent, disconnect and remove the oxygen sensor.
8. Remove the exhaust manifold outer heat shield and powertrain lifting eye.
9. Turn out fixing bolts and remove from the engine an internal heat-shielding screen and assembly of a collector.
Installation
1. Thoroughly clean the mating surfaces of the manifold and block, then wipe them with a rag soaked in acetone.
2. Place a new gasket on the manifold. Install the manifold in its regular place and tighten the fasteners with the required force (for 2.0 l SOHC engines: 15÷20 Nm, for 1.6 l and 2.0 l DOHC engines: 25÷30 Nm).
Tighten evenly, diagonally.
3. Install the outer heat shield, screw in the mounting bolts and tighten them to the required torque (14 Nm).
4. If removed, reinstall the fan assembly.
5. Connect to a final collector a reception pipe of system of release of the fulfilled gases (don't forget to replace the gasket). Screw on the fixing nuts and tighten them to the required torque (40÷50 Nm).
6. Connect the negative wire to the battery and check the exhaust system for signs of leaks.
Engines 2.4 l
Removing
1. Disconnect the negative cable from the battery.
If the stereo system installed in the car is equipped with a security code, before disconnecting the battery, make sure that you have the correct combination to activate the audio system!
2. Jack up the car and put it on stands.
3. Give fixing nuts and a bolt of a basic suspension bracket, then separate a reception pipe of system of release of the fulfilled gases from a final collector. Remove the seal.
4. Remove the exhaust manifold outer heat shield and powertrain lifting eye.
5. Give fixing nuts and remove assembly of a final collector from the engine.

Installation
1. Thoroughly clean the mating surfaces of the manifold and block, then wipe them with a rag soaked in acetone.
2. Place a new gasket on the manifold. Install the collector in its regular place and tighten the fixing nuts with the required force (25÷29 Nm).
Tighten fasteners evenly, diagonally.
3. Install the heat shields, screw in the mounting bolts and tighten them to the required torque (14 Nm).
4. Connect to a final collector a reception pipe of system of release of the fulfilled gases (don't forget to replace the gasket). Screw on the fixing nuts and tighten them to the required torque (44 Nm).
5. Connect the negative cable to the battery and check the exhaust system for signs of leaks.
Engines 3.0 l
Removing
1. Details of the exhaust manifold installation on 3.0L models are shown in the illustrations.
2. Disconnect the negative cable from the battery.
If the stereo system installed in the car is equipped with a security code, before disconnecting the battery, make sure that you have the correct combination to activate the audio system!
3. Jack up the car and put it on stands.
4. Give fixing nuts and separate a forward reception pipe of system of release of the fulfilled gases from a final collector.
5. Lower the vehicle to the ground.
6. To remove the front manifold, first dismantle the air conditioning fan assembly.
7. To remove the front manifold on DOHC engines, first dismantle the generator assembly with the support bracket.
8. On DOHC engines, remove the A/C compressor from its support bracket and, without disconnecting the refrigeration lines, move it aside.
9. To remove the front manifold, remove the muzzle oil dipstick and remove its guide tube.
10. To remove the front manifold on DOHC engines, remove the heat shield.
11. To remove the rear manifold, disconnect the EGR pipe.
12. To remove the rear manifold on SOHC engines, first dismantle the intake air duct pressure chamber strut and turn the jet stop bracket aside.
13. Disconnect the wiring and remove the oxygen sensor.
14. Turn out fixing bolts and remove assembly of a final collector.
Installation
1. Thoroughly clean the mating surfaces of the manifold and block, then wipe them with a rag soaked in acetone.
2. Place a new gasket on the manifold. Install the collector in its regular place and tighten the fixing nuts with the required force (for SOHC engines: 30 Nm, for DOHC engines: 19 Nm).
Tighten fasteners evenly, diagonally.
3. Install heat shields.
4. If equipped, connect the EGR pipe, install the pressure chamber strut and the jet stop bracket.
5. Replace the oxygen sensor.
6. Install fan assembly, A/C compressor, dipstick guide tube and generator assembly.
7. Connect to a final collector a reception pipe of system of release of the fulfilled gases (don't forget to replace the gasket).
8. Replace the drive belt (And) and adjust the force (their) tension.
9. Connect the negative wire to the battery and check the exhaust system for signs of leaks.
Engines 3.5 l
Removing
1. Exhaust manifold installation details on 3.5L models are shown in the illustration.
2. Disconnect the negative cable from the battery.
If the stereo system installed in the car is equipped with a security code, before disconnecting the battery, make sure that you have the correct combination to activate the audio system!
3. Jack up the car and put it on stands.
4. Give fixing nuts and separate a forward reception pipe of system of release of the fulfilled gases from a final collector.
5. To remove the rear manifold, disconnect the EGR pipe.
6. Turn out fixing bolts and remove assembly of a final collector.
Installation
1. Thoroughly clean the mating surfaces of the manifold and block, then wipe them with a rag soaked in acetone.
2. Place a new gasket on the manifold. Install the collector in its regular place and tighten the fixing nuts with the required force (30 Nm).
Tighten fasteners evenly, diagonally.
3. Install the heat shield (s).
4. When installing the rear manifold, connect the EGR pipe.
5. When installing the front manifold, reinstall the cooling fan/radiator assembly.
6. When installing the front manifold, reinstall the alternator.
7. Install drive belt (And) and adjust the force (their) tension.
8. Jack up the car and put it on stands.
9. Connect exhaust pipe/catalytic converter assembly to exhaust manifold (don't forget to replace the gasket).
10. Lower the vehicle to the ground.
11. Connect the negative wire to the battery and check the exhaust system for signs of leaks.