
Engines 1.5 l
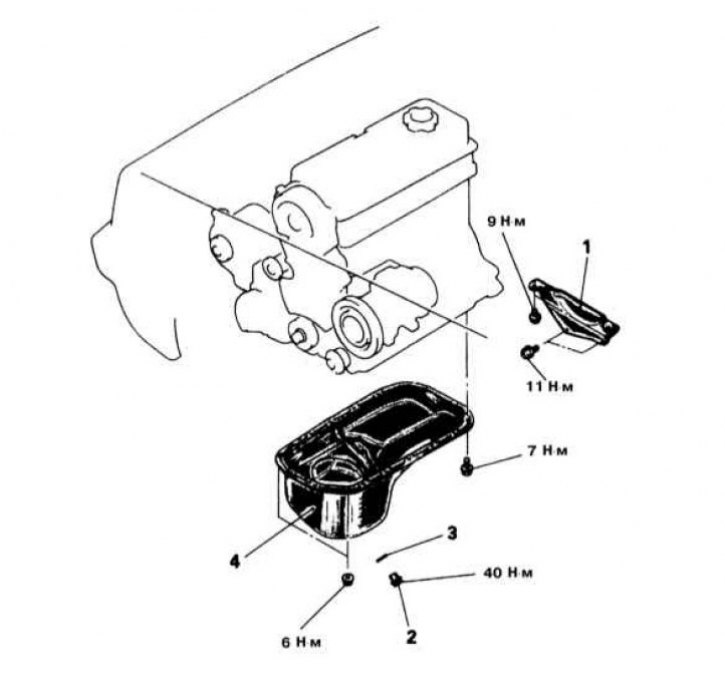
Sump Installation Details on Mirage 1.5L Models (4G15 engine)
1 - Transmission dome cover; 2 - Drain plug; 3 - Sealing washer; 4 - Oil pan
Removing
1. The details of installing the oil pan on 1.5L engines are shown in the illustration.
2. Disconnect the negative cable from the battery.
If the stereo system installed in the car is equipped with a security code, before disconnecting the battery, make sure that you have the correct combination to activate the audio system!
3. Jack up the car and put it on stands. After removing the plug, drain the engine oil.
4. Remove the transmission dome lower cover.
5. Unscrew the fixing bolts, to destroy the sealant layer, tap the pan along the perimeter with a soft-faced hammer, then separate it from the engine block.
In no case do not try to pry the pallet with a lever under the mating surface! If necessary, use special tool type MD998727 to break the sealant layer.
Installation
1. Thoroughly clean the mating surfaces of the sump and cylinder block, completely removing traces of old sealant from them. Finally, wipe the surfaces with a cloth soaked in acetone.
2. Apply sealant to the mating surface of the pallet, - the sealant should be applied with a continuous pad and on the inside of the bolt holes
3. Within 15 minutes of applying the sealant, press the pan against the block. Screw in the mounting bolts and tighten them with the required force (7 Nm).
4. Install the transmission dome cover.
5. If necessary, replacing the sealing washer, screw in the drain plug of the pan and tighten it with the required force (40 Nm).
6. Lower the vehicle to the ground and fill the engine with the required amount of fresh engine oil of the appropriate grade (see chapter Settings and ongoing maintenance).
7. Connect the negative cable to the battery. Start the engine and check for signs of leaks.
Engines 1.8 l
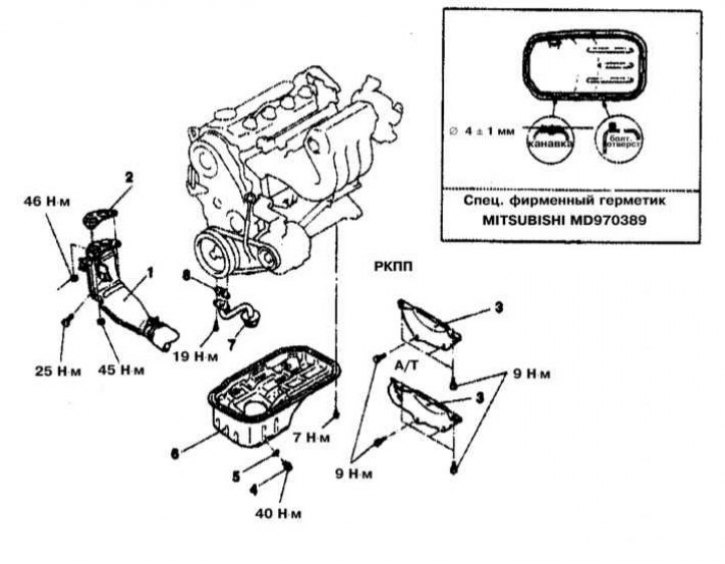
Details of installation of the oil pan on models 1.8 l
1 - Downpipe of the exhaust system; 2 - Sealing gasket; 3 - Transmission dome cover; 4 - Drain plug; 5 - Sealing washer; 6 - Oil pan; 7 - Oil intake; 8 - Sealing gasket
Removing
1. The details of installing the oil pan on 1.8L engines are shown in the illustration.
2. Disconnect the negative cable from the battery.
If the stereo system installed in the car is equipped with a security code, before disconnecting the battery, make sure that you have the correct combination to activate the audio system!
3. Jack up the car and put it on stands.
4. After removing the plug, drain the engine oil.
5. Disconnect a reception pipe of system of release of the fulfilled gases from a final collector of the engine.
6. Remove the transmission dome lower cover.
7. Unscrew the fixing bolts, to destroy the sealant layer, tap the pan around the perimeter with a soft-faced hammer, then separate it from the engine block.
In no case do not try to pry the pallet with a lever under the mating surface! If necessary, use special tool type MD998727 to break the sealant layer.
Installation
1. Thoroughly clean the mating surfaces of the sump and cylinder block, completely removing traces of old sealant from them. Finally, wipe the surfaces with a cloth soaked in acetone.
2. Apply sealant to the mating surface of the pan. Sealant should be applied in a continuous pad and on the inside of the bolt holes.
3. Within 15 minutes of applying the sealant, press the pan against the block. Screw in the mounting bolts and tighten them with the required force (7 Nm).
4. Install the transmission dome cover.
5. Having replaced the gasket, connect the exhaust pipe of the exhaust system to the exhaust manifold, - tighten the fixing nuts of the connecting flange with the required force (45 Nm). Do not forget to screw in the fixing bolt - the required tightening force is 25 Nm.
6. If necessary, replacing the sealing washer, screw in the drain plug of the pan and tighten it with the required force (40 Nm).
7. Lower the vehicle to the ground and fill the engine with the required amount of fresh engine oil of the appropriate grade (see chapter Settings and ongoing maintenance).
8. Connect the negative cable to the battery. Start the engine and check for signs of leaks.
Engines 1.6 l and 2.0 l
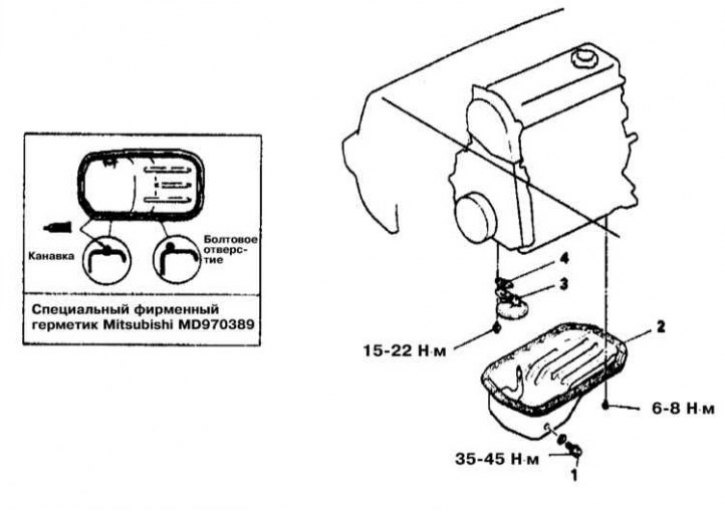
Sump Installation Details on 2.0L SOHC Models
1 - Drain plug; 2 - Oil pan; 3 - Oil intake with strainer; 4 - Sealing gasket
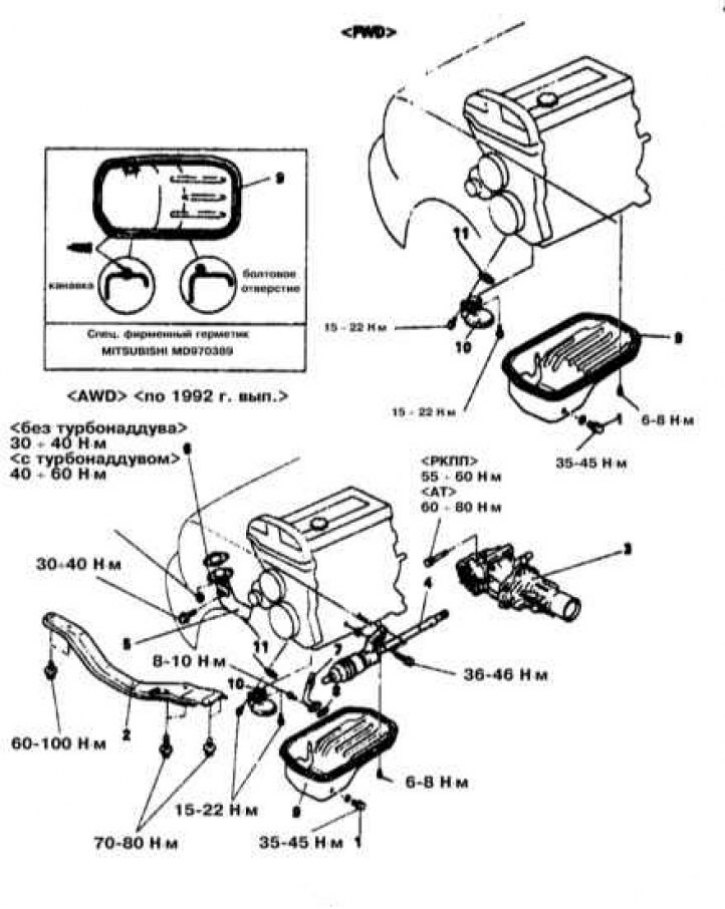
Sump Installation Details on 1.6L and 2.0L DOHC Front and All Wheel Drive Models
1 - Drain plug; 2 - Left beam; 3 - Transfer box; 4 - Drive shaft; 5 - Downpipe of the exhaust system; 6 - Sealing gasket; 7 - Turbocharger oil return pipe; 8 - Sealing gasket; 9 - Oil pan; 10 - Oil intake with strainer; 11 - Sealing gasket
Front wheel drive models (FWD)
Removing
1. Details of installation of the oil pan on FWD models equipped with 1.6L and 2.0L engines are shown in the illustrations.
2. Disconnect the negative cable from the battery.
If the stereo system installed in the car is equipped with a security code, before disconnecting the battery, make sure that you have the correct combination to activate the audio system!
3. Jack up the car and put it on stands.
4. After removing the plug, drain the engine oil.
5. Disconnect a reception pipe of system of release of the fulfilled gases from a final collector of the engine.
6. Support the engine with a trolley jack, then remove the mounting bolts and remove the center beam.
7. Unscrew the fixing bolts, to destroy the sealant layer, tap the pan around the perimeter with a soft-faced hammer, then separate it from the engine block.
In no case do not try to pry the pallet with a lever under the mating surface! If necessary, use special tool type MD998727 to break the sealant layer.
Installation
1. After wiping the pan, check it for cracks and other mechanical damage. Assess the condition of the oil pickup. Replace defective components.
2. Thoroughly clean the mating surfaces of the sump and cylinder block, completely removing traces of old sealant from them. Finally, wipe the surfaces with a cloth soaked in acetone.
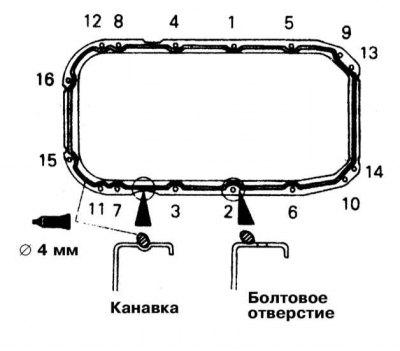
3. Apply sealant to the mating surface of the pan. Sealant should be applied in a continuous pad (with a section diameter of about 4 mm) and on the inside of the bolt holes.
4. Within 15 minutes of applying the sealant, press the pan against the block. Screw in the mounting bolts and tighten them with the required force (6÷8 Nm).
5. Install the beam. Screw in the fixing bolts and tighten them to 100 Nm.
6. Install the transmission dome cover.
7. Having replaced the gasket, connect the exhaust pipe of the exhaust system to the exhaust manifold, - tighten the fixing nuts of the connecting flange with the required force (40 Nm).
8. If necessary, after replacing the sealing washer, screw in the drain plug of the pan and tighten it with the required force (45 Nm).
9. Lower the vehicle to the ground and fill the engine with the required amount of fresh engine oil of the appropriate grade (see chapter Settings and ongoing maintenance).
10. Connect the negative cable to the battery. Start the engine and check for signs of leaks.
All-wheel drive models (AWD)
Removing
1. See illustration for 1.6L and 2.0L equipped AWD models for oil pan installation details.
2. Disconnect the negative cable from the battery.
If the stereo system installed in the car is equipped with a security code, before disconnecting the battery, make sure that you have the correct combination to activate the audio system!
3. Jack up the car and put it on stands.
4. After removing the plug, drain the engine oil.
5. Disconnect a reception pipe of system of release of the fulfilled gases from a final collector of the engine.
6. Remove the transfer case assembly and right [left] drive shaft.
7. Support the engine with a trolley jack, then remove the mounting bolts and remove the center beam.
8. Disconnect the turbocharger oil return pipe from the sump wall.
9. Remove the mounting bolts, to destroy the sealant layer, tap the pan around the perimeter with a soft-faced hammer, then separate it from the engine block.
In no case do not try to pry the pallet with a lever under the mating surface! If necessary, use special tool type MD998727 to break the sealant layer.
Installation
1. After wiping the pan, check it for cracks and other mechanical damage. Assess the condition of the oil pickup. Replace defective components.
2. Thoroughly clean the mating surfaces of the sump and cylinder block, completely removing traces of old sealant from them. Finally, wipe the surfaces with a cloth soaked in acetone.
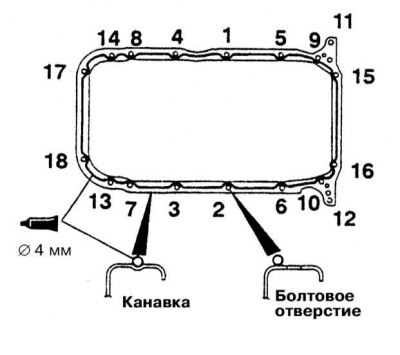
3. Apply sealant to the mating surface of the pan. Sealant should be applied in a continuous pad (with a section diameter of about 4 mm) and on the inside of the bolt holes.
4. Within 15 minutes of applying the sealant, press the pan against the block. Screw in the mounting bolts and tighten them with the required force (6÷8 Nm).
5. After replacing the gasket, connect the turbocharger oil return pipe to the oil pan. Tighten fasteners to the required torque (7÷10 Nm).
6. Install the left beam. Screw in the mounting bolts and tighten them with the required force (100 Nm - front and 80 Nm - rear).
7. Install the transfer case assembly and right [left] drive shaft.
8. Having replaced the gasket, connect the exhaust pipe of the exhaust system to the exhaust manifold, - tighten the fixing nuts of the connecting flange with the required force (40 Nm).
9. If necessary, replacing the sealing washer, screw in the drain plug of the pan and tighten it with the required force (45 Nm).
10. Lower the vehicle to the ground and fill the engine with the required amount of fresh engine oil of the appropriate grade (see chapter Settings and ongoing maintenance).
11. Connect the negative cable to the battery. Start the engine and check for signs of leaks.
Engines 2.4 l
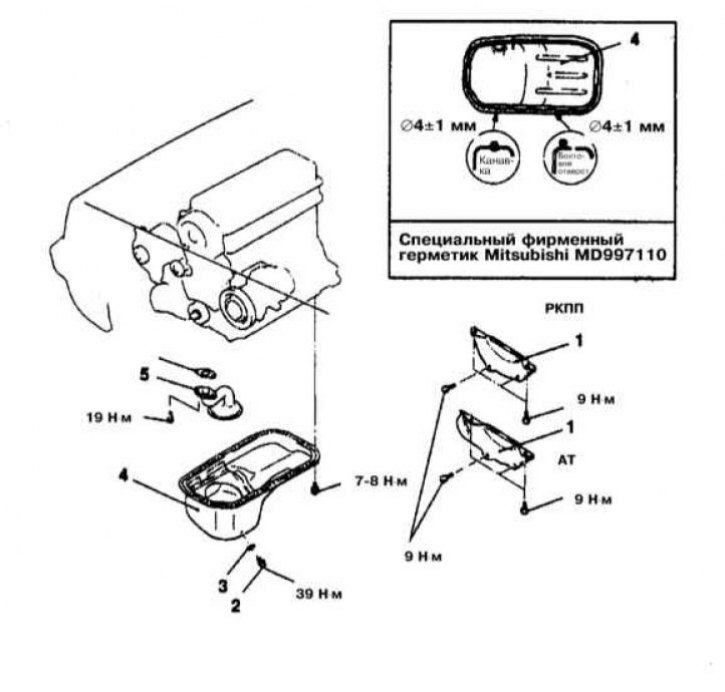
Details of installation of the oil pan on models 2.4 l
1 - Transmission dome cover; 2 - Drain plug; 3 - Sealing washer; 4 - Oil pan; 5 - Oil intake with strainer
Removing
1. The details of installing the oil pan on 2.4L engines are shown in the illustration.
2. Disconnect the negative cable from the battery.
If the stereo system installed in the car is equipped with a security code, before disconnecting the battery, make sure that you have the correct combination to activate the audio system!
3. Jack up the car and put it on stands. After removing the plug, drain the engine oil.
4. Remove the engine oil level dipstick and remove its guide tube.
5. Disconnect the electrical wiring from the oxygen sensor (O2).
6. Disconnect a reception pipe of system of release of the fulfilled gases from a final collector of the engine.
7. Remove the transmission dome lower cover.
8. Remove the fixing bolts, to destroy the sealant layer, tap the pan around the perimeter with a soft-faced hammer, then separate it from the engine block.
In no case do not try to pry the pallet with a lever under the mating surface! If necessary, use special tool type MD998727 to break the sealant layer.
Installation
1. Thoroughly clean the mating surfaces of the pan and cylinder block, completely removing traces of old sealant from them. Finally, wipe the surfaces with a cloth soaked in acetone.
2. Apply sealant to the mating surface of the pan. Sealant should be applied in a continuous pad and on the inside of the bolt holes.
3. Within 15 minutes of applying the sealant, press the pan against the block. Screw in the mounting bolts and tighten them with the required force (8 Nm).
4. If necessary, replacing the sealing washer, screw in the drain plug of the pan and tighten it with the required force (39 Nm).
5. Install the transmission dome cover. Screw in the mounting bolts and tighten them with the required force (9 Nm).
6. Having replaced the gasket, connect the exhaust pipe of the exhaust system to the exhaust manifold, - tighten the fixing nuts of the connecting flange with the required force (44 Nm).
The catalytic converter mounting bolts are tightened with a force of 49 Nm.
7. Connect the electrical wiring to the O2 sensor.
8. Lower the vehicle to the ground and fill the engine with the required amount of fresh engine oil of the appropriate grade (see chapter Settings and ongoing maintenance).
9. Connect the negative cable to the battery. Start the engine and check for signs of leaks.
Engines 3.0 l
Removing
1. Disconnect the negative cable from the battery.
If the stereo system installed in the car is equipped with a security code, before disconnecting the battery, make sure that you have the correct combination to activate the audio system!
2. Jack up the car and put it on stands. After removing the plug, drain the engine oil.
3. Remove the left beam. On models equipped with 4WS, the right beam must also be removed.
4. Remove the starter.
5. Disconnect the torque arm bracket from the rear transmission strut bracket. Remove the brackets for both transmission mounts.
6. Remove the transmission dome lower cover.
7. Unscrew the fixing bolts, to destroy the sealant layer, tap the pan around the perimeter with a soft-faced hammer, then separate it from the engine block.
In no case do not try to pry the pallet with a lever under the mating surface! If necessary, use special tool type MD998727 to break the sealant layer.
Installation
1. Thoroughly clean the mating surfaces of the sump and cylinder block, completely removing traces of old sealant from them. Finally, wipe the surfaces with a cloth soaked in acetone.
2. Apply sealant to the mating surface of the pan. Sealant should be applied in a continuous pad and on the inside of the bolt holes.
3. Within 15 minutes of applying the sealant, press the pan against the block. Screw in the mounting bolts and, acting strictly in a certain order, tighten them with the required force (6 Nm).
4. Reinstall the lower transmission dome cover and starter assembly.
5. Install the transmission support brackets and attach the torque arm mounting bracket.
6. Install the beam (And) subframe. Screw in the mounting bolts and tighten them with the required force (60÷70 Nm).
7. If necessary, replacing the sealing washer, screw in the drain plug of the pan and tighten it with the required force (39 Nm).
8. Lower the vehicle to the ground and fill the engine with the required amount of fresh engine oil of the appropriate grade (see chapter Settings and ongoing maintenance).
9. Connect the negative cable to the battery. Start the engine and check for signs of leaks.
Engines 3.5 l
Removing
1. Disconnect the negative cable from the battery.
If the stereo system installed in the car is equipped with a security code, before disconnecting the battery, make sure that you have the correct combination to activate the audio system!
2. Jack up the car and put it on stands. After removing the plug, drain the engine oil.
3. Turn out bolts of fastening of the bottom section of the pallet crankcase. After tapping with a hammer through a block of wood, remove the lower section of the pallet.
4. Remove the starter.
5. Remove the engine oil dipstick and remove its guide tube.

6. Unbolt the upper section of the pallet. To separate the upper section from the engine block, screw a bolt into the specially provided threaded hole in the casting of the element.
Never try to separate the pallet by prying it under the mating surface with a lever!
7. With the top section removed, remove the service bolt used for removal.
Installation
1. Thoroughly clean the mating surfaces of both sections of the pan and cylinder block, completely removing traces of old sealant from them. Finally, wipe the surfaces with a cloth soaked in acetone.
2. Apply sealant to the mating surface of the top section of the sump. Sealant should be applied in a continuous pad and on the inside of the bolt holes.
3. Within 15 minutes of applying the sealant, press the pan against the block. Screw in the mounting bolts and, acting strictly in a certain order, tighten them with the required force (6 Nm).
4. After replacing the sealing ring, install the guide tube of the dipstick for measuring impellent oil.
5. Install the starter assembly.
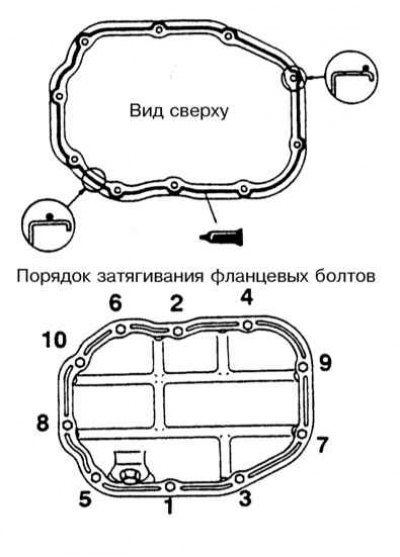
6. Apply sealant to the thoroughly cleaned mating surface of the lower pan section. Sealant should be applied in a continuous pad and on the inside of the bolt holes.
7. Within 15 minutes of applying the sealant, press the pan against the block. Screw in the mounting bolts and, acting strictly in a certain order, tighten them with the required force (10÷12 Nm).
8. If necessary, after replacing the sealing washer, screw in the drain plug of the pan and tighten it with the required force (39 Nm).
9. Lower the vehicle to the ground and fill the engine with the required amount of fresh engine oil of the appropriate grade (see chapter Settings and ongoing maintenance).
10. Connect the negative cable to the battery. Start the engine and check for signs of leaks.