

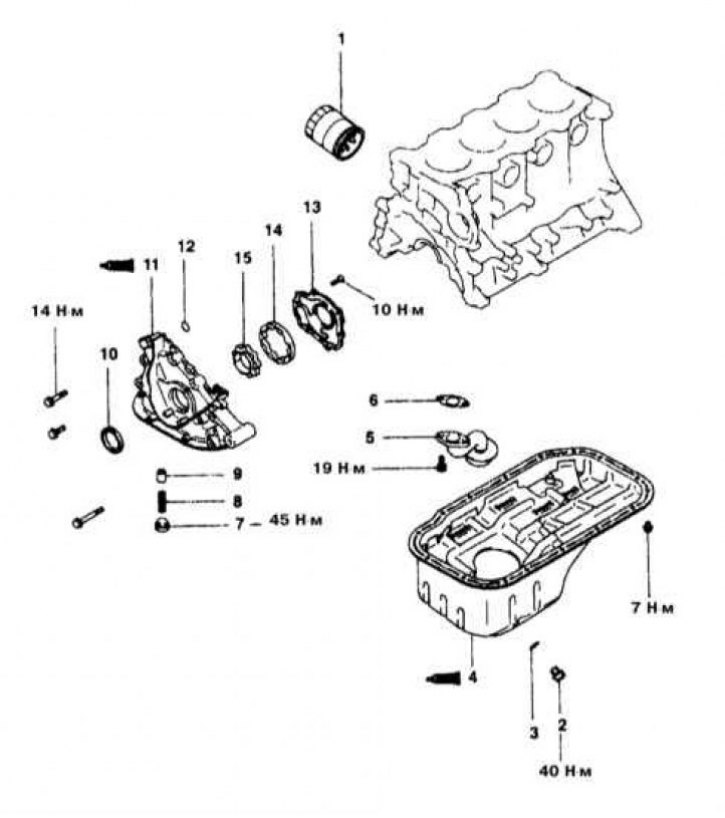
Details of installation of the oil pump on models 1.5 l
1 - Full flow oil filter; 2 - Drain plug; 3 - Sealing washer; 4 - Oil pan; 5 - Oil intake with strainer; 6 - Sealing gasket; 7 - Plug of the pressure reducing valve; 8 - Sealing washer; 9 - Pressure reducing valve spring; 10 - Plunger of the pressure reducing valve; 11 - Oil seal; 12 - Housing of the pump assembly; 13 - Sealing gasket; 14 - Cover of the pump body; 15 - Outer pump rotor; 16 - Inner pump rotor
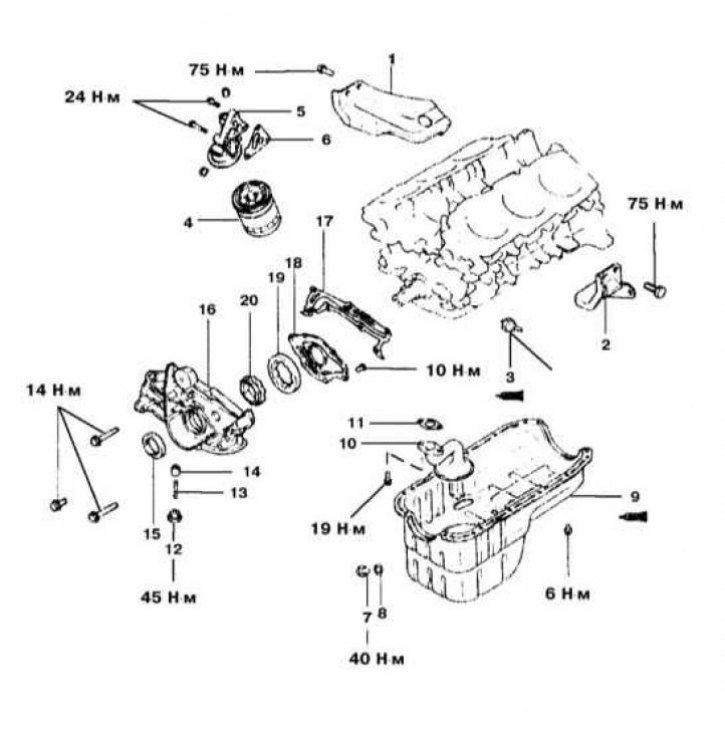
Details of installation of the oil pump on models 1.8 l
1 - Full flow oil filter; 2 - Drain plug; 3 - Sealing washer; 4 - Oil pan; 5 - Oil intake with strainer; 6 - Sealing gasket; 7 - Plug of the pressure reducing valve; 8 - Pressure reducing valve spring; 9 - Plunger of the pressure reducing valve; 10 - Oil seal; 11 - Housing of the pump assembly; 12 - O-ring; 13 - Cover of the pump body; 14 - Outer pump rotor; 15 - Inner pump rotor
Details of installation of the oil pump on models 3.0 l
1 - Right transmission rack; 2 - Left transmission rack; 3 - Oil pressure switch; 4 - Oil filter; 5 - Oil filter support bracket; 6 - Sealing gasket of the oil filter bracket; 7 - Drain plug; 8 - Sealing washer; 9 - Oil pan; 10 - Oil intake with strainer; 11 - Sealing gasket; 12 - Plug; 13 - Pressure reducing valve spring; 14 - Plunger of the pressure reducing valve; 15 - Crankshaft oil seal; 16 - Oil pump housing; 17 - Sealing gasket; 18 - Oil pump cover; 19 - Outer rotor of the oil pump; 20 - Internal rotor of the oil pump
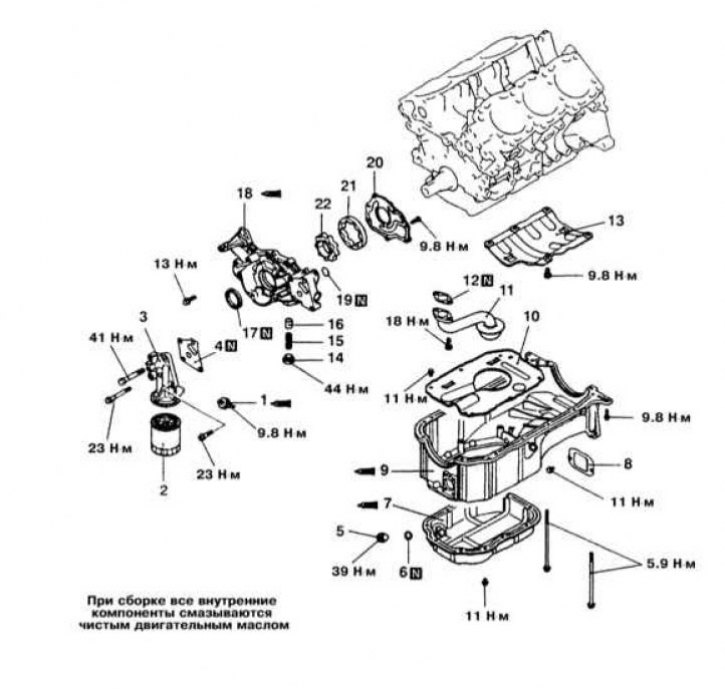
Details of installation of the oil pump on models 3.5 l
1 - Oil pressure gauge block; 2 - Oil filter; 3 - Oil filter support bracket; 4 - Sealing gasket; 5 - Drain plug; 6 - Sealing washer; 7 - Lower section of the oil pan; 8 - Cover; 9 - Upper section of the oil pan; 10 - Oil deflector plate; 11 - Oil intake; 12 - Sealing gasket; 13 - Oil deflector plate; 14 - Plug; 15 - Pressure reducing valve spring; 16 - Plunger of the pressure reducing valve; 17 - Crankshaft seal; 18 - Oil pump housing; 19 - O-ring; 20 - Oil pump cover; 21 - Outer rotor of the oil pump; 22 - Internal rotor of the oil pump; N - Replace
Engines 1.5 l and 1.8 l
Removing
1. Details of the oil pump installation on the 1.5L and 1.8L models are shown in the illustrations.
2. Disconnect the negative cable from the battery.
If the stereo system installed in the car is equipped with a security code, before disconnecting the battery, make sure that you have the correct combination to activate the audio system!
3. Jack up the car and put it on stands.
4. Drain the engine oil.
5. Support the engine with a trolley jack (in order to distribute the load, lay a block of wood between the head of the jack and the oil pan).
6. Remove the powertrain front mount bracket and accessory drive belts.
7. Remove the upper and lower sections of the timing cover.
8. Remove the timing belt (see Section Removing and installing timing cover and timing belt) and crankshaft gear.
9. Remove the oil pan (see Section Removal and installation of the pallet crankcase of the engine) and oil pickup with strainer (don't forget the pads).
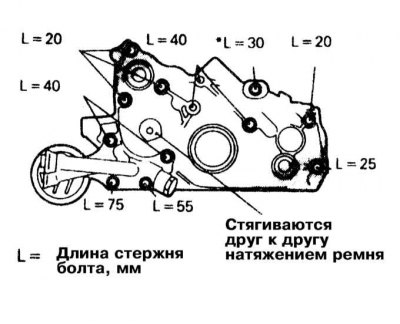
10. Turn out bolts of fastening of a forward cover (corps) pump, - note that the bolts have different lengths and must be installed strictly in their original places during assembly.
11. Remove the pump assembly.
12. Remove the back cover of the pump assembly.
13. Remove the inner and outer rotors from the pump housing.
Installation
1. Thoroughly clean the mating surfaces of the components of the pump assembly and the engine block, completely removing all traces of old sealant from them. Finally, wipe the surfaces with a cloth soaked in acetone.
2. Lubricate both pump rotors generously with clean engine oil and place them in the pump assembly housing, making sure that the components rotate in the correct direction.
3. Install the back cover of the pump. Screw in the mounting bolts and tighten them with the required force (10 Nm).
4. Lubricate the pressure reducing valve components with engine oil and install them in the required order in their original place. Screw in the plug and tighten it to the required torque (45 Nm).
5. Replace the front crankshaft oil seal by generously lubricating the sealing lips of the new element with clean engine oil.
6. After replacing the gasket, install the pump assembly on the engine block. Screw in the mounting bolts and tighten them with the required force (14 Nm).
7. Install the oil intake with a strainer, - tighten the fixing bolts with a force of 19 Nm.
8. Reinstall the oil pan (see Section Removal and installation of the pallet crankcase of the engine).
9. Install the crankshaft gear and timing belt (see Section Removing and installing timing cover and timing belt). Install timing covers. Install the drive belts and powertrain front mount bracket.
10. Fill the engine with fresh engine oil of the appropriate grade, adjusting the level correctly.
11. Connect the negative cable to the battery. Start the engine and check it for signs of leaks.
Engines 1.6 l, 2.0 l and 2.4 l
After dismantling the pump, its cavity must be filled with technical vaseline before installation - do not use any alternative lubricants!
Removing
1. Disconnect the negative cable from the battery.
If the stereo system installed in the car is equipped with a security code, before disconnecting the battery, make sure that you have the correct combination to activate the audio system!
2. Bring the engine to the TDC position of the end of the compression stroke of the piston of the first cylinder.
3. Jack up the car and put it on stands. Drain the engine oil.
4. Support the engine with a trolley jack (in order to distribute the load, lay a block of wood between the head of the jack and the oil pan).
5. Remove the powertrain front mount bracket and accessory drive belts.
6. Remove the upper and lower sections of the timing cover.
7. Remove the timing belt (see Section Removing and installing timing cover and timing belt) and crankshaft gear.
8. Disconnect the electrical wiring and remove the oil pressure gauge sensor.
9. Remove the full flow oil filter and its support bracket.
10. Remove the oil pan (see Section Removal and installation of the pallet crankcase of the engine) and an oil intake with a strainer - do not forget to remove the seals as well.

11. Using the special tool MD998162, remove the plug from the engine front cover.
12. Unscrew the plug from the wall of the engine block, - insert a Phillips screwdriver with a sting 8 mm in diameter into the freed hole to fix the balancing shaft.
13. Turn out a bolt of fastening of a conducted gear wheel of the pump to a balancing shaft.
14. Turn out bolts of fastening of a forward cover of pump assembly.
If necessary, the balancing shaft can be removed together with the pump cover.
15. Remove the pump cover located behind the engine front cover. Remove the drive and driven gears from the pump assembly.
Installation
1. Thoroughly rinse and dry the removed components. Lay the gears in the front casing of the pump and manually check for freedom of rotation. Make sure that there is no edge wear on the surfaces of the covers in contact with the gears.
2. Thoroughly clean the mating surfaces of the components of the pump assembly and the engine block, completely removing all traces of old sealant from them. Finally, wipe the surfaces with a cloth soaked in acetone.
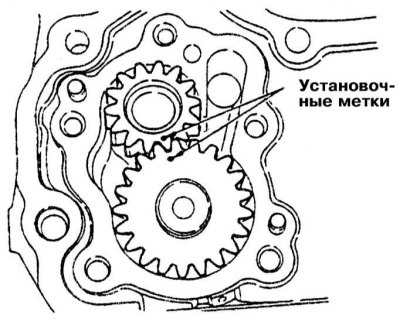
3. Achieve the correct alignment of the alignment marks, put the drive and driven gears in their regular places in the front section of the pump assembly housing.
4. Install the pump cover. Screw in the mounting bolts and tighten them with the required force (18 Nm).
5. Using a suitable mandrel, fit a new crankshaft oil seal into the front housing.
6. Install a new gasket on the front section of the pump housing. In order to protect the oil seal from damage, place guide tool MD998285 on the front crankshaft trunnion, - lightly lubricate the outer edge of the guide with engine oil.
7. Press the front section of the pump assembly against the gasket by temporarily tightening it with the mounting bolts.
8. After replacing the gasket, install the oil filter on the support bracket. Screw in the mounting bots (do not forget to put washers) and tighten them to the required torque (19 Nm).
9. Using an 8mm Phillips screwdriver through the hole in the block, secure the balance shaft.
10. Place the pump drive gear on the trunnion of the left balancing shaft and tighten the bolt of its fastening with a force of 37 Nm.
11. With the new O-ring seated in the groove on the front section of the housing, install the plug, tightening it to 24 Nm using the special socket MD998162.
12. After replacing the gasket, reinstall the oil pickup.
13. After carefully wiping the mating surfaces and applying a sealant pad, install the oil pan on the engine block (see Section Removal and installation of the pallet crankcase of the engine). Fix the pallet with holders by tightening the bolts of the latter with a force of 7 Nm.
14. Install the gauge block and oil pressure switch, restore the original wiring connection.
15. Reinstall the oil cooler, screw in the mounting bolts and tighten them with the required force (43 Nm).
16. Finally tighten the bolts securing the front section of the pump casing to the required torque.
17. Install a new oil filter.
18. Fill the engine with the required amount of engine oil of the required grade.
19. Connect the negative wire to the battery.
20. Check oil pressure and check for signs of oil leaks.
Engines 3.0 l
Removing
1. Details for installing the oil pump on 3.0L models are shown in the illustration.
2. Disconnect the negative cable from the battery.
If the stereo system installed in the car is equipped with a security code, before disconnecting the battery, make sure that you have the correct combination to activate the audio system!
3. Jack up the car and put it on stands.
4. Drain the engine oil.
5. Support the engine with a trolley jack (in order to distribute the load, lay a block of wood between the head of the jack and the oil pan).
6. Remove the powertrain front mount bracket and accessory drive belts.
7. Remove the upper and lower sections of the timing cover.
8. Remove the timing belt (see Section Removing and installing timing cover and timing belt) and crankshaft gear.
9. Remove the oil pan (see Section Removal and installation of the pallet crankcase of the engine) and oil pickup with strainer (don't forget the pads).
10. Turn out bolts of fastening of a forward cover (corps) pump, - note that the bolts have different lengths and must be installed strictly in their original places during assembly.
11. Remove the pump assembly.
12. If necessary, remove the rear cover of the pump assembly and remove the inner and outer rotors from the pump housing.
Installation
1. Thoroughly clean the mating surfaces of the components of the pump assembly and the engine block, completely removing all traces of old sealant from them. Finally, wipe the surfaces with a cloth soaked in acetone.
2. Lubricate both pump rotors generously with clean engine oil and place them in the pump assembly housing, making sure that the components rotate in the correct direction.
3. Install the back cover of the pump. Screw in the mounting bolts and tighten them with the required force (10 Nm).
4. Lubricate the pressure reducing valve components with engine oil and install them in the required order in their original place. Screw in the plug and tighten it to the required torque (45 Nm).
5. Replace the front crankshaft oil seal by liberally lubricating the sealing lips of the new element with clean engine oil.
6. After replacing the gasket, install the pump assembly on the engine block. Screw in the mounting bolts and tighten them with the required force (14 Nm).
7. Install the oil intake with a strainer, - tighten the fixing bolts with a force of 19 Nm.
8. Reinstall the oil pan (see Section Removal and installation of the pallet crankcase of the engine).
9. Install the crankshaft gear and timing belt (see Section Removing and installing timing cover and timing belt). Install timing covers.
10. Install drive belts and powertrain front suspension bracket.
11. Fill the engine with fresh engine oil of the appropriate grade, correcting its level in the correct way.
12. Connect the negative cable to the battery. Start the engine and check it for signs of leaks.
Engines 3.5 l
Removing
1. The details of installing the oil pump on 3.5L models are shown in the illustration.
2. Disconnect the negative cable from the battery.
If the stereo system installed in the car is equipped with a security code, before disconnecting the battery, make sure that you have the correct combination to activate the audio system!
3. Jack up the car and put it on stands.
4. Drain the engine oil.
5. Remove the wheel arch protection locker.
6. Remove the oil filter adapter.
7. Remove the upper and lower sections of the oil pan.
8. Remove the lower oil slinger plate, oil pickup and upper oil slinger plate.
9. Turn out fixing bolts and remove the case of the oil pump.
10. Remove the oil pump cover.
11. Mark the installation position of the rotors, then remove them from the pump assembly.
12. Remove the crankshaft oil seal from its seat in the oil pump housing casting.
Installation
1. Thoroughly clean the mating surfaces of the components of the pump assembly and the engine block, completely removing all traces of old sealant from them. Finally, wipe the surfaces with a cloth soaked in acetone.
2. Fit a new crankshaft oil seal into the receptacle in the oil pump housing.
3. Lubricate the rotors with clean engine oil, match the alignment marks, then seat the components in the pump assembly housing.
4. Install the pump cover, screw in the mounting bolts and tighten them to the required torque (10 Nm).
5. Apply a 3mm pad of sealant to the mating surface of the pump assembly. Press the pump against the engine block, screw in the mounting bolts and tighten them to the required torque (14 Nm).
6. Install the upper oil baffle plate and oil pickup (don't forget to replace the gasket). Tighten the plate mounting bolts with a force of 10 Nm, oil intake - 18 Nm.
7. Fit the lower oil deflector plate into the upper section of the oil pan. Screw in the mounting bolts and tighten them with the required force (11 Nm).
8. Install the oil pan sections on the engine block (see Section Removal and installation of the pallet crankcase of the engine).
9. After replacing the gasket, install the oil filter adapter, - the large fixing bolts are tightened with a force of 41 Nm, the smaller ones - 23 Nm.
10. Install the timing belt (see Section Removing and installing timing cover and timing belt) and timing cover.
11. Install drive belts and powertrain front suspension bracket.
12. Fill the engine with fresh engine oil of the appropriate grade, correcting its level correctly (see chapter Settings and ongoing maintenance).
13. Connect the negative cable to the battery.
14. Start the engine and check it for signs of leak development.