



Contents: 1.5L engines ⤓ Engines 1.8 l ⤓ Engines 2.0L SOHC ⤓ Engines 1.6 or 2.0 L DOHC ⤓ 2.4L engines ⤓ Engines 3.0L DOHC ⤓ Engines 3.0L SOHC ⤓ 3.5L engines ⤓
1.5L engines
Removal
1. Relieve pressure in the fuel system.
Remember that gasoline is highly flammable! When working with fuel system components, observe all accepted fire safety measures. Do not smoke! Do not approach the work area with an open flame or unprotected portable appliance! Do not service the system in rooms equipped with natural gas heating devices equipped with a pilot flame (such as water heaters and clothes dryers). Do not forget that gasoline is a carcinogen, i.e., a substance that promotes the development of cancer! Try to avoid fuel coming into contact with exposed areas of the body, use rubber protective gloves, and in case of accidental contact with fuel, wash your hands thoroughly with warm water and soap. Collect spilled fuel immediately and do not store rags soaked in fuel near open flames. Remember that the fuel system of models equipped with fuel injection is constantly under pressure. Before disconnecting fuel lines, relieve residual pressure in the system. Wear safety glasses when servicing fuel system components. Always keep a Class B fire extinguisher on hand!
2. Disconnect the negative cable from the battery.
If your car stereo system is equipped with a security code, make sure you have the correct combination to activate the audio system before disconnecting the battery!
3. Drain the cooling system.
To avoid burns, proceed with the above work only after the system has completely cooled down! Do not allow antifreeze to come into contact with exposed areas of the body or painted surfaces of the car. Wash off any accidental splashes immediately with plenty of water. Remember that antifreeze is a highly toxic liquid and its ingestion, even in small quantities, can have the most serious consequences (even fatal). Never leave antifreeze stored in a loosely closed container and immediately collect any coolant spilled on the floor. Remember that the sweet smell of antifreeze can attract the attention of children and animals. Consult any car service station for information on how to dispose of used coolant. In many regions of the world, special collection points for various types of waste have been set up. Never pour old coolant down the drain or onto the ground!
4. Remove the air cleaner assembly with the air intake hose.
5. Disconnect the ground bus and throttle cable.
6. Disconnect the breather pipe and the positive crankcase ventilation (PCV) hose.
7. After marking, disconnect the vacuum hoses from the intake manifold and throttle body.
8. Disconnect the vacuum line from the brake booster servo assembly.
9. Remove the upper radiator hose, the hoses leading to the throttle body and the hoses of the interior heating system.
10. Disconnect the fuel supply and return lines.
11. Remove the high voltage wiring.
12. Disconnect the electrical wiring from the crankshaft position (CKP) and camshaft position (CMP) sensors, oxygen sensor (O2), coolant temperature (ECT) sensor and engine temperature gauge sensor, idle speed control (ISC) actuator drive motor, throttle position sensor (TPS), intake air temperature (IAT) sensor and exhaust gas recirculation (EGR) temperature sensor.
13. Disconnect the wiring from the ignition distributor, fuel injectors and power transistor. Remove the ground bus.
14. Disconnect the engine management system wiring.
15. Remove the power steering hose retainer on the powertrain suspension support bracket.
16. Support the engine with a trolley jack (to distribute the load, place a wooden block between the jack head and the oil pan). Raise the jack, completely unloading the powertrain suspension support, then release the fasteners and remove the support bracket.
17. Remove the cylinder head cover.
18. Remove the upper timing belt cover.
19. Turn the crankshaft clockwise until the timing marks are aligned.
20. Use wire to secure the timing belt to the camshaft toothed wheel.
21. Block the camshaft from turning and remove its toothed wheel together with the toothed belt attached to it.
22. Remove the upper section of the rear timing cover.
23. Separate the exhaust pipe from the exhaust manifold.
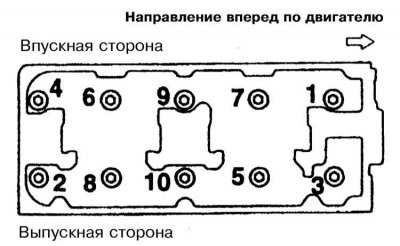
24. Acting strictly in a specific order, in three steps, loosen the head mounting bolts.
25. Remove the head from the cylinder block.
Installation
1. Thoroughly clean the mating surfaces of the cylinder head and block, completely removing traces of sealant and old gasket material. Finally, wipe the surfaces with a rag soaked in acetone.
2. Place the new sealing gasket on the block (identification marking facing up).
The gasket is laid dry, without the use of any sealants.
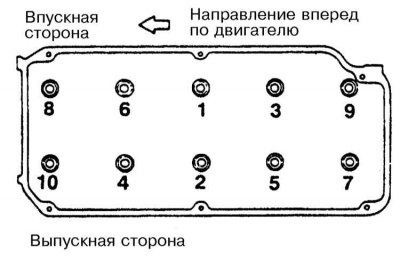
3. Carefully install the head on the block. Screw in the mounting bolts and, strictly in a specific order, in several stages, tighten them to the required force (see Specifications).
4. After replacing the gasket, connect the inlet pipe to the exhaust manifold.
5. Install the rear timing belt cover.
6. Once the timing marks are correctly aligned, install the camshaft gear. Screw in the mounting bolt and tighten it to the required torque (70 N·m). Adjust the timing belt tension, then install the outer timing cover.
7. Replace the cylinder head cover. Screw in the mounting bolts and tighten them to the required torque (1.8 N·m).
8. Install the powertrain suspension support bracket, lower the jack and remove it from under the vehicle.
9. Install the power steering hose retainer on the powertrain suspension support bracket.
10. Connect the wiring to the CKP, CMP, O2, ECT, TP, IAT and EGR temperature sensors, as well as to the ISC actuator drive motor.
11. Reconnect the wiring to the ignition distributor, fuel injectors and power transistor. Restore the original ground bus connection.
12. Connect the engine management system wiring harness.
13. After replacing the O-rings, connect the fuel supply and return lines.
14. Install the air cleaner assembly. Connect the breather hose.
The original can be found on the website: mitsubishiman.ru
15. Fill the engine with fresh coolant (see Chapter Settings and ongoing maintenance).
16. Connect the negative cable to the battery.
Engines 1.8 l
Removal
1. Relieve the pressure in the fuel system. Disconnect the negative cable from the battery.
If your car stereo system is equipped with a security code, make sure you have the correct combination to activate the audio system before disconnecting the battery!
2. Remove the air cleaner assembly with the air intake hose.
3. Drain the cooling system.
To avoid burns, proceed with the above work only after the system has completely cooled down! Do not allow antifreeze to come into contact with exposed areas of the body or painted surfaces of the car. Wash off any accidental splashes immediately with plenty of water. Remember that antifreeze is a highly toxic liquid and its ingestion, even in small quantities, can have the most serious consequences (even fatal). Never leave antifreeze stored in a loosely closed container and immediately collect any coolant spilled on the floor. Remember that the sweet smell of antifreeze can attract the attention of children and animals. Consult any car service station for information on how to dispose of used coolant. In many regions of the world, special collection points for various types of waste have been set up. Never pour old coolant down the drain or onto the ground!
4. Disconnect the vacuum line from the brake booster servo assembly and the PCV hose
5. After marking, disconnect the vacuum hoses from the intake manifold and throttle body.
6. Remove the upper radiator hose, overflow pipe, and the hoses leading to the thermostat and throttle body.
7. Disconnect the fuel supply and return lines.
8. Disconnect the throttle cable from the throttle body.
9. Disconnect the electrical wiring from the oil pressure switch.
10. Disconnect the electrical wiring from the oxygen sensor (O2), the coolant temperature sensor (ECT) and the engine temperature meter sensor, the drive electric motor of the idling speed (additional air supply) actuator (IAC), the throttle position sensor (TPS), the knock sensor and the fuel injection injectors.
11. Remove the spark plug wires.
12. Unbolt and move aside the control system wiring harness assembly.
13. Remove the thermostat housing and its sealing ring.
14. Remove the cylinder head cover.
15. Remove the upper timing belt cover.
16. Turn the crankshaft clockwise until the timing marks are aligned.
17. Use wire to secure the timing belt to the camshaft toothed wheel.
18. Block the camshaft from turning and remove its toothed wheel together with the toothed belt attached to it.
19. Remove the upper section of the rear timing cover.
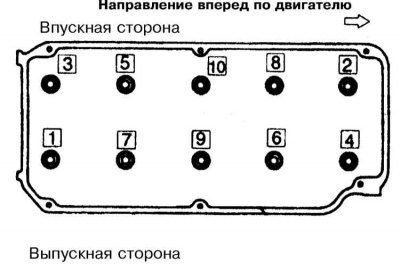
20. Acting strictly in a specific order, in three steps, loosen the head mounting bolts.
21. Remove the head from the cylinder block.
Installation
1. Thoroughly clean the mating surfaces of the cylinder head and block, completely removing traces of sealant and old gasket material. Finally, wipe the surfaces with a rag soaked in acetone.
2. Place the new sealing gasket on the block (identification marking facing up).
The gasket is laid dry, without the use of any sealants.
3. Carefully install the head onto the block.
4. Assess the condition of the mounting bolts, replace bolts whose length exceeds 96.4 mm.
5. Before installation, lightly lubricate the threaded part of the bolts with liquid machine oil. Place washers under the heads (with the chamfer facing outward).
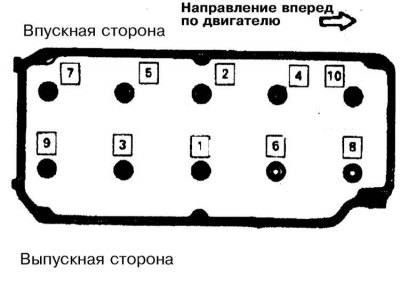
6. Screw in the mounting bolts and tighten them to the required torque in a strictly defined order, in several stages (see Specifications).
7. Install the camshaft gear, lock it from turning with a suitable key, then screw in the mounting bolt and tighten it to the required torque (90 Nm). Make sure that the timing marks are aligned correctly.
8. Install the upper timing belt cover and the cylinder head cover. Tighten the cylinder head cover bolts to 3 N·m.
9. To facilitate installation of the thermostat housing, loosen the water pump mounting bolt.
10. Apply a bead of sealant type MD97389 to the surface of the water pipe that mated with the thermostat housing.
11. After wetting with water, install a new sealing ring of the water outlet pipe, then press the thermostat housing onto the latter. Screw in the mounting bolts and tighten them to the required torque (22 N·m).
12. Connect the wiring to the O2, ECT (and temp gauge), EGR temp, TPS and knock sensors, as well as the IAC drive motor and fuel injection injectors.
13. Connect the upper radiator hose to the thermostat housing.
14. Connect the throttle cable to the throttle body.
15. Connect the engine oil pressure switch.
16. Connect the high voltage wires to the spark plugs.
17. After replacing the sealing ring and mounting clamp, connect the fuel supply and return hoses.
18. Install the air intake hose. Connect the breather pipe and replace the air cleaner cover.
19. Connect the brake booster and PCV vacuum hoses.
20. Fill the engine with fresh coolant (see Chapter Settings and ongoing maintenance).
21. Connect the negative cable to the battery.
Engines 2.0L SOHC
Removal
1. Disconnect the negative cable from the battery.
If your car stereo system is equipped with a security code, make sure you have the correct combination to activate the audio system before disconnecting the battery!
2. Drain the cooling system.
To avoid burns, proceed with the above work only after the system has completely cooled down! Do not allow antifreeze to come into contact with exposed areas of the body or painted surfaces of the car. Wash off any accidental splashes immediately with plenty of water. Remember that antifreeze is a highly toxic liquid and its ingestion, even in small quantities, can have the most serious consequences (even fatal). Never leave antifreeze stored in a loosely closed container and immediately collect any coolant spilled on the floor. Remember that the sweet smell of antifreeze can attract the attention of children and animals. Consult any car service station for information on how to dispose of used coolant. In many regions of the world, special collection points for various types of waste have been set up. Never pour old coolant down the drain or onto the ground!
3. Remove the air intake sleeve.
4. Disconnect the throttle cable and remove its support bracket.
5. Disconnect the fuel supply line (high pressure line), remove the sealing ring.
6. Disconnect the upper radiator hose, coolant bypass hose and heater hose from the cylinder head/intake manifold.
7. Disconnect the vacuum line from the brake booster servo assembly.
8. Remove the fuel return line.
9. Label and disconnect the vacuum hoses located under the intake manifold. Also disconnect the PCV hose from the cylinder head cover.
10. Mark and disconnect the high voltage wires from the distributor cap.
11. Label and disconnect all other electrical wiring, including that leading to the distributor and fuel injectors.
Please note that some wires need to be disconnected from the engine compartment bulkhead. Once all connectors are disconnected, unscrew the support bracket fasteners of the control system wiring harness and move the harness to the side.
12. Loosen the clamp securing the air conditioning and power steering hoses on the upper part of the left powertrain suspension bracket. Without disconnecting, move the hoses to the side.
13. Support the engine with a trolley jack (to distribute the load, place a wooden block between the jack head and the engine sump). Raise the jack, completely unloading the power unit supports, but without lifting the latter.
14. Remove the through bolt of the left support of the unit (if necessary, vary the position of the jack to facilitate the removal of the bolt). After removing the through bolt, loosen the remaining fasteners and remove the support bracket from the engine.
15. Remove the cylinder head cover and its sealing gasket. Remove the half-ring plug from the cylinder head.
16. Remove the upper timing belt cover. Turn the crankshaft clockwise until all the provided timing marks are aligned - the engine should be in the TDC position of the end of the compression stroke of the piston of the first cylinder.
17. Unscrew the mounting bolt and remove the camshaft gear with the timing belt attached to it - place the assembly on the lower section of the front cover.
Try to prevent the crankshaft from turning when the timing belt is removed!
18. Loosen the self-locking nuts and remove the small bolt securing the exhaust pipe to the exhaust manifold. Separate the pipe from the manifold and remove the sealing gasket.
19. Remove the bolts securing the support bracket to the lower part of the intake manifold.
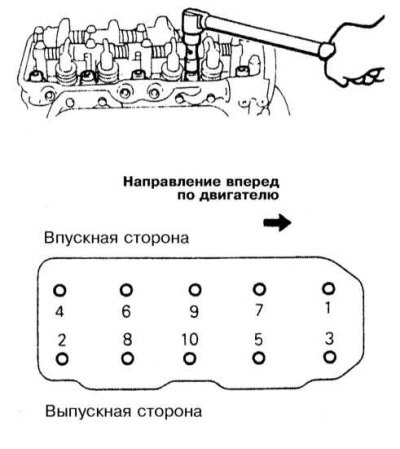
20. Acting in a strictly defined order, using a hex key (MB 998051-01) in two or three steps, loosen the head mounting bolts, then unscrew them manually.
21. By shaking it from side to side or tapping around the perimeter with a soft-faced hammer, separate the head from the block.
Do not try to pry the "stuck" head under the mating surface with a lever under any circumstances - if necessary, tap it around the perimeter with a hammer through a wooden block.
22. Remove the head assembly with the intake manifold/chamber and exhaust manifold, using an assistant if necessary. Transfer the assembly to a workbench and rest it on a couple of wooden blocks. Remove the head if necessary. The procedure for cleaning and servicing the cylinder head is described later in this Chapter.
23. Before installation, the head must be completely assembled on the workbench, which guarantees the correct installation and fastening of each of the installed components.
Installation
1. Thoroughly clean the mating surfaces of the cylinder head and block, completely removing traces of sealant and old gasket material. Finally, wipe the surfaces with a rag soaked in acetone.
2. Place the new sealing gasket on the block (identification marking facing up).
The gasket is laid dry, without the use of any sealants.
3. Carefully install the head on the block - try not to displace the gasket.
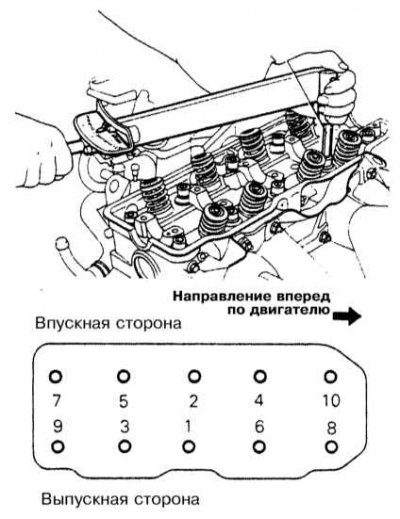
4. Screw in the mounting bolts and tighten them to the required torque in a strictly defined order in three stages (see Specifications).
5. Install the support bracket on the intake manifold, screw in the mounting bolts and tighten them to the required torque (22 Nm).
6. After replacing the sealing gasket, connect the exhaust pipe to the exhaust manifold. Screw on new self-locking fastening nuts and tighten them to the required torque (35 N·m).
7. Make sure that the camshaft has not turned, then install the timing belt and gear assembly onto it. Screw in the mounting bolt and tighten it to 91 N·m.
8. Install the upper timing belt cover. Screw in the mounting bolts and tighten them to the required torque (11 N·m).
9. Lubricate the contact surfaces of the half-ring plug with sealant and install the latter in its regular place in the cylinder head. After replacing the gasket, install the cylinder head cover.
10. Install the power unit suspension support bracket on the engine, tighten the fasteners (bolt pairs) with the required force (57 N·m).
11. Using the jack, align the holes in the support to install the through bolt. Install the bolt and tighten the nuts securely.
12. Slowly lower the jack until the weight of the unit is fully supported by the support, then tighten the through bolt of the latter to 71 N·m. Tighten the small lock nut to 36 N·m.
13. Install the mounting bracket for securing the air conditioning and power steering hoses onto the support bracket on top.
14. Place the control wiring harness in its original place. Screw in and tighten the mounting bolts. Restore the original wiring connection, making sure it is laid correctly and the connector is securely fastened.
15. Connect the spark plug wires to the distributor cap.
16. Connect the vacuum hoses and PCV hose.
17. Connect the fuel return line. Connect the vacuum hose to the brake booster servo assembly.
18. Install the heater hose, water bypass pipe and upper radiator hose - make sure that the hoses are routed correctly (try to avoid twisting and excessive bending) and that they are securely fastened with their clamps.
19. After replacing the sealing ring, connect the fuel supply line to the fuel line (before installation, the ring should be lightly lubricated with clean gasoline). Screw in the mounting bolts and tighten them to a torque of 6 N·m (not higher).
20. Connect and adjust the throttle cable.
21. Connect the air intake hose.
22. Fill the engine with fresh coolant (see Chapter Settings and ongoing maintenance).
23. In order to minimize the risk of contamination of the engine oil, change the latter (see Chapter Settings and ongoing maintenance).
24. Connect the negative cable to the battery.
25. Start the engine and check it for signs of developing leaks of working fluids and vacuum losses. Check the proper functioning of the electrical equipment, including the instrument panel and lighting devices.
26. If necessary, adjust the drive belts and the level of working fluids (coolant and engine oil).
Engines 1.6 or 2.0 L DOHC
Removal
1. Relieve pressure in the fuel system.
2. Disconnect the negative cable from the battery.
If your car stereo system is equipped with a security code, make sure you have the correct combination to activate the audio system before disconnecting the battery!
3. Drain the cooling system.
To avoid burns, proceed with the above work only after the system has completely cooled down! Do not allow antifreeze to come into contact with exposed areas of the body or painted surfaces of the car. Wash off any accidental splashes immediately with plenty of water. Remember that antifreeze is a highly toxic liquid and its ingestion, even in small quantities, can have the most serious consequences (even fatal). Never leave antifreeze stored in a loosely closed container and immediately collect any coolant spilled on the floor. Remember that the sweet smell of antifreeze can attract the attention of children and animals. Consult any car service station for information on how to dispose of used coolant. In many regions of the world, special collection points for various types of waste have been set up. Never pour old coolant down the drain or onto the ground!
4. Disconnect the throttle cable from the throttle body.
On models equipped with a speed control system (tempostat), two throttle cables are provided.
5. Remove the air cleaner assembly from the air intake.
6. Disconnect the electrical wiring from the oxygen sensor (O2), engine coolant temperature sensor (ECT), and engine temperature gauge/switch (on A/C models).
7. Disconnect the wiring harness from the ISC drive motor, throttle position sensor (TPS), crankshaft angle sensor, knock sensor (turbocharged models), and EGR temperature sensor (California models), as well as the fuel injectors, power transistor, and noise filter. Disconnect the ground busbar and engine wiring harness.
8. Remove the upper radiator hose and overflow pipe.
9. Remove the central cover of the high-voltage wiring protection and disconnect the wires from the spark plugs.
10. Disconnect (and immediately plug) the fuel supply line.
11. Disconnect the small vacuum hose.
12. Remove the heater hose and the water bypass hose.
13. Remove the PCV hose.
14. On turbocharged models, remove the vacuum hoses and water lines, then remove the hollow union bolt and disconnect the oil line from the turbocharger assembly.
15. Disconnect (and immediately plug) the fuel return line.
16. Disconnect the brake booster vacuum hose.
17. Remove the timing belt.
18. Remove the cylinder head cover and the semi-circular seal.
19. On non-turbo models, loosen the self-locking nuts and disconnect the exhaust downpipe from the exhaust manifold. Remove the sealing gasket.
20. On turbocharged models, remove the metal heat shield, then remove the bolts securing the turbocharger assembly to the exhaust manifold.
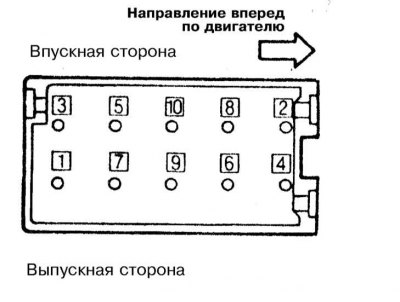
21. Acting strictly in a specific order, in three steps, loosen the head mounting bolts.
22. Remove the cylinder head and its sealing gasket from the cylinder block.
Installation
1. Thoroughly clean the mating surfaces of the cylinder head and block, completely removing traces of sealant and old gasket material. Finally, wipe the surfaces with a rag soaked in acetone.
2. Check the condition of the head and assess the degree of its non-flatness. Compare the measurement results with the requirements Specifications. If necessary, have the head and/or block reground.
During turning, no more than 0.2 mm of metal should be removed from the surface of the head/block.
3. Place the new sealing gasket on the block (identification marking facing up).
The gasket is laid dry, without the use of any sealants. On models with the appropriate configuration, install the gasket and the sealing ring of the turbocharger assembly.
4. Carefully install the head onto the block.
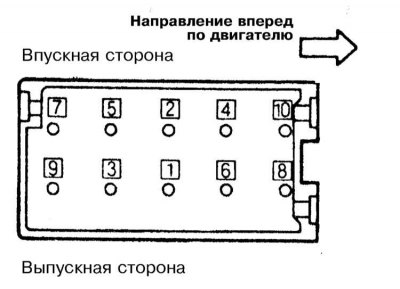
5. Screw in the mounting bolts and, strictly in a specific order, in three steps, tighten them with the required force (90÷100 N·m for a cold engine).
When checking the tightening force of the head fasteners on a hot engine, the control value is 100÷110 N·m.
6. On turbocharged models, install the heat shield. On non-turbocharged models, replace the sealing gasket and connect the downpipe to the exhaust manifold.
7. Apply sealant to the perimeter of the semicircular sealing insert and the lower edges of the semicircular sections of the new gasket on the front cover side, then install the cylinder head cover.
8. Install the timing belt and associated components.
9. Restore the original connection of communication and electrical lines. Connect and adjust the throttle cable(s).
10. Install the central cover of the high-voltage wiring protection.
11. After replacing the O-rings, connect both fuel lines.
12. Install the air cleaner assembly with the air intake. Connect the breather pipe.
13. Replace engine oil and oil filter.
14. Fill the engine with fresh coolant (see Chapter Settings and ongoing maintenance).
15. Connect the negative cable to the battery.
16. Start the engine and warm it up to normal operating temperature (thermostat should open), then adjust the coolant level in the radiator accordingly.
17. Check the idle speed and ignition timing settings. Make the appropriate adjustments if necessary.
18. After the engine has completely cooled down, check the coolant level again.
2.4L engines
Removal
1. Relieve pressure in the fuel system.
2. Disconnect the negative cable from the battery.
If your car stereo system is equipped with a security code, make sure you have the correct combination to activate the audio system before disconnecting the battery!
3. Remove the air cleaner assembly with the air intake.
4. Drain the cooling system.
To avoid burns, proceed with the above work only after the system has completely cooled down! Do not allow antifreeze to come into contact with exposed areas of the body or painted surfaces of the car. Wash off any accidental splashes immediately with plenty of water. Remember that antifreeze is a highly toxic liquid and its ingestion, even in small quantities, can have the most serious consequences (even fatal). Never leave antifreeze stored in a loosely closed container and immediately collect any coolant spilled on the floor. Remember that the sweet smell of antifreeze can attract the attention of children and animals. Consult any car service station for information on how to dispose of used coolant. In many regions of the world, special collection points for various types of waste have been set up. Never pour old coolant down the drain or onto the ground!
5. Disconnect the throttle cable. Release the support bracket fasteners and move the cable assembly to the side.
6. Remove the breather pipe.
7. Label and disconnect the vacuum lines from the throttle body.
8. Disconnect (and immediately plug) the fuel supply line.
9. Disconnect the electrical wiring from the air conditioning compressor, power steering pressure switch sensor, oxygen sensor (O2), coolant temperature sensor (ECT) and engine temperature meter sensor, absolute pipeline pressure sensor (MAP), intake air temperature sensor (IAT), throttle position sensor valve body (TPS), camshaft position sensor (CMP), EGR solenoid valve, idling speed stabilizer (IAC) electric motor drive, fuel injection injectors and ignition coil.
10. Remove the central cover of the high-voltage wiring protection and disconnect the spark plug wires.
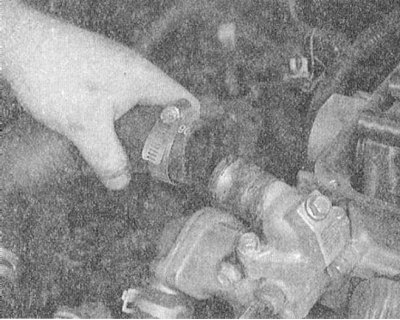
11. Disconnect the cooling system hoses and unbolt the thermostat housing from the engine.
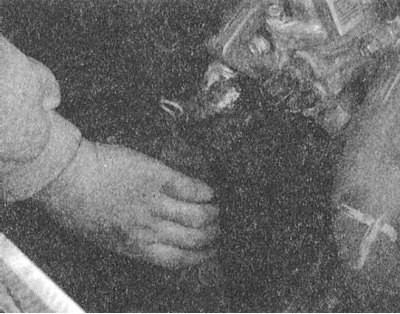
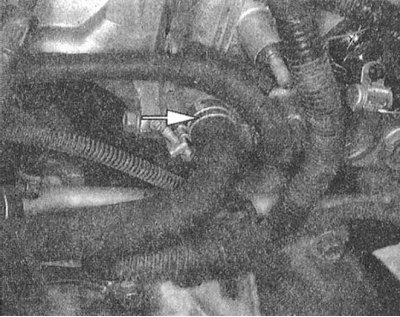
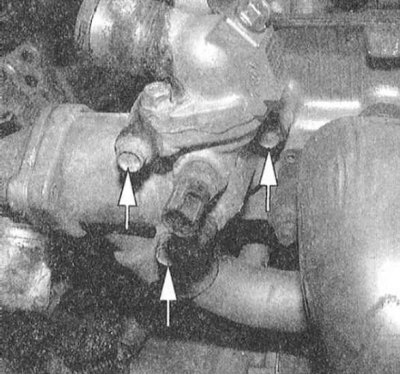
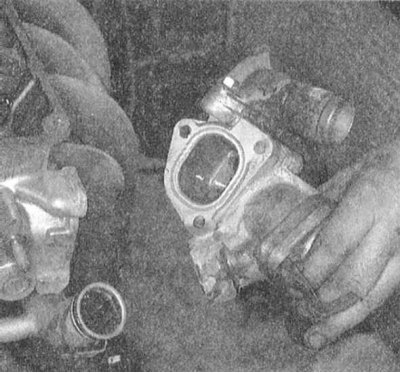
12. Remove the upper timing belt cover.
13. Ensure that all provided alignment marks are correctly aligned.
14. Use wire to secure the timing belt to the camshaft sprocket, then remove the sprocket.
15. Remove the cylinder head cover and take out the semicircular sealing insert.
16. Disconnect the support bracket from the intake manifold assembly.
17. Loosen the self-locking nuts and disconnect the exhaust pipe from the exhaust manifold. Remove the sealing gasket.
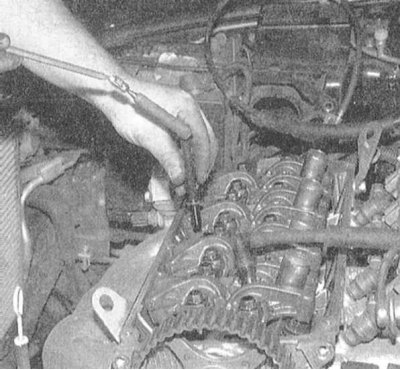
18. Acting strictly in a specific order, in three steps, loosen the head mounting bolts.
It is convenient to remove the head mounting bolts using a magnet.
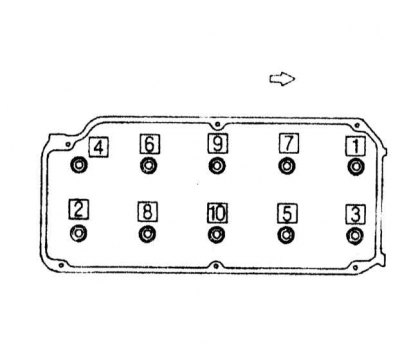
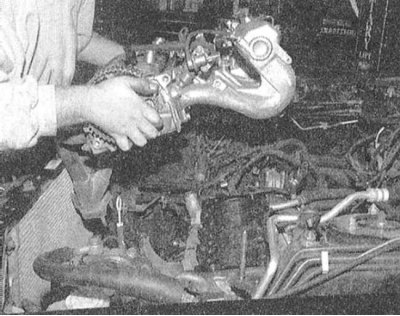
19. Remove the cylinder head and its sealing gasket from the cylinder block.
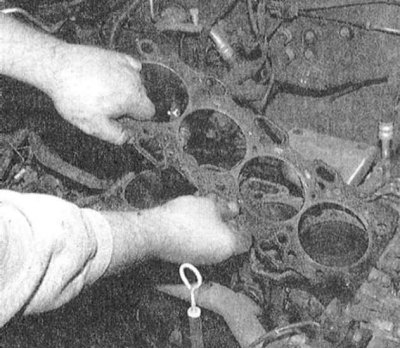
Installation
1. Thoroughly clean the mating surfaces of the cylinder head and block, completely removing traces of sealant and old gasket material. Finally, wipe the surfaces with a rag soaked in acetone.
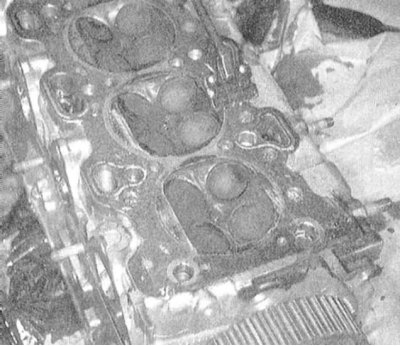
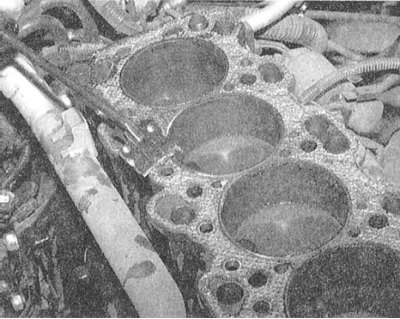
2. Place the new sealing gasket on the block (identification marking facing up).
The gasket is laid dry, without the use of any sealants.
3. Assess the condition of the mounting bolts, replace the bolts whose length exceeds 99.4 mm.
4. Before installation, lightly lubricate the threaded part of the bolts with liquid machine oil. Place washers under the heads (with the chamfer facing outward).
5. Carefully install the head onto the block.
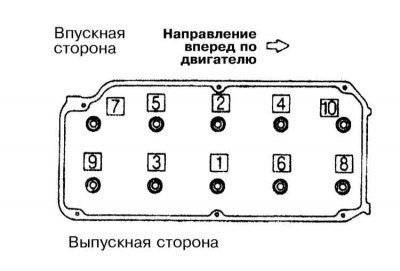
6. Screw in the mounting bolts and, strictly in a specific order, in three stages, tighten them to the required force (78 N·m - see. Specifications)
7. Replace the sealing gasket and connect the inlet pipe to the exhaust manifold. Tighten the fasteners to the required torque (44 N·m).
8. Install the thermostat housing. Screw in the three mounting bolts and tighten them to the required torque (24 N·m).
9. Connect the cooling system hoses to the thermostat.
10. Apply sealant to the perimeter of the semicircular sealing insert and the lower edges of the semicircular sections of the new gasket on the front cover side, then install the cylinder head cover.
11. Install the timing belt and associated components.
Don't forget to untie the belt from the camshaft gear.
12. Restore the original connection of communication and electrical lines. Connect and adjust the throttle cable(s).
13. Install the upper timing belt cover.
14. Install the support bracket on the intake manifold, screw in the mounting bolts and tighten them to the required torque (30 Nm).
15. Connect the wiring to the O2, ECT, MAP, IAT, TPS and CMP sensors, as well as to the A/C compressor, power steering pressure switch, IAC drive motor, injection injectors, ignition coil and EGR solenoid valve.
16. Connect the high voltage wiring and install the spark plug wire cover.
17. After replacing the O-rings, connect the fuel lines.
18. Install the air cleaner with the air intake. Connect the breather pipe.
19. Fill the engine with fresh coolant (see Chapter Settings and ongoing maintenance).
20. Connect the negative cable to the battery.
Engines 3.0L DOHC
Removal
1. Relieve pressure in the fuel system.
2. Disconnect the negative cable from the battery.
If your car stereo system is equipped with a security code, make sure you have the correct combination to activate the audio system before disconnecting the battery!
3. Drain the cooling system.
To avoid burns, proceed with the above work only after the system has completely cooled down! Do not allow antifreeze to come into contact with exposed areas of the body or painted surfaces of the car. Wash off any accidental splashes immediately with plenty of water. Remember that antifreeze is a highly toxic liquid and its ingestion, even in small quantities, can have the most serious consequences (even fatal). Never leave antifreeze stored in a loosely closed container and immediately collect any coolant spilled on the floor. Remember that the sweet smell of antifreeze can attract the attention of children and animals. Consult any car service station for information on how to dispose of used coolant. In many regions of the world, special collection points for various types of waste have been set up. Never pour old coolant down the drain or onto the ground!
4. Remove the air intake sleeves.
5. Remove the intake manifold assembly with the plenum chamber (see Section Removal and installation the intake manifold).
6. Remove the exhaust manifold (see Section Removal and installation the exhaust manifold).
7. Remove the timing belt (see Section Removal and installation the timing belt cover and timing belt).
8. Remove the breather pipe.
9. Remove the central cover of the high-voltage wiring protection and disconnect the wires from the spark plugs.
10. Remove the cylinder head covers.
11. Remove the intake camshaft timing gear.
12. Remove the rear timing belt cover.
13. Remove the ignition coil.
14. Disconnect the hoses and remove the thermostat housing.
15. Disconnect the water inlet pipe from the front head.
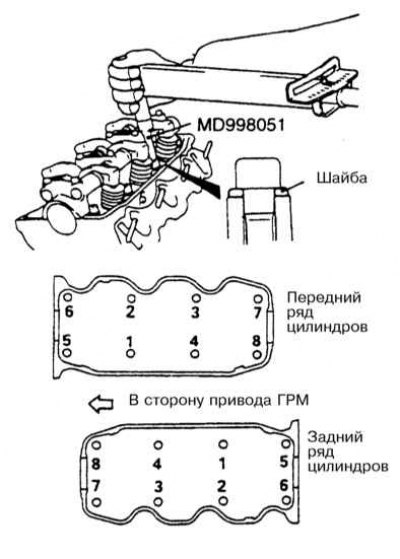
16. Proceeding in the reverse order to that shown in the illustration, loosen the cylinder head mounting bolts in three steps.
17. Remove the head and its sealing gasket.
Installation
1. Thoroughly clean the mating surfaces of the cylinder heads and block, completely removing traces of sealant and old gasket material. Finally, wipe the surfaces with a rag soaked in acetone.
2. Place the new sealing gasket on the block (identification marking facing up).
The gasket is laid dry, without the use of any sealants.
3. Carefully install the head onto the block.
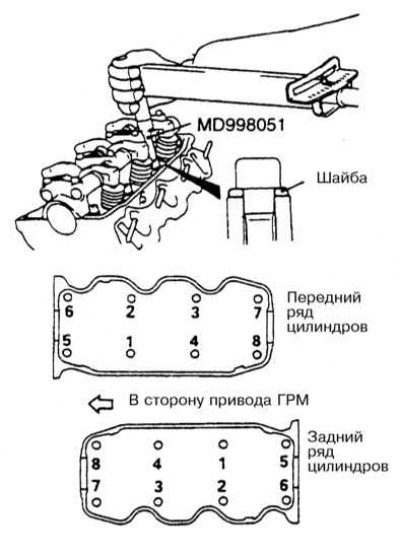
4. Place the washers (with the chamfer facing up), screw in the fastening bolts and, strictly in a specific order, in three steps, tighten them evenly with the required force (105÷115 N·m).
5. After replacing the sealing ring, connect the water inlet pipe to the head. Screw in the mounting bolts and tighten them to the required torque (12÷15 N·m).
6. After replacing the sealing gaskets, install the thermostat housing in its regular place. Screw in the mounting bolts and tighten them with a force of 17÷20 N·m.
7. Connect the cooling system hoses to the thermostat and secure them securely with new clamps.
8. Install the ignition coil, tightening its mounting bolts to the required torque (10 Nm).
9. Install the rear timing belt cover - the required tightening torque for the cover bolts is 24 Nm.
10. Install the intake camshaft gears.
Screw in the mounting bolt and tighten it to the required torque (90 Nm).
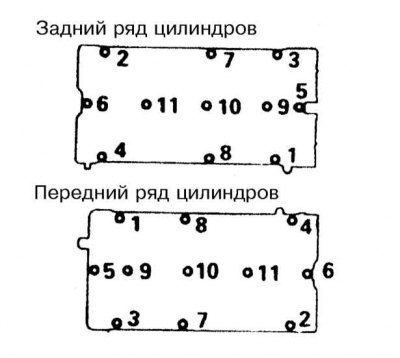
11. Lubricate the lower edges of the cylinder head cover with sealant. Screw in the mounting bolts and, acting strictly in a specific order, tighten them evenly with the required force (5÷6 N·m).
12. Connect the spark plug wires and install the central cover of the high-voltage wiring protection. Screw in the mounting bolts and tighten them to the required torque (3 N·m).
13. Connect the breather hose.
14. Install the timing belt (see Section Removal and installation the timing belt cover and timing belt).
15. Install the exhaust manifold assembly (see Section Removal and installation the exhaust manifold).
16. After replacing the sealing gaskets, install the intake manifold assembly with the plenum chamber (see Section Removal and installation the intake manifold).
17. Install the air intake sleeves.
18. Replace the engine oil and oil filter (see Chapter Settings and ongoing maintenance).
19. Fill the engine with fresh coolant (see Chapter Settings and ongoing maintenance).
20. Connect the negative cable to the battery.
21. Adjust the throttle cable.
22. Start the engine, warm it up to normal operating temperature and check the idle speed and ignition timing settings. Make the appropriate adjustments if necessary.
23. After the engine has completely cooled down, check the coolant level again.
Engines 3.0L SOHC
Removal
1. Relieve pressure in the fuel system.
2. Disconnect the negative cable from the battery.
If your car stereo system is equipped with a security code, make sure you have the correct combination to activate the audio system before disconnecting the battery!
3. Drain the cooling system.
To avoid burns, proceed with the above work only after the system has completely cooled down! Do not allow antifreeze to come into contact with exposed areas of the body or painted surfaces of the car. Wash off any accidental splashes immediately with plenty of water. Remember that antifreeze is a highly toxic liquid and its ingestion, even in small quantities, can have the most serious consequences (even fatal). Never leave antifreeze stored in a loosely closed container and immediately collect any coolant spilled on the floor. Remember that the sweet smell of antifreeze can attract the attention of children and animals. Consult any car service station for information on how to dispose of used coolant. In many regions of the world, special collection points for various types of waste have been set up. Never pour old coolant down the drain or onto the ground!
4. Remove the air intake sleeve.
5. Remove the intake manifold assembly with the plenum chamber (see Section Removal and installation the intake manifold).
6. Remove the timing belt (see Section Removal and installation the timing belt cover and timing belt).
7. Remove the camshaft sprockets and the rear timing belt cover.
8. Remove the steering pump support bracket.
When removing the rear cylinder head, remove the generator support bracket accordingly.
9. Disconnect the water inlet pipe.
10. Remove the purge tube assembly.
11. Remove the cylinder head cover.
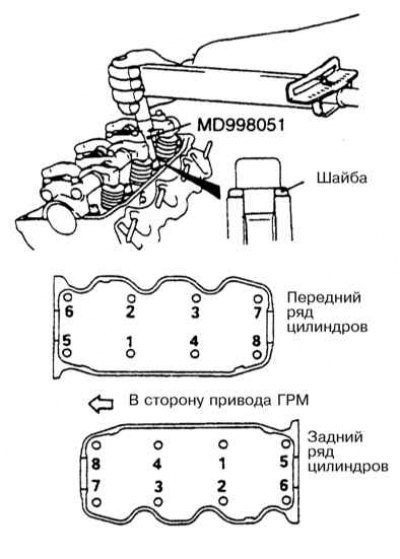
12. Proceeding in the reverse order to that shown in the illustration, loosen the cylinder head mounting bolts in three steps.
13. Remove the head and its sealing gasket.
Installation
1. Thoroughly clean the mating surfaces of the cylinder heads and block, completely removing traces of sealant and old gasket material. Finally, wipe the surfaces with a rag soaked in acetone.
2. Place the new sealing gasket on the block (identification marking facing up).
The gasket is laid dry, without the use of any sealants.
3. Carefully install the head onto the block.
4. Place the washers (with the chamfer facing up), screw in the fastening bolts and, strictly in a specific order, in three steps, tighten them evenly with the required force (105÷115 N·m).
5. Apply sealant to the lower edges of the semicircular sections, install the cylinder head cover on the block. Screw in the mounting bolts and tighten them evenly to the required torque (9 Nm).
6. Install the purge tube assembly.
7. Connect the water inlet pipe. Install the generator and/or steering pump support brackets.
8. Install the rear timing belt cover and camshaft sprockets. Screw in the sprocket mounting bolts and tighten them to the required torque (90 Nm).
9. Install the timing belt (see Section Removal and installation the timing belt cover and timing belt).
10. After replacing the sealing gaskets, install the intake manifold assembly with the plenum chamber (see Section Removal and installation the intake manifold).
11. Install the exhaust manifold (see Section Removal and installation the exhaust manifold).
12. Install the air intake sleeve.
13. Fill the engine with fresh coolant (see Chapter Settings and ongoing maintenance).
14. Connect the negative cable to the battery.
15. Start the engine, warm it up to normal operating temperature and check the idle speed and ignition timing settings. Make the appropriate adjustments if necessary.
16. After the engine has completely cooled down, check the coolant level again.
3.5L engines
Removal
1. Disconnect the negative cable from the battery.
If your car stereo system is equipped with a security code, make sure you have the correct combination to activate the audio system before disconnecting the battery!
2. Drain the cooling system.
To avoid burns, proceed with the above work only after the system has completely cooled down! Do not allow antifreeze to come into contact with exposed areas of the body or painted surfaces of the car. Wash off any accidental splashes immediately with plenty of water. Remember that antifreeze is a highly toxic liquid and its ingestion, even in small quantities, can have the most serious consequences (even fatal). Never leave antifreeze stored in a loosely closed container and immediately collect any coolant spilled on the floor. Remember that the sweet smell of antifreeze can attract the attention of children and animals. Consult any car service station for information on how to dispose of used coolant. In many regions of the world, special collection points for various types of waste have been set up. Never pour old coolant down the drain or onto the ground!
3. Remove the timing belt (see Section Removal and installation the timing belt cover and timing belt).
4. Remove the intake manifold and exhaust manifold.
5. Remove the spark plug wires.
6. Remove the cylinder head covers.
7. Remove the center section of the rear timing belt cover.
8. Loosen the cylinder head mounting bolts in three steps.
9. Remove the head and its sealing gasket.
Installation
1. Thoroughly clean the mating surfaces of the cylinder heads and block, completely removing traces of sealant and old gasket material. Finally, wipe the surfaces with a rag soaked in acetone.
2. After replacing the sealing gasket, carefully install the head onto the block.
3. In three stages, evenly tighten the head mounting bolts to the required force (103÷113 N·m).
4. Install the rear timing belt cover center section.
5. After replacing the sealing gaskets, install the cylinder head covers. Screw in the mounting bolts and tighten them to the required torque (3÷4 N·m).
6. Connect the spark plug wires.
7. Install the intake manifold and exhaust manifold.
8. Install the timing belt (see Section Removal and installation the timing belt cover and timing belt).
9. Reinstall all other components that were removed for access purposes.
10. Fill the engine with fresh coolant (see Chapter Settings and ongoing maintenance).
11. Connect the negative cable to the battery.