English Русский
Български
Беларускі
Український
Српски
Hrvatski
Română
Polski
Slovenský
Magyar
Articles Bookmark Contacts Sitemap   
Company Audi Company Ford Company Hyundai Company Kia Company Mazda Company Mercedes-Benz Company Nissan
MitsubishiMan.ru


Home Colt Lancer Galant L200 Outlander Pajero Others
Lancer 9 (2000-2007, petrol) Lancer 3 and 5 (1984-1992)

Checking and adjusting valve clearances (Mitsubishi Lancer 9)

  • Home
  • Lancer
  • 9 (2000-2007, petrol)
  • Power unit
  • Repair of MPI engines
  • Checking and adjusting valve clearances
0
1. Start the engine and warm it up to a coolant temperature of 80 - 95°C, then turn off the engine.

2. Turn the ignition switch to the "LOCK" (OFF) position.

3. Remove the spark plug wires and ignition coils.

4. Remove the spark plugs to facilitate the inspection procedure.

5. Remove the cylinder head cover.

6. Turn the crankshaft clockwise until the notch on the crankshaft pulley aligns with the "T" mark on the lower timing belt cover.

Caution: Do not turn the crankshaft counterclockwise.


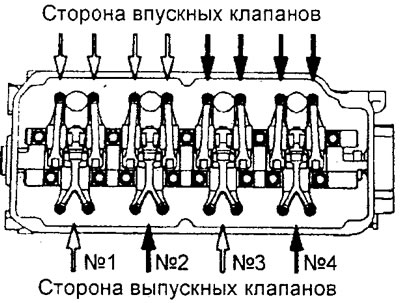
7. By moving the valve rocker arms for cylinders No.1 and No.4 up and down by hand, determine the cylinder whose piston is at TDC at the end of the compression stroke.

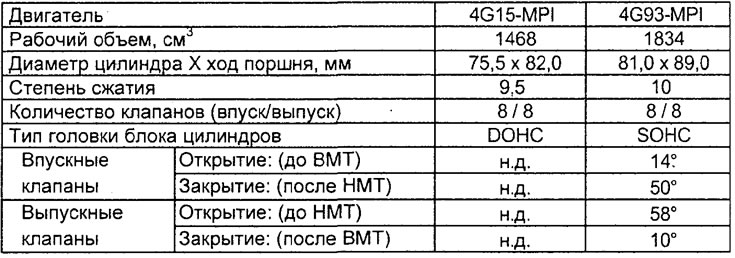
Table. Engine characteristics.


[The text of the article was obtained from the website MitsubishiMan]

Note: If a gap is felt in both the intake and exhaust valve drives, the piston of that cylinder is at TDC at the end of the compression stroke.


8. If the piston of cylinder No.1 is at TDC of the end of the compression stroke, then check and adjust the clearance in the valve drive for the rocker arms indicated by white arrows () in the picture.

a) Measure the valve clearance.


Nominal value (on warm engine):

Inlet valves:
  • Engine 4G15 - 0.25 mm
  • Engine 4G93 - 0.20 mm
  • Exhaust valves - 0.30 mm


b) If the valve clearance does not match the nominal value, loosen the lock nut of the rocker arm adjusting screw, and then adjust the clearance by turning the adjusting screw and measuring the clearance with a feeler gauge.

c) Tighten the rocker arm adjusting screw lock nut to the specified torque while holding the adjusting screw with a screwdriver.

Tightening torque: 9±1 Nm

9. Turn the crankshaft 360° clockwise until the notch on the crankshaft pulley aligns with the "T" mark on the lower timing belt cover.

10. If the piston of cylinder No.4 is at TDC of the end of the compression stroke, then check and adjust the clearance in the valve drive for the rocker arms indicated by black arrows () in the figure is similar to the procedure given in point "8".

11. Install the cylinder head cover and tighten the mounting bolts. Tightening torque 3.5 +0.5 N·m


12. Install and tighten the spark plugs to the specified torque.

Tightening torque: 25 +5 Nm

13. Install the ignition coils and spark plug wires.
This article is available at: russian, bulgarian, belarusian, ukrainian, serbian, croatian, romanian, polish, slovak, hungarian
This article was reviewed by: Arseny Pavlov
Share with friends:
◀ Previous
Lancer 9: Repair of MPI engines
Next ▶

General information about engines
Catalog numbers of original spare parts
Timing Belt Replacement (4G15 Engine)
Timing Belt Replacement (4G93 Engine)
Replacing oil seals
Replacing the cylinder head gasket
Engine assembly
Similar materials for other Mitsubishi models

➤ Checking and adjusting valve clearances Mitsubishi Colt 2 and 3 (1983-1993)
➤ Checking and adjusting valve clearances — Mirage only Mitsubishi Galant 6 and 7 (1987-1998)
➤ Adjusting valve clearances Mitsubishi L200 4 (2005-2014, diesel)
➤ Checking the opening pressure of the radiator cap valve Mitsubishi Outlander 1 (2003-2008)
➤ Adjusting valve clearances Mitsubishi Pajero 1 and 2 (1982-1999)
➤ Checking and adjusting valve clearances (SOHC) Mitsubishi Carisma (1995-2004)
Link in different formats to this article
Comments and feedback from visitors
No comments yet


Add up two numbers 10 + 14


Lancer 9 (2000-2007, petrol) 
  • General information
  • User manual
  • Maintenance
  • Power unit
  • Repair of MPI engines
  • Repair of GDI engines
  • Engine overhaul
  • Cooling and lubrication system
  • MPI fuel injection system
  • GDI fuel injection system
  • Intake and exhaust system
  • Starting and charging system
  • Transmission
  • Automatic gearbox
  • Variator (CVT)
  • Drive shafts and gearbox
  • Chassis and running gear
  • Front suspension
  • Rear suspension
  • Steering
  • Brake system
  • Body and interior
  • Doors, locks and windows
  • Exterior (external elements)
  • Interior (internal elements)
  • Electrical equipment
  • Heater and air conditioner
  • Security system SRS
  • Equipment and devices
  • Wiring diagrams (saloon)
  • Wiring diagrams (wagon)
Lancer 3 and 5 (1984-1992) 
  • General information
  • Maintenance
  • Power unit
  • Engine repair
  • Lubrication system
  • Cooling system
  • Ignition system
  • Fuel system
  • Carburetor
  • Fuel injection
  • Diesel power system
  • Exhaust system
  • Transmission
  • Clutch
  • Car gearbox
  • Chassis and running gear
  • Front suspension
  • Rear suspension
  • Steering
  • Brake system
  • Wheels and tires
  • Body and interior
  • Exterior (external elements)
  • Interior (internal elements)
  • Heating system
  • Electrical equipment
  • Equipment and devices
  • Power devices
  • Electrical circuits
MitsubishiMan.ru © 2018–2026 • Mobile version • Articles about Mitsubishi • Contacts • Sitemap: EN BG BY UA RS HR RO PL SK HU • Site search • Bookmark
Colt 2 and 3 (1983-1993) · Colt 4 and 5 (1991-2003) · Colt 5 (1995-2003) · Lancer 3 and 5 (1984-1992) · Lancer 9 (2000-2007) · Galant 5 (1983-1989) · Galant 6 and 7 (1987-1998) · L200 4 (2005-2014) · Outlander 1 (2003-2008) · Pajero 1 and 2 (1982-1999) · Pajero 4 (2006-2021) · Carisma (1995-2004) · Space Star (1998-2005) ·
This resource sets cookies 🍪 to avoid bothering you with repeated data entry.