Contents: Starting the engine with a…⤓ Troubleshooting: Troubleshooting…⤓ Checking fault codes ⤓ Reading with ABS warning light ⤓ Recharging a completely discharged…⤓ Troubleshooting Algorithm ⤓ Diagnostic table ⤓
Starting the engine with a completely discharged battery
If the engine is started with a completely discharged battery by connecting an external power source via jumper cables and the vehicle is immediately driven (without giving the discharged battery some time to recharge), the ignition system may begin to misfire, which will cause the vehicle to stop and become incapable of moving further.
This phenomenon occurs as a result of high current consumption by the ABS system for self-diagnosis. To avoid such a phenomenon, it is necessary to allow the battery to charge while the engine is idling.
Caution: Do not operate the vehicle when the anti-lock braking system (ABS) is disabled (e.g. the ABS control unit connector is disconnected), otherwise the vehicle's performance during braking will be unstable.
Troubleshooting: Troubleshooting Algorithm
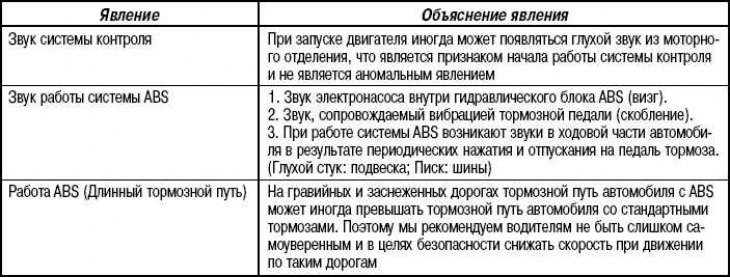
The phenomena described in the following table are not abnormal and do not indicate a malfunction.
The conditions for detecting malfunctions may vary depending on the diagnostic code.
Checking fault codes
Read the fault code using the MUT-II or ABS warning light.
Reading with ABS warning light
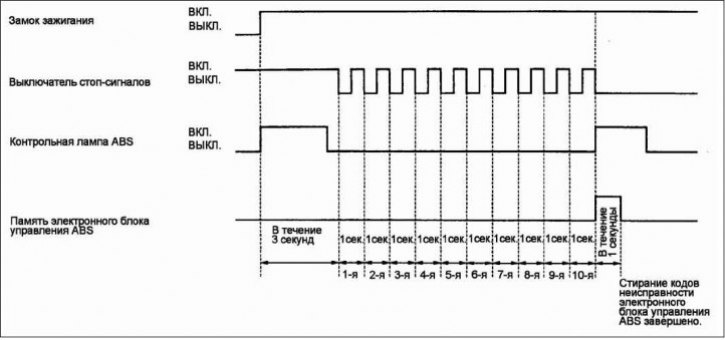
Use the special tool to ground terminal (1) (diagnostic control terminal) of the diagnostic connector.
Stop the engine.
Turn on the brake light switch (press the brake).
After performing steps 1. through 3., turn on the ignition. Within 3 seconds of turning on the ignition, turn off the brake light switch (release the brake). Then, turn the brake light switch on and off a total of 10 times.
Note: If the ABS control unit has stopped working due to the safety function, it will not be possible to clear the fault codes.
Checking the hydraulic unit
Caution! Before connecting (or disconnecting) the MUT-II device, turn the ignition key to the "OFF" position
Raise the vehicle with a jack and install support stands in specially designated places under it, or install the wheels being tested on the drums of the brake test stand.
Caution! During testing, the surfaces of the brake tester drum and the tire must be dry.
When testing the front brakes, set the vehicle's parking brake, and when testing the rear brakes, block the front wheels.
Release the parking brake lever and check the resistance force (torque) at each wheel.
When using a brake tester, record the resistance force values at each wheel. Turn the ignition key to the "OFF" position and connect the MUT-II.
After making sure that the gearshift lever (vehicles with manual transmission) or selector (vehicles with automatic transmission) is in neutral, start the engine.
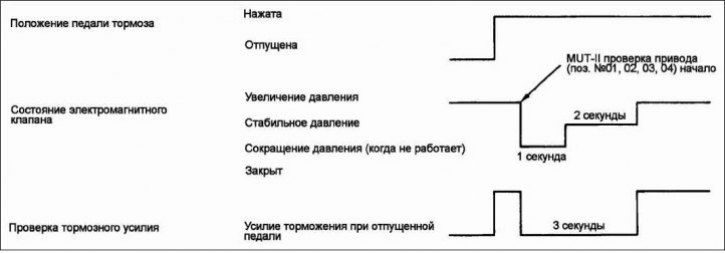
Use MUT-II to operate the drive.
Note: During the drive test, the ABS indicator light will be on and the anti-lock brake control will be disabled.
Note: If the ABS system has been disabled by the safety function, the actuator test using the MUT-II cannot be performed.
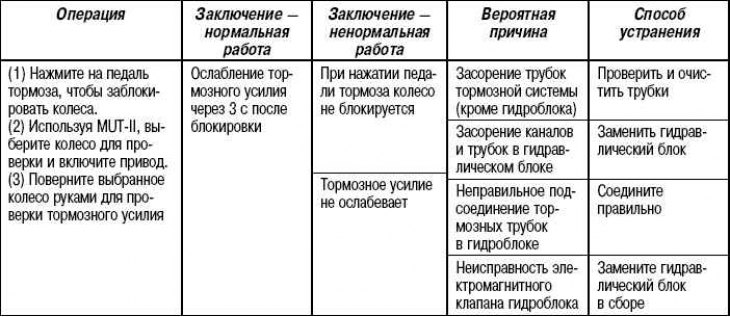
Turn the wheel by hand and check the change in braking force when the brake pedal is pressed.
When using a brake tester, depress the brake pedal until the braking force reaches the values specified below, and check whether the braking force decreases when the hydraulic unit drive is engaged to the values measured in item 2.
- Front wheel: 785–981 N.
- Rear wheel: 588–784 N.
If the test results are unsatisfactory, eliminate the cause in accordance with the "Diagnostics Table".
After completing the check, turn the ignition key to the OFF position and immediately disconnect the MUT-II.
Recharging a completely discharged battery
If the engine is started with a completely discharged battery by connecting an external power source via jumper cables and the vehicle is immediately driven (without giving the discharged battery some time to recharge), the ignition system may begin to misfire, which will cause the vehicle to stop and become incapable of moving further.
This phenomenon occurs as a result of high current consumption by the ABS system for self-diagnosis. To avoid this phenomenon, it is necessary to either allow the battery to charge while the engine is idling, or to disable the ABS system by removing the fuse from the ABS system circuit. In this case, the ABS indicator lamp will light.
After the battery is sufficiently charged, turn off the engine, reinstall the fuse (ABS circuits) and start the engine again. Make sure that the ABS warning light is off
Troubleshooting Algorithm
Diagnostic table