
English Русский
Български
Беларускі
Український
Српски
Hrvatski
Română
Polski
Slovenský
Magyar
Articles Bookmark Contacts Sitemap   
Company Audi Company Ford Company Hyundai Company Kia Company Mazda Company Mercedes-Benz Company Nissan
MitsubishiMan.ru


Home Colt Lancer Galant L200 Outlander Pajero Others
Lancer 9 (2000-2007, petrol) Lancer 3 and 5 (1984-1992)

Checking/removing and installing the fan/ballast resistors (vehicles manufactured before 8.88) (Mitsubishi Lancer 3)

  • Home
  • Lancer
  • 3 (1984-1992)
  • Body and interior
  • Heating system
  • Checking/removing and installing the fan/ballast resistors (vehicles manufactured before 8.88)
0
Contents: Removal ⤓ Installation ⤓
Note: If the fan does not work at only one speed, the ballast resistor is usually defective. To replace the resistor, you need to remove the fan.


Removal


Disconnect the ground cable from the battery.

Caution: This erases data in the electronic memory, such as the engine fault memory or the radio receiver code. Disconnect the battery only when the ignition is switched off, otherwise the fuel injection device control unit may be damaged. Before disconnecting the battery, read the instructions in the "Radio receiver" and "Removing and installing the battery" sections.


Remove the glove compartment and the right-hand small item box, see item. 20.17/20.18.

Disconnect the control cable for the flow of the mixture of outside and inside air from the fan.

Separate the air duct from the fan.
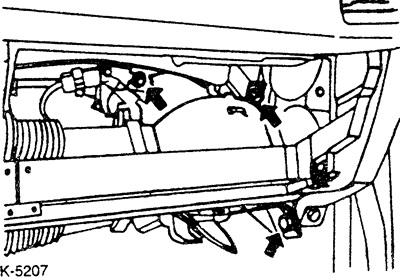


Loosen the arrow bolts and remove the fan.

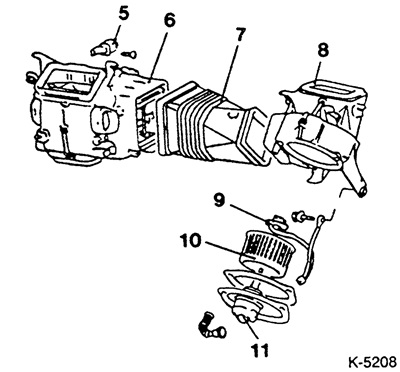
Disconnect motor "11". Resistor "9" is located on the fan housing. Replace the resistor if necessary. Other parts shown in the figure. 10 - fan rotor, 5 - heater relay, 6 - heater housing, 7 - channel, 8 - fan housing.

Note: To remove the heater housing, you must first remove the entire instrument panel.


Connect the fan motor to the battery. The motor should rotate normally. Otherwise, replace the motor.

The material was borrowed from the website (www.MitsubishiMan.ru)

If the engine is running normally, the heater relay, switch, or wiring is broken.

Remove any foreign objects that have fallen into the air duct.

Installation


Install the motor and secure it, remembering to install the gasket. Replace the damaged gasket.

Install the air mixture adjustment cable, see item 22.4.

Install the fan, all trims and glove compartment in reverse order.

Connect the ground cable to the battery.

If they are available, set the time on the clock and enter the security code into the radio.
This article is available at: russian, bulgarian, belarusian, ukrainian, serbian, croatian, romanian, polish, slovak, hungarian
This article was reviewed by: Dmitry Vasiliev
Share with friends:
◀ Previous
Lancer 3 and 5: Heating system
Next ▶

Heater Fan / Heater Unit
Heater — general information
Checking/removing and installing the fan/ballast resistors (vehicles produced since 9.88)
Removal and installation/adjustment of heater rods
Removal and installation air outlet nozzles
Diagnosing heater faults
Similar materials for other Mitsubishi models

➤ Camshaft — Checking and Installing Mitsubishi Colt 4 and 5 (1991-2003)
➤ Checking, removing and installing the generator Mitsubishi Galant 6 and 7 (1987-1998)
➤ Checking and adjusting the tension of auxiliary drive belts Mitsubishi L200 4 (2005-2014, diesel)
➤ Removal, Checking and Installing the Oil Pan (2WD Models) Mitsubishi Outlander 1 (2003-2008)
➤ Drive Belts — Checking and Adjusting Tension Mitsubishi Pajero 1 and 2 (1982-1999)
➤ Checking the fully closed throttle position switch for… Mitsubishi Carisma (1995-2004)
Link in different formats to this article
Comments and feedback from visitors
No comments yet


Add up two numbers 43 + 25


Lancer 9 (2000-2007, petrol) 
  • General information
  • User manual
  • Maintenance
  • Power unit
  • Repair of MPI engines
  • Repair of GDI engines
  • Engine overhaul
  • Cooling and lubrication system
  • MPI fuel injection system
  • GDI fuel injection system
  • Intake and exhaust system
  • Starting and charging system
  • Transmission
  • Automatic gearbox
  • Variator (CVT)
  • Drive shafts and gearbox
  • Chassis and running gear
  • Front suspension
  • Rear suspension
  • Steering
  • Brake system
  • Body and interior
  • Doors, locks and windows
  • Exterior (external elements)
  • Interior (internal elements)
  • Electrical equipment
  • Heater and air conditioner
  • Security system SRS
  • Equipment and devices
  • Wiring diagrams (saloon)
  • Wiring diagrams (wagon)
Lancer 3 and 5 (1984-1992) 
  • General information
  • Maintenance
  • Power unit
  • Engine repair
  • Lubrication system
  • Cooling system
  • Ignition system
  • Fuel system
  • Carburetor
  • Fuel injection
  • Diesel power system
  • Exhaust system
  • Transmission
  • Clutch
  • Car gearbox
  • Chassis and running gear
  • Front suspension
  • Rear suspension
  • Steering
  • Brake system
  • Wheels and tires
  • Body and interior
  • Exterior (external elements)
  • Interior (internal elements)
  • Heating system
  • Electrical equipment
  • Equipment and devices
  • Power devices
  • Electrical circuits
MitsubishiMan.ru © 2018–2026 • Mobile version • Articles about Mitsubishi • Contacts • Sitemap: EN BG BY UA RS HR RO PL SK HU • Site search • Bookmark
Colt 2 and 3 (1983-1993) · Colt 4 and 5 (1991-2003) · Colt 5 (1995-2003) · Lancer 3 and 5 (1984-1992) · Lancer 9 (2000-2007) · Galant 5 (1983-1989) · Galant 6 and 7 (1987-1998) · L200 4 (2005-2014) · Outlander 1 (2003-2008) · Pajero 1 and 2 (1982-1999) · Pajero 4 (2006-2021) · Carisma (1995-2004) · Space Star (1998-2005) ·
This resource sets cookies 🍪 to avoid bothering you with repeated data entry.