Contents: Mass Air Flow Sensor ⤓ Camshaft position sensor and…⤓ Nozzles ⤓ Ignition coil and power transistor ⤓ EGR valve servo drive ⤓
Mass Air Flow Sensor
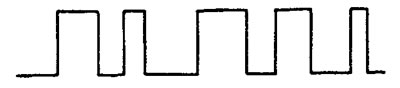
1. Connect the oscilloscope (motor tester) sensor to terminal "3" of the mass air flow sensor connector or to the corresponding terminal of the engine control unit.
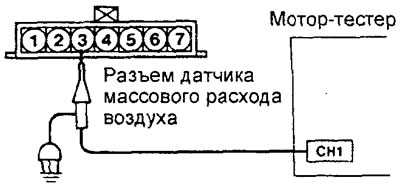
2. Compare the sensor signal waveform on the oscilloscope with the figure when the engine is running at idle speed.
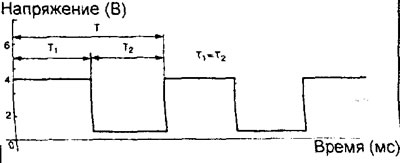
Division value: X - 5 ms/d, Y - 2 V/d.
3. Check that the period "T" decreases and the signal frequency increases with increasing crankshaft speed (i.e. the amount of air entering the cylinders).
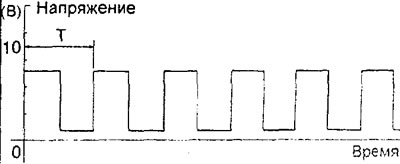
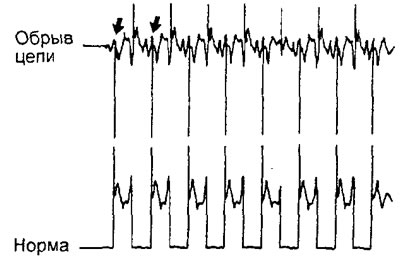
4. Possible deviations from the normal signal shape.
a) Due to a fault in the circuits between the mass air flow sensor and the engine control unit, the signal appears in the form of rectangular pulses even if the engine is not running.
b) Due to damage to the mass air flow sensor, the signal is present as an unstable curve of variable frequency. However, if high voltage leaks (from the ignition system) occur when the engine crankshaft speed increases, then temporary distortions will appear on the curve, even with a serviceable mass air flow sensor.
Camshaft position sensor and crankshaft position sensor
1. To check the signal shape, connect the oscilloscope to the connectors of the camshaft and crankshaft position sensors (see the pin number in the figure).
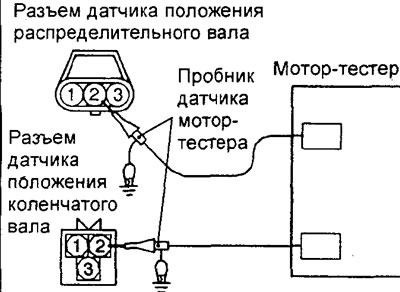
Engine 4G15.
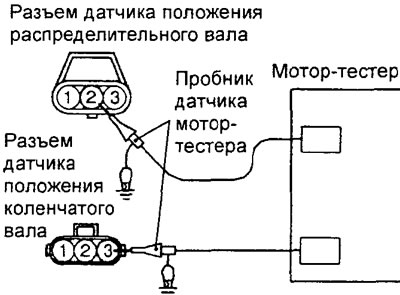
Engine 4G93.
2. Compare the shape of the sensor signal on the oscilloscope with the shape of the signal in the corresponding figure when the engine is idling. Check that the period "T" is reduced as the engine crankshaft speed increases.
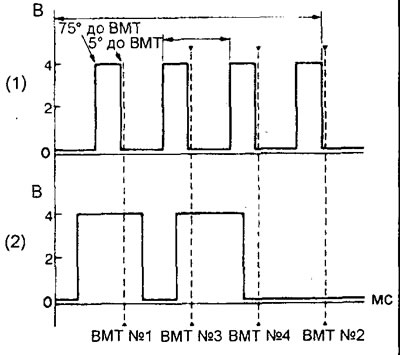
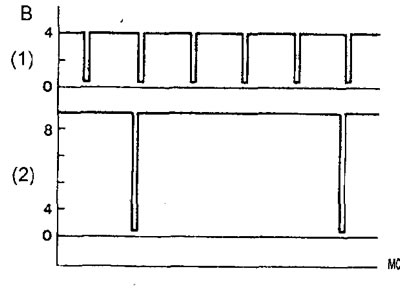
Normal waveform of camshaft position sensor and crankshaft position sensor signals. (1) - crankshaft position sensor, (2) - camshaft position sensor. Division value: X - 10 ms/d, Y - 2 V/d.
Note: Two crankshaft revolutions equal one camshaft revolution.
3. Possible deviations from the normal signal shape.
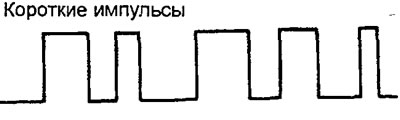
a) Due to a fault in the circuits between the sensor and the engine control unit, the signal appears in the form of short pulses, even if the engine is not running.
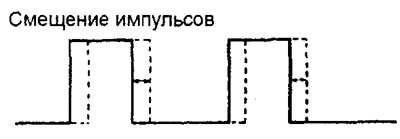
b) Due to weakening of the timing belt tension or a faulty sensor rotor, the rectangular pulses shift to the right or left.
Nozzles
1. Connect the motor tester probe to the terminals of the engine and variator electronic unit connector corresponding to injector No.1 and the signal when the injector circuit is opened (terminals "1" and "63").
2. Then check injectors No.2, No.3, No.4 in the same way.
Electronic unit outputs:
- Nozzle #2 - "9" and "63"
- Nozzle #3 - "24" and "63"
- Nozzle #4 - "2" and "63"
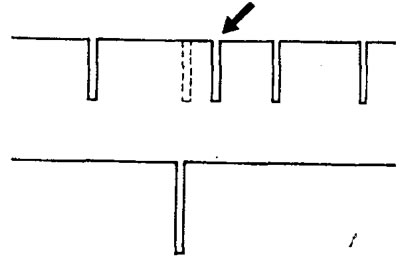
3. Check that the shape and duration of the injector control signal correspond to the figure when the engine is idling.
1) - signal when the injector circuit is opened, (2) - signal on the injector. Division value: X - 25 ms/d, Y - 2 V/d.
4. When checking the signal, please pay attention to the following points.
a) When the accelerator pedal is pressed sharply, the duration of the injector control pulse will initially increase significantly and will not quickly return to its normal form.
b) Check that the signal when the injector circuit is opened is synchronized with each injector control signal.
Ignition coil and power transistor
1. Connect the sensor to the motor tester; to terminal "3" of the ignition coil connector or to the terminals of the electronic control unit corresponding to coils No.1 - 4.
Electronic unit outputs:
- Coil #1 - "11"
- Coil #2 - "12"
- Coil #3 - "3f"
- Coil #4 - "31"
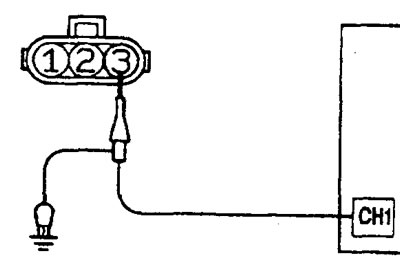
2. Check that the signal shapes correspond to the figure when the engine is running in the specified mode.
Engine operating mode is approximately 1200 rpm
Note: When observing the signal, pay attention to the state of the voltage increase section and the maximum voltage.
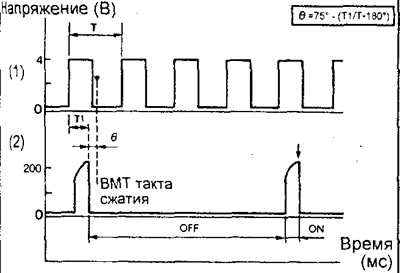
(1) - crankshaft position sensor signal, (2) - power transistor signal. Division value: X - 10 ms/d.; Y - 2 B/d.; T - time of rotation of the seal shaft by 180°; in the ignition timing angle.
3. In the normal state, the signal has a section of voltage growth in the upper right part (voltage growth from approximately "D" to "E").
Nominal value:
- "D" - approximately 2.0 V
- "E" - approximately 4.5 V
4. Examples of deviations from the normal signal shape (signal shape when the engine crankshaft is cranked by the starter).
a) Due to a break in the circuit, the signals in the primary winding of the ignition coil are rectangular (the upper right section of voltage growth is missing), and the maximum voltage reaches only the specified value "D".
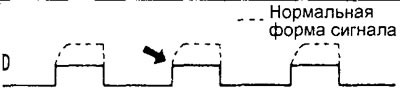
b) Due to a malfunction of the power transistor, when the power transistor is turned on (position "ON"), supply voltage (S/V) occurs.
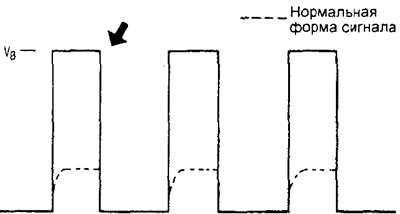
EGR valve servo drive
1. Connect the oscilloscope sensor (motor tester) to terminals "4" and "6", "1" and "3" of the EGR solenoid valve connector or the corresponding terminals of the engine control unit connector.
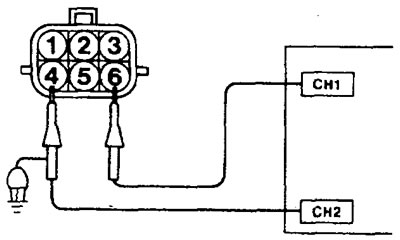
2. Check that during the operation of the stepper motor, a normal waveform signal appears (see figure) in the mode of increasing the engine crankshaft speed (when pressing the accelerator pedal).
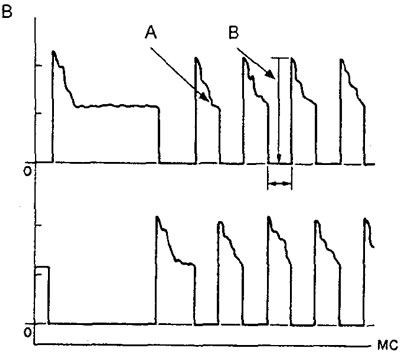
Division value: X - 25 ms/div, Y - 1 V/div. Region "A" - counter-EMF arising during rotation of the electric motor. Region "B" - EMF of self-induction in the winding.
3. When observing the signal, pay attention to the following points.
a) Point "A" - the presence or absence of EMF induced during rotation of the electric motor.
Note: if the electric motor is faulty, then the back-EMF does not occur when the electric motor rotates, or its value is very small.
b) Point "B" is the value of the self-induction EMF (inductive surge).
Note: if a short circuit occurs in the winding, the self-induction EMF arising in the winding does not appear or its value is very small.
4. An example of deviation from the normal signal shape.
a) Due to a malfunction of the stepper motor (it does not work), the back EMF does not appear when the motor rotates.
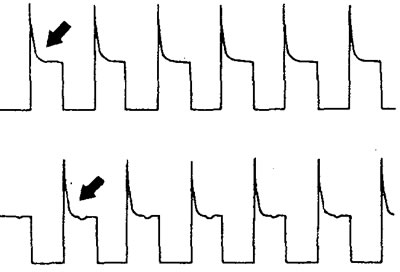
b) Open circuit between the stepper motor and the electronic engine control unit. When the circuit is open, current does not flow in the motor winding (the voltage does not drop to 0 V). Note that the back-EMF signal that occurs when the motor rotates (with a functioning stepper motor) is only slightly different from the signal when the motor winding circuit is open.