
English Русский
Български
Беларускі
Український
Српски
Hrvatski
Română
Polski
Slovenský
Magyar
Articles Bookmark Contacts Sitemap   
Company Audi Company Ford Company Hyundai Company Kia Company Mazda Company Mercedes-Benz Company Nissan
MitsubishiMan.ru


Home Colt Lancer Galant L200 Outlander Pajero Others
Pajero 4 (2006-2021) Pajero 1 and 2 (1982-1999)

Body supports (mounting to the chassis) (Mitsubishi Pajero 1)

  • Home
  • Pajero
  • 1 (1982-1999)
  • Body and interior
  • Exterior (external elements)
  • Body supports (mounting to the chassis)
0
Contents: Construction and details of the…⤓ Construction and details of the…⤓ Construction and details of the…⤓

Construction and details of the 4-door body supports (1992-95)
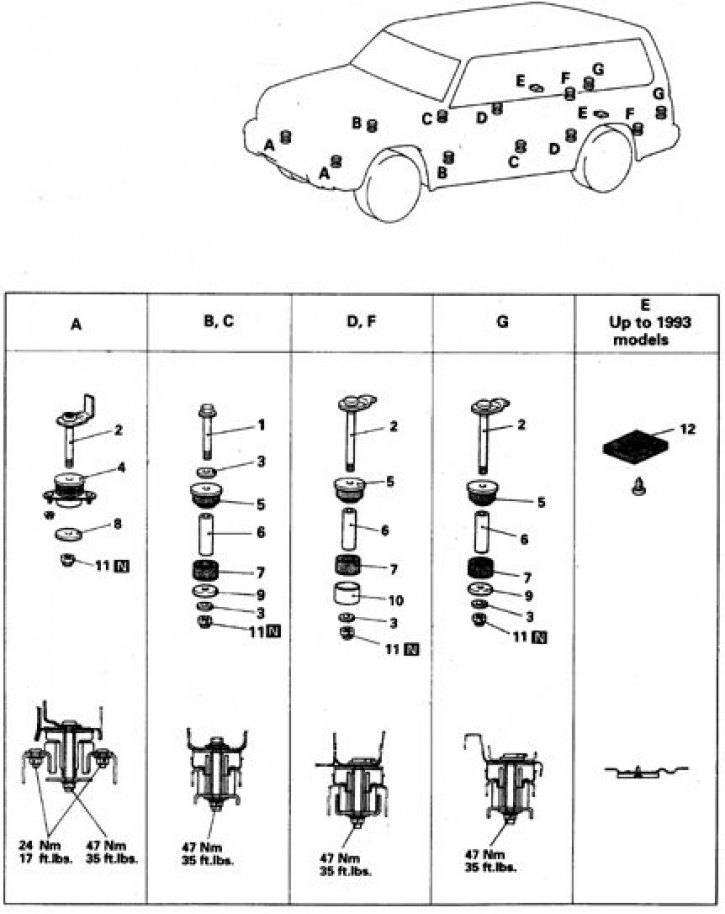


1, 2. Bolt; 3, 8, 9. Washer; 4. Support cushion from the body side; 5. Pillow A; 6. Bushing; 7. Pillow B; 10. Limiter; 11. Self-tightening nut; 12. Gasket (before 1993)


Construction and details of the 2-door body supports (1983-91)
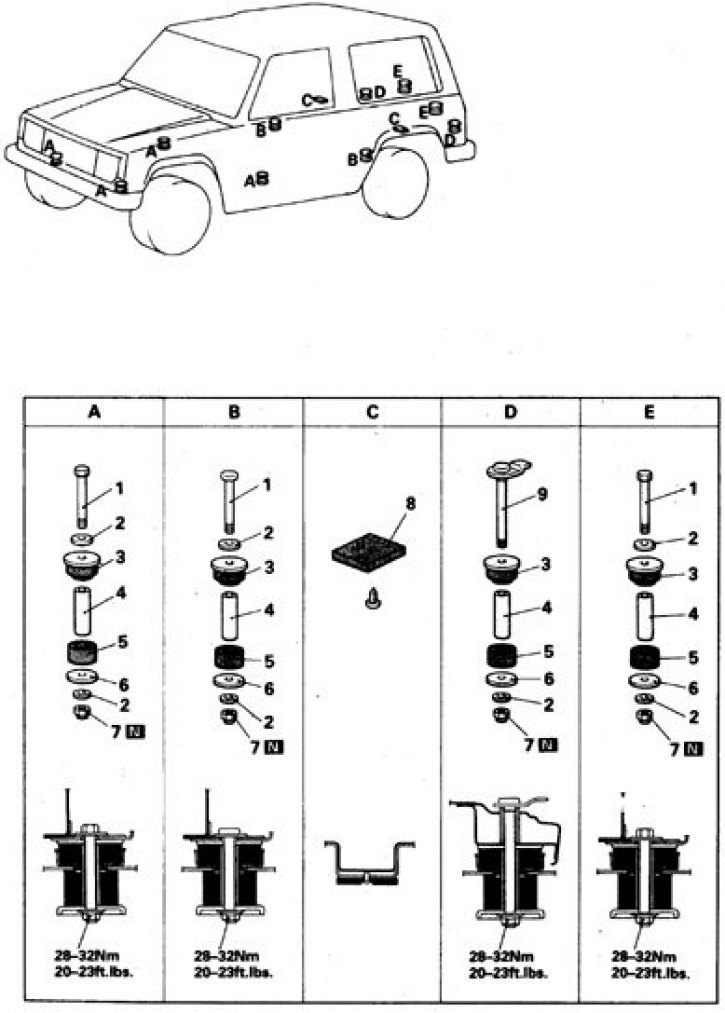


N – subject to replacement during assembly

1, 9. Bolt; 2, 6. Washer; 3. Pillow A; 4. Bushing; 5. Pillow B; 7. Self-tightening nut; 8. Gasket


Construction and details of the 4-door body supports (1983-91)
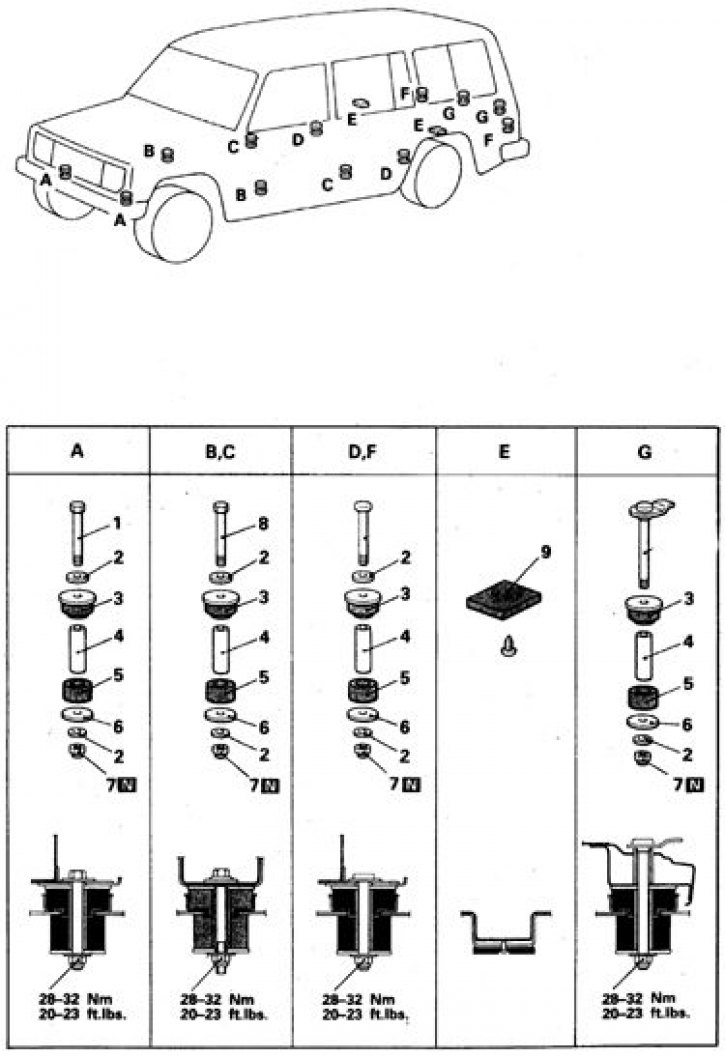


N – subject to replacement during assembly; 1, 8. Bolt; 2, 6. Washer; 3. Pillow A; 4. Bushing; 5. Pillow B; 7. Self-tightening nut; 9. Gasket


If any work requires removing the body mounting bolts, the body should be raised only to a height that provides access; it is prohibited to raise the body to a significant height, as damage may occur.

If you need to replace any body mount, you should unscrew all the body mount bolts on that side and install stands under the body near each of the mounts.

1. Raise the vehicle, place jack stands under each support, placing wooden blocks between them. Place at least one stand under the frame.

2. Unscrew the body support bolts on the side on which the work is being performed. If possible, remove the washer and lower cushion.

3. Remove the support from under the frame and carefully lower the frame on the side where the work is being done, do not allow the frame to lower excessively.

4. Reinstall the stand under the frame.

5. Remove the upper cushion, bushing and gaskets.

6. Install the body support parts in reverse order.

7. Tighten the support nuts to the required torques.
This article is available at: russian, bulgarian, belarusian, ukrainian, serbian, croatian, romanian, polish, slovak, hungarian
This article was reviewed by: Arseny Pavlov
Share with friends:
◀ Previous
Pajero 1 and 2: Exterior (external elements)
Next ▶

Removal and installation the wing
Front Antenna — Removal and Installation
Exterior rear view mirrors
Front facing grille
Bumpers — removal and installation
Spare tire holder
Similar materials for other Mitsubishi models

➤ Body and interior equipment Mitsubishi Colt 4 and 5 (1991-2003)
➤ Mounting Motor Position Sensor — Check Mitsubishi Lancer 3 and 5 (1984-1992)
➤ Lubrication of chassis components Mitsubishi Galant 6 and 7 (1987-1998)
➤ Cabin and cargo compartment mounting diagram Mitsubishi L200 4 (2005-2014, diesel)
➤ Removal and installation the throttle body Mitsubishi Outlander 1 (2003-2008)
➤ Cleaning the throttle body Mitsubishi Carisma (1995-2004)
Link in different formats to this article
Comments and feedback from visitors
No comments yet


Add up two numbers 20 + 40


Pajero 4 (2006-2021) 
  • General information
  • User manual
  • Troubleshooting
  • Maintenance
  • Technical specifications
  • Power unit
  • Engine repair
  • Cooling system
  • Lubrication system
  • Fuel system
  • Engine management system
  • Intake and exhaust system
  • Engine electrical equipment
  • Transmission
  • Clutch
  • Manual gearbox
  • Automatic gearbox
  • Drive shafts
  • Chassis and running gear
  • Front suspension
  • Rear suspension
  • Brake system
  • Steering
  • Body and interior
  • Exterior (external elements)
  • Interior (internal elements)
  • Doors, locks and windows
  • Body dimensions
  • Electrical equipment
  • Safety system (SRS)
  • Air conditioner
  • Equipment and devices
  • Electrical diagrams
Pajero 1 and 2 (1982-1999) 
  • General information
  • User manual
  • Seats and seat belts
  • Instruments and controls
  • Driving and operation
  • Maintenance
  • Power unit
  • Gasoline engines
  • Diesel engines
  • Ignition system
  • Engine electrical equipment
  • Cooling and lubrication system
  • Power and exhaust system
  • Fuel system (gasoline)
  • Fuel system (diesel)
  • Transmission
  • Clutch
  • Mechanical gearbox
  • Automatic gearbox
  • Drive shafts and axles
  • Chassis and running gear
  • Front suspension
  • Rear suspension
  • Steering
  • Brake system
  • Body and interior
  • Exterior (external elements)
  • Interior (internal elements)
  • Doors, locks and windows
  • Electrical equipment
  • Equipment and devices
  • Heater and air conditioner
  • Cruise control
  • Headlights and lighting
  • Electrical circuits
MitsubishiMan.ru © 2018–2026 • Mobile version • Articles about Mitsubishi • Contacts • Sitemap: EN BG BY UA RS HR RO PL SK HU • Site search • Bookmark
Colt 2 and 3 (1983-1993) · Colt 4 and 5 (1991-2003) · Colt 5 (1995-2003) · Lancer 3 and 5 (1984-1992) · Lancer 9 (2000-2007) · Galant 5 (1983-1989) · Galant 6 and 7 (1987-1998) · L200 4 (2005-2014) · Outlander 1 (2003-2008) · Pajero 1 and 2 (1982-1999) · Pajero 4 (2006-2021) · Carisma (1995-2004) · Space Star (1998-2005) ·
This resource sets cookies 🍪 to avoid bothering you with repeated data entry.