
English Русский
Български
Беларускі
Український
Српски
Hrvatski
Română
Polski
Slovenský
Magyar
Articles Bookmark Contacts Sitemap   
Company Audi Company Ford Company Hyundai Company Kia Company Mazda Company Mercedes-Benz Company Nissan
MitsubishiMan.ru


Home Colt Lancer Galant L200 Outlander Pajero Others
Galant 6 and 7 (1987-1998) Galant 5 (1983-1989, petrol)

Stretching — removal and installation (Mitsubishi Galant 5)

  • Home
  • Galant
  • 5 (1983-1989, petrol)
  • Chassis and running gear
  • Car suspension
  • Stretching — removal and installation
0
Contents: Removal ⤓ Installation ⤓
Note: Some models do not have a strut brace.


Removal


1. Jack up the front of the car and place it on supports. Apply the parking brake and block the rear wheels. Remove the front wheel.

2. Remove the clamp securing the stabilizer to the strut brace.

3. Unscrew the nut securing the strut brace to the front cross member, as well as the two bolts with nuts securing the other end of the brace to the lower arm.
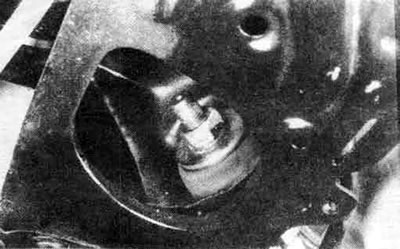


3.3a. To remove the strut brace, first unscrew the large nut on the front of the cross beam, remove the washer and bushing...
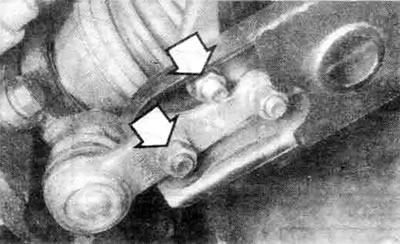


3.3b.... then unscrew the two bolts with nuts (shown by arrows) securing the strut brace to the lower suspension arm


4. Remove the large washer and rubber bushings from the front of the strut, then remove the strut brace from the crossmember.


5. Check the strut brace for cracks and deformation. If the strut brace is bent more than 3 mm, it must be replaced. Inspect the bushings for cracks, hardening and general destruction, replace the bushings if necessary.

Installation


6. Before installing the strut brace, old or new, screw the internal lock nut onto it as shown in the illustration.
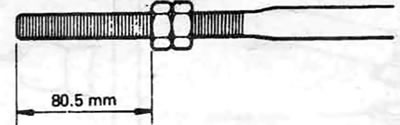


3.6. Screw the inner lock nut onto the strut brace so that the outer surface of the outer nut is 80.5 mm from the end of the strut - this will ensure the correct setting of the longitudinal tilt angle of the strut pivot axis


7. Install the inner washer, rubber bushing and sleeve onto the strut brace, then insert the brace into the hole in the cross member. Install the two bolts and nuts securing the brace to the lower arm and tighten them to the torque specified in specifications of this Chapter.

8. Install the outer rubber bushing, washer and nut onto the front of the tie rod, but do not tighten the nut completely.

9. Install the clamp and bolt securing the stabilizer to the strut. Lower the vehicle and tighten the clamp bolt securely.

10. Tighten the outer tie rod nut to the torque specified in the specification.

11. It is advisable to take the car to a car repair shop to check and, if necessary, adjust the front wheel alignment angles.
This article is available at: russian, bulgarian, belarusian, ukrainian, serbian, croatian, romanian, polish, slovak, hungarian
This article was reviewed by: Vladimir Glazunov
Share with friends:
◀ Previous
Galant 5: Car suspension
Next ▶

Front Anti-Roll Bar — Removal and Installation
Suspension and steering — general description
Suspension and steering — specification
Front Strut/Shock Absorber and Coil Spring — Removal, Inspection and Installation
Shock absorber — replacement
Lower control arm — removal, inspection and installation
Ball joints — inspection and replacement
Steering knuckle and hub — removal and installation
Link in different formats to this article
Comments and feedback from visitors
No comments yet


Add up two numbers 18 + 45


Galant 6 and 7 (1987-1998) 
  • General information
  • Introduction to guide
  • User manual
  • Driving and operation
  • Maintenance
  • Power unit
  • Dismantling the engine
  • Engine overhaul
  • Cooling and heating
  • Power and exhaust systems
  • Engine electrical equipment
  • Engine management systems
  • Transmission
  • Mechanical gearbox
  • Automatic gearbox
  • Clutch
  • Drive shafts and transfer case
  • Chassis and running gear
  • Brake system
  • Car suspension
  • Steering
  • Body and interior
  • Exterior (external elements)
  • Interior (internal elements)
  • Doors, locks and windows
  • Electrical equipment
  • Equipment and devices
  • Wiring diagrams Galant
  • Wiring diagrams Mirage
  • Wiring diagrams Diamante
Galant 5 (1983-1989, petrol) 
  • General information
  • Troubleshooting
  • Maintenance
  • Power unit
  • Engine repair
  • Engine overhaul
  • Cooling and heating
  • Fuel and exhaust system
  • Engine electrical equipment
  • Reducing exhaust toxicity
  • Transmission
  • Manual gearbox
  • Automatic gearbox
  • Clutch and drive shafts
  • Chassis and running gear
  • Brake system
  • Car suspension
  • Steering
  • Body and interior
  • Exterior (external elements)
  • Interior (internal elements)
  • Doors, locks and windows
  • Electrical equipment
  • Equipment and devices
  • Electrical diagrams
MitsubishiMan.ru © 2018–2026 • Mobile version • Articles about Mitsubishi • Contacts • Sitemap: EN BG BY UA RS HR RO PL SK HU • Site search • Bookmark
Colt 2 and 3 (1983-1993) · Colt 4 and 5 (1991-2003) · Colt 5 (1995-2003) · Lancer 3 and 5 (1984-1992) · Lancer 9 (2000-2007) · Galant 5 (1983-1989) · Galant 6 and 7 (1987-1998) · L200 4 (2005-2014) · Outlander 1 (2003-2008) · Pajero 1 and 2 (1982-1999) · Pajero 4 (2006-2021) · Carisma (1995-2004) · Space Star (1998-2005) ·
This resource sets cookies 🍪 to avoid bothering you with repeated data entry.