



Contents: Examination ⤓ Checking the lateral and radial…⤓ Elimination of radial runout ⤓ Installing wheels on a car ⤓ Balancing and rebalancing of wheels…⤓
The cause of steering wheel vibration at certain speeds is usually wheel imbalance.
Examination
Check tire pressure and adjust if necessary.
Take a test drive, determine if possible the exact boundaries of the defect, the speed range, the condition of the road surface, turns or driving in a straight line.
Raise the car, see item 29.
Check the wheel rim alignment. The hub or brake drum should protrude from the rim hole or be at least flush with it. Otherwise, replace the wheel rim.
Check the wheel suspension. To do this, check the condition of the silent blocks, joints, shock absorbers and wheel disks.
Remove and clean the wheels. Remove stones, etc., from the tyre profile.
Make sure that there are no bald spots on the tires from braking. These are areas with a shallower profile depth that occur when braking with the wheels completely locked.
Check the profile depth of individual tires and compare them with each other. If the tires are abnormally worn at the front and/or rear, check and, if necessary, adjust the front and rear wheel alignment angles. The toe-in should be set at the upper tolerance limit.
Please note: To check the wheel alignment angles, you will need a special measuring stand, which is usually only available at service stations.
Take a test drive and check if the defect still appears.
Checking the lateral and radial runout of wheels
With the vehicle raised, apply the appropriate dial indicator first to the working surface of the tire, then to its side surface. Slowly turn the wheel by hand, read the dial indicator and mark the maximum indicator reading with chalk.
Required values:
- Maximum radial runout of 2.0 mm;
- maximum lateral runout = 2.0 mm.
If these values are not maintained, balance the wheels on a stationary balancing machine. The wheels must be centered on the machine in the same way as on the car. Conical clamping devices that center the wheel by the middle hole are not allowed. The permissible residual imbalance in both balancing planes is 5 grams.
Elimination of radial runout
Release the air from the tire and press the tire beads into the wheel rim bed.
Rotate the tire 120°.
Inflate the tire and recheck the radial runout.
If the maximum value has increased, rotate the tire on the rim another 120° and check the radial runout.
If the maximum value has not decreased, balance the wheel.
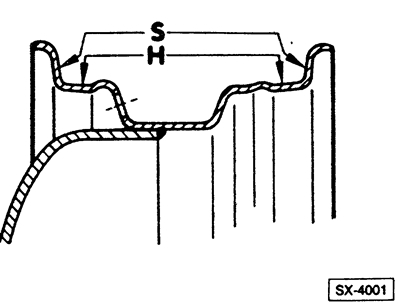
Checking radial and lateral runout
Mount the wheel disk without the tire on the balancing machine or on the car. Attach the dial indicator.
Measure the radial runout "H" and lateral runout "S" in the places indicated in the figure. In this case, point spikes in the indicator readings caused by elevations or depressions in the disk material are not taken into account.
Required values:
- H - 2.0 mm;
- S - 2.0 mm.
If the tolerance limits are exceeded, replace the wheel rim.
Installing wheels on a car
With the vehicle raised, position the wheels so that the point of maximum radial runout is at the top. In this position, cross-tighten the wheel nuts. Tightening torque see item 19.4.
Note: If the difference in wear between individual tires is small, install the wheels with the smallest radial runout and the smallest balancing weights on the front axle.
Take a test drive. If you notice an imbalance in the front of the car or vibration in the steering wheel, this is a residual imbalance and requires additional wheel balancing on the car.
Balancing and rebalancing of wheels on a car
When balancing drive wheels, be sure to mount both tires on the same axle on rollers.
The wheels must be driven by the car's engine to ensure that they rotate synchronously. All-wheel drive vehicles must be fully raised. Balance the wheels on one axle first, then on the other.
Take a test drive.
If the defect continues to appear, it means that the radial or "limping" movements of one or more wheels are too great. They cannot be measured by means of a service station. In this case, the only option is to replace the front and/or rear tires. In this case, the tires must be replaced in pairs.