



Contents: Checks and adjustments ⤓ Adjusting the Parking Brake Lever…⤓ Adjusting the Parking Brake Lever…⤓ Checking the Parking Brake Indicator…⤓ Running-in of friction liningsto ⤓
Note: On vehicles with rear drum brakes, the drum brake performs the parking brake function.
Checks and adjustments
Checking the travel of the parking brake lever
1. Pull the parking brake lever with a force of approximately 200 N and count the number of clicks until it locks.
Nominal value - 5-7 clicks
Caution: When performing the check, make sure that the force on the parking brake lever corresponds to the value specified above.
2. If the stroke of the parking brake lever does not correspond to the nominal value, make the appropriate adjustment.
Adjusting the Parking Brake Lever Stroke (Models with Rear Disc Brake and Drum Parking Brake)
1. Remove the lower part of the center console (see chapter "Body").
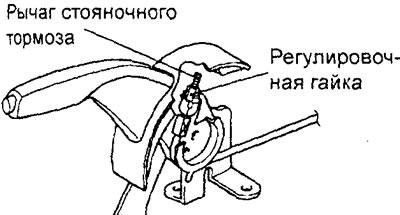
2. Loosen the tension of the parking brake cable by loosening the adjusting nut shown in the illustration.
3. Remove the rear wheels.
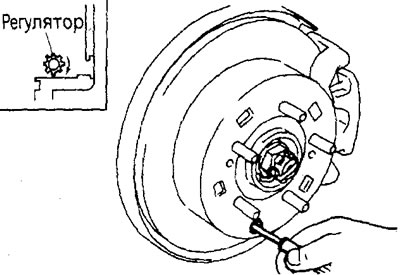
4. Remove the plug from the access hole in the rear brake support shield and, by turning the adjuster (in the direction indicated by the arrow) using a flat-head screwdriver, spread the brake pads so that the brake disc does not rotate.
5. Turn the regulator clockwise 5 clicks.
6. Turn the adjusting nut to adjust the stroke of the parking brake lever so that it is within the nominal value.
The article was obtained from this portal: mitsubishiman.ru
Caution: If the stroke of the parking brake lever is less than the nominal value and the gap between the brake shoe and the brake disc is too small, the rear brakes may grab.
7. After completing the adjustment, check that there is no gap between the adjusting nut and the parking brake lever.
8. After adjusting the parking brake lever travel, jack up the rear of the vehicle.
9. Lower the parking brake lever all the way down and, by rotating the rear wheels, make sure that the rear brakes (parking brake) do not grab.
10. Install the lower part of the center console (see chapter "Body").
Adjusting the Parking Brake Lever Stroke (Models with Rear Drum Brakes)
1. Remove the lower part of the center console (see chapter "Body").
2. Loosen the tension of the parking brake cable by loosening the adjusting nut.
3. With the engine idling, press the brake pedal hard two or three times. Make sure that the pedal travel stops changing.
Note: If the pedal travel does not change, this indicates that the automatic clearance adjustment mechanism is functioning normally and the required clearance has been set between the brake shoes and the brake drum.
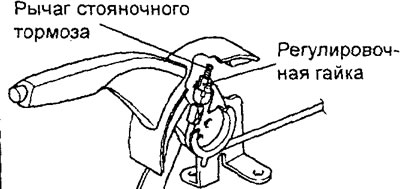
4. Turn the adjusting nut to adjust the stroke of the parking brake lever so that it is within the nominal value.
Caution: If the stroke of the parking brake lever is less than the nominal value, this will lead to an increase in the cable extension. Make sure that the lever stroke is adjusted correctly.
5. After completing the adjustment, check that there is no gap between the adjusting nut and the parking brake lever.
6. After adjusting the parking brake lever travel, raise the rear of the vehicle with a jack.
7. Lower the parking brake lever all the way down and, by rotating the rear wheels, make sure that the rear brakes (parking brake) do not grab.
8. Install the lower part of the center console (see chapter "Body").
Checking the Parking Brake Indicator Switch
1. Remove the lower part of the center console and the driver's seat (see chapter "Body").
2. Connect an ohmmeter between the switch terminal and the switch mounting bolt and measure the resistance.
3. The parking brake indicator switch is in good condition if the switch circuit is closed when the parking brake lever is raised, and if the circuit is open when the lever is lowered (lower position).
4. Install the driver's seat and the lower part of the center console into place (see chapter "Body").
Running-in of friction linings
toNote: Running-in is carried out after replacing the brake pads or brake disc, or if the parking brake does not operate reliably.
Caution: carry out the running-in of friction linings on the road, provided there is sufficient visibility and no obstacles. Take the necessary safety measures to avoid an emergency situation.
1. Adjust the stroke of the parking brake lever.
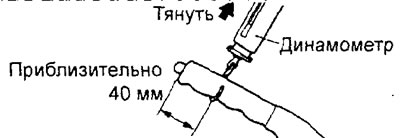
2. Attach the dynamometer to the center of the parking brake lever handle and pull the lever with a force of 100-150 N in a direction perpendicular to the lever.
3. Drive your car for about 100 meters at a constant speed of 35-50 km/h.
4. Release the parking brake lever and wait 5 to 10 minutes for the brake disc (models with rear disc brakes) or brake drum (models with rear drum brakes) to cool.
5. Repeat the procedures in paragraphs "2" - "4" four to five times.