



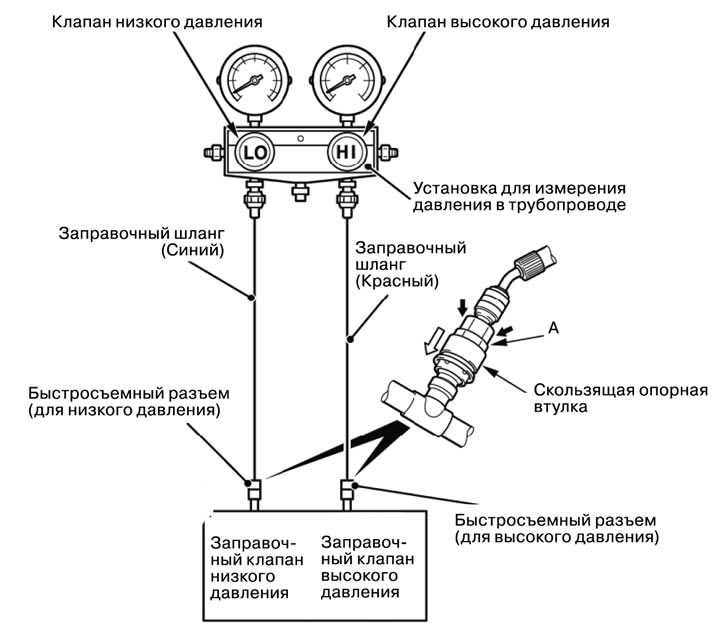
1. Unscrew the handle completely (the valve is closed), install an adaptor valve on the low pressure side of the pressure measuring unit.
2. Connect the filling hose (blue) to the adaptor valve.
3. Connect the quick-release connector (for low pressure) to the (blue) filling hose.
4. Connect the other end of the quick-release connector (for low pressure) to the low pressure filling valve.
Note: The low pressure filling valve must be connected to the suction hose.
Attention:
- Use only tools that are specifically designed for working with the R134a connector.
- When installing the quick-release connector, press firmly on place "A" opposite the filling valve until it clicks. While connecting, run your hand along the hose with pressure to check the hose for twisting and kinking.
5. Close the high and low pressure valves of the pressure measuring unit.
6. Install the vacuum pump adapter onto the vacuum pump.
7. Connect the vacuum pump connector to the vacuum pump adapter.
8. Connect the filling hose (red) to the R134a connection port of the vacuum pump adapter.
9. Tighten the adaptive valve handles (the valve is open).
10. Open the low pressure valve of the pressure measuring unit.
11. Set the vacuum pump power switch to the "ON" position.
Caution: Even if the vacuum pump power switch is set to "ON", the vacuum pump will not operate because the connection was changed during operation (7).
12. To turn on the vacuum pump, turn the vacuum pump adapter switch towards the R134a connector.
Caution: Do not turn on the compressor to pump pressure out of the system.
13. It takes approximately 10 minutes to pump down the pressure to a vacuum pressure of 100 kPa or more.
14. Set the vacuum pump adapter switch to the "OFF" position and wait for five minutes.
Caution: Do not operate the compressor in a vacuum state; otherwise it may be damaged.
15. Perform leak tests. If the negative pressure does not decrease, there is no leak.
Caution: If the negative pressure drops, tighten the connections additionally, then repeat the pumping sequence.
16. Unscrew the handle until it stops (the valve is open), connect the filling valve to the filling canister.
17. Unscrew the adaptive valve handle until it stops (the valve is closed), disconnect the valve from the pressure measuring device and connect it to the filling canister.
18. Tighten the filling valve handle (the valve is closed), to puncture the filling canister.
19. Unscrew the filling valve handle (the valve is open), then tighten the adaptive valve handle (the valve is open), to introduce refrigerant into the system.
Caution: If the filling canister is turned upside down at this point, liquid refrigerant may enter the compressor, which may be damaged by the pressure of the compressed liquid. Keep the filling canister vertical so that the refrigerant comes out in a gaseous state.
20. If the refrigerant does not flow, turn the adaptive valve handle all the way out (the valve is closed).
21. Check for gas leaks using a leak detector.
If a gas leak is detected, re-tighten the connections, then repeat the filling sequence starting with step 12.
Attention: It is necessary to use a special leak detector for the R134a connector.
22. Start the engine.
23. Turn on the air conditioner and set the lowest temperature (maximum cooling mode).
24. Set a stable engine speed of 1500 rpm.
Information copied from the website [MITSUBISHIMAN]
25. Tighten the adaptive valve handle (the valve is open), fill the system with refrigerant to the specified amount.
Caution: If the filling canister is turned upside down at this point, pressurized liquid refrigerant may enter the compressor, which may cause damage to the compressor due to the pressure of the compressed liquid. Keep the filling canister vertical so that the refrigerant comes out in a gaseous state.
26. After completing the refrigerant filling, unscrew the adaptive valve handle until it stops (the valve is closed).
27. Tighten the filling valve handle (the valve is closed).
Disconnect the quick release connector (for low pressure) from the low pressure filling valve.
Caution: If there is any liquid left in the filling canister, tighten the filling valve and adaptor valve tightly to ensure that the remaining refrigerant is preserved for further use.