
4G9 engine
Removing
1. Drain the coolant from the cooling system.
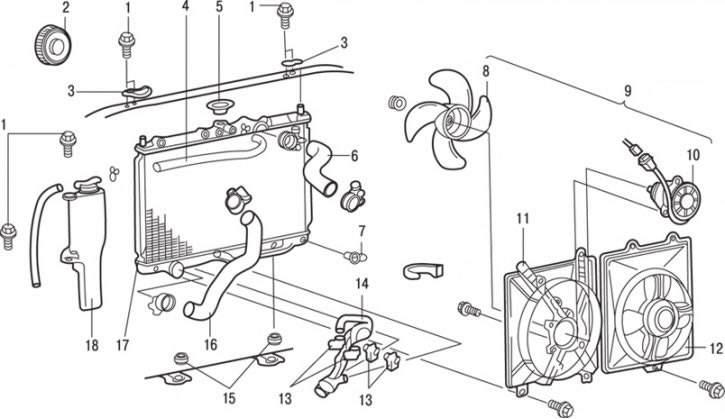
Pic. 6.15. Car radiator with 4G9 engines: 1 - bolt, 25 Nm; 2 – a protective cap of a headlight; 3 – the top support of a radiator; 4 – a hose of a broad tank; 5 - radiator cap; 6 – the top hose of a radiator; 7 - drain plug; 8 - fan; 9 - radiator fan assembly; 10 - radiator fan motor; 11 - diffuser (casing) cooling fan; 12 - condenser fan assembly (for vehicles with air conditioning); 13 - bolts, 5 Nm; 14 - ATF cooler hose (automatic transmission fluid heat exchanger); 15 - lower radiator support; 16 - lower radiator hose; 17 - radiator assembly; 18 - expansion tank
2. Remove plug 7 (pic. 6.15) drain hole.
3. Remove cover 5 of the radiator.
4. Loosen the clamp and disconnect the hose 4 of the expansion tank.
5. Remove a protective cap 2 headlights.
6. Turn out bolts and remove a broad tank 18.
7. Mark the clamp and hose before disconnecting the hose.
8. Loosen the clamp and disconnect the upper hose 6 of the radiator.
9. Mark the clamp and hose before disconnecting the hose.
10. Loosen the clamp and disconnect the bottom hose 16 of the radiator.
11. After disconnecting the hose from the radiator, it is necessary to close the holes in the hose and radiator with plugs to prevent dust or foreign particles from entering them.
12. Loosen the clamp and disconnect the ATF cooler hose (automatic transmission fluid heat exchanger) 14.
13. After disconnecting the hose from the radiator, it is necessary to close the holes in the hose and radiator with plugs to prevent dust or foreign particles from entering them.
14. Turn out bolts and remove the top support 3 radiators.
15. Remove the radiator 17 as an assembly.
16. Turn away nuts and remove the bottom support 15 of a radiator.
17. Turn out bolts and remove the fan 12 of the condenser in gathering (for vehicles with air conditioning).
18. Turn out bolts and remove the fan 9 of a radiator in gathering.
19. Turn out bolts and remove the fan 8.
20. Turn away a nut and remove the electric motor 10 fan of a radiator.
21. Check for abnormal noise when the electrically driven fan rotates.
Installation
Installation is carried out in the reverse order of removal, taking into account the following.
1. Push the hose onto the nozzle fitting until it stops.
2. Align the match marks on the clamp and hose before connecting the hose.
3. Fill the coolant into the cooling system.
4. Fill in and check up level of a working liquid in an automatic transmission.
F8QT engine
Removing
1. Drain the coolant from the cooling system.
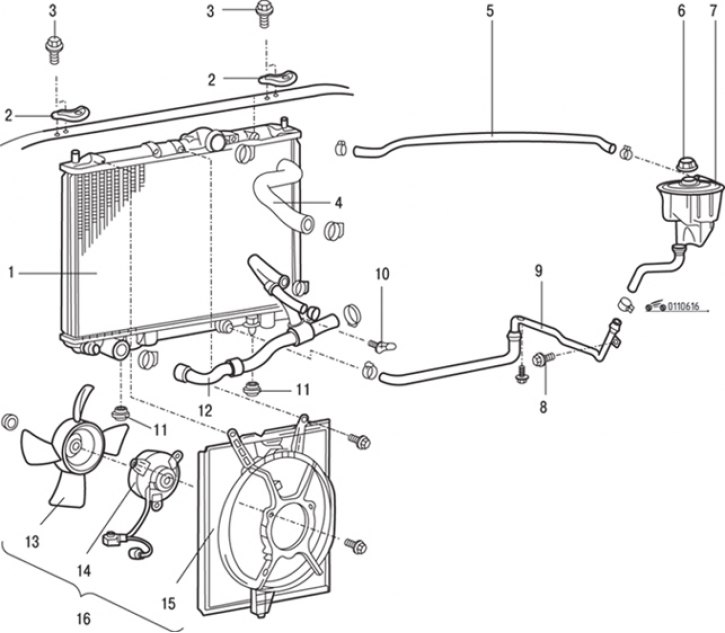
Pic. 6.16. Car radiator with F8QT engines: 1 - radiator assembly; 2 – the top support of a radiator; 3 - bolt, 25 Nm; 4 – the top hose of a radiator; 5 - hose from the radiator to the expansion tank; 6 – a cover of a broad tank; 7 - expansion tank; 8 - bolt, 10 Nm; 9 - a tube with a filter element as an assembly; 10 - drain plug; 11 - lower radiator support; 12 - lower radiator hose; 13 - fan; 14 - fan of the cooling system; 15 - casing; 16 - cooling fan assembly
2. Remove plug 10 (pic. 6.16) drain hole.
3. Remove cover 6 of the expansion tank.
4. Loosen the clamp and disconnect the hose 5 from the radiator to the expansion tank.
5. Mark the clamp and hose before disconnecting the hose.
6. Loosen the clamp and disconnect the top hose 4 of the radiator.
7. Mark the clamp and hose before disconnecting the hose.
8. Loosen the clamp and disconnect the bottom hose 12 of the radiator.
9. Loosen the clamp and disconnect the tube 9 with the filter element assembly.
10. Turn out bolts and remove a broad tank 7.
11. Turn out bolts and remove the top support 2 radiators.
12. Remove a radiator 1 in gathering.
13. Turn out bolts and remove the bottom support 11 of a radiator.
14. Turn out bolts and remove the fan 16 in gathering.
15. Turn away a nut and remove the fan 13.
16. Turn away a nut and remove the electric motor of the fan 14 of a radiator.
Examination
1. Verify that the electrically driven radiator fan rotates when power is applied to the fan leads.
2. Check for abnormal noise when the electrically driven fan rotates.
Installation
Installation is carried out in the reverse order of removal, taking into account the following.
1. Push the hose onto the nozzle fitting until it stops.
2. Combine the alignment marks applied before dismantling on hoses and collars of a radiator and connect hoses of a radiator.
3. Fill the coolant into the cooling system.
F9Q engine
Removing
1. Drain the coolant from the cooling system.
2. Remove the air filter.
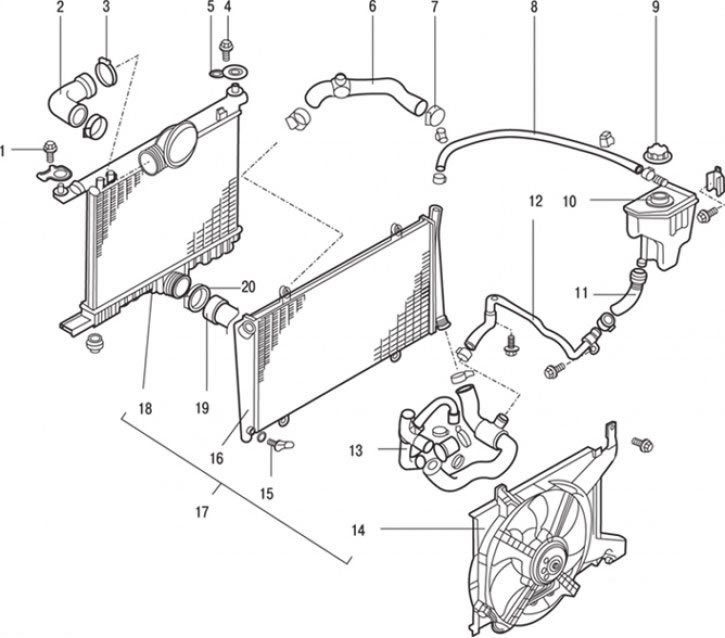
Pic. 6.17. Car radiator with F9Q engines: 1 – the top support of a radiator (left); 2 - air hose; 3 - clamp, 5.5 Nm; 4 - bolt, 25 Nm; 5 – the top support of a radiator (right); 6 – the top hose of a radiator; 7 - clamp, 4.0 Nm; 8 – a hose of a broad tank; 9 – a tight cover of a broad tank; 10 - expansion tank; 11 - filter hose assembly; 12 - filter tube assembly; 13 - lower radiator hose; 14 - radiator fan assembly; 15 - drain plug; 16 - radiator assembly; 17 - radiator fan, radiator and intercooler assembly; 18 - intermediate cooler assembly; 19 - air hose connection; 20 - clamp, 4.5 Nm
3. Unscrew plug 15 (pic. 6.17) drain hole.
4. Remove the tight cover 9 of the expansion tank.
5. Mark the clamp and hose before disconnecting the hose.
6. Loosen the clamp and disconnect the hose 8 from the radiator to the expansion tank.
7. Loosen the clamp and disconnect the air hose 2.
8. Mark the clamp and hose before disconnecting the hose.
9. Loosen the clamp and disconnect the top hose 6 of the radiator.
10. Turn out bolts and remove a broad tank 10.
11. Loosen the clamps and disconnect the hose 11 of the filter assembly.
12. Loosen the clamps and disconnect the tube 12 of the filter assembly.
13. Mark the clamp and hose before disconnecting the hose.
14. Loosen the clamp and disconnect the bottom hose 13 of the radiator.
15. Loosen the clamps and disconnect the air hose 19.
16. Turn out bolts and remove the top left support of 1 radiator.
17. Turn out bolts and remove the top right support 5 of a radiator.
18. Turn out bolts and remove the fan of a radiator, a radiator and intercooler in gathering 17.
19. Turn out bolts and remove the fan 14 of a radiator in gathering.
20. Remove the radiator 16 as an assembly.
21. Remove an intermediate cooler 18 in gathering.
Examination
1. Verify that the electrically driven radiator fan rotates when voltage is applied to the fan leads.
2. Check for abnormal noise when the electrically driven fan rotates.
Installation
Installation is carried out in the reverse order of removal, taking into account the following.
1. Push the hose onto the nozzle fitting until it stops.
2. Combine the alignment marks applied before dismantling on hoses and collars of a radiator and connect hoses of a radiator.
3. Fill the coolant into the cooling system.
4. Install the air filter.