



Cars with 4G9 engines
Removal
1. Drain the coolant from the cooling system.
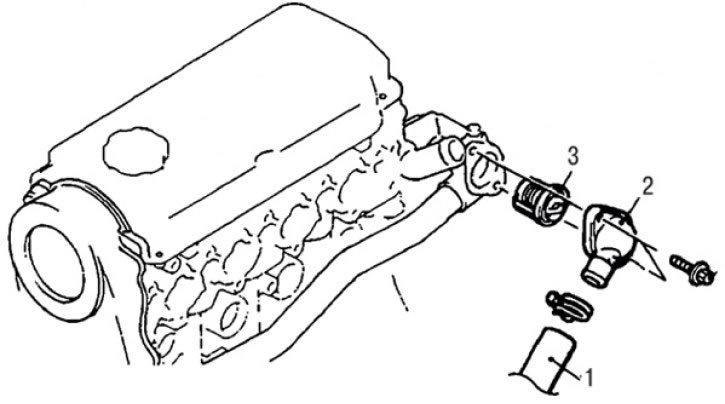
Fig. 6.4. Thermostat for cars with 4G9 engines: 1 – connection of the lower radiator hose; 2 – thermostat inlet pipe; 3 – thermostat
2. Loosen the clamp and remove the lower radiator hose 1 (Fig. 6.4).
3. Before disconnecting the lower radiator hose, make alignment marks on the hose and clamp, then disconnect the hose.
4. Unscrew the bolts and remove the thermostat inlet pipe 2.
5. Remove thermostat 3.
Examination
1. Immerse the thermostat in a vessel with water and heat the water while stirring it. Measure the temperature at which the valve begins to open, which should be 82°C.
2. Measure the valve stroke at a water temperature corresponding to its full opening; the valve stroke should be at least 8 mm.
To determine the valve stroke, measure the distance from the bottom of the valve to the thermostat housing when the thermostat is fully closed and then fully open, then calculate the valve stroke.
Installation
Installation is carried out in the reverse order of removal, taking into account the following.
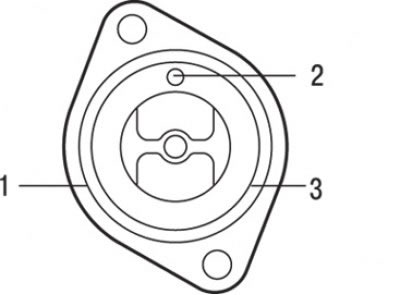
Fig. 6.5. Position of the thermostat valve: 1 – thermostat housing; 2 – air valve; 3 – rubber ring
1. Install the thermostat so that the air valve is directed strictly upwards (Fig. 6.5).
Caution! Make sure there is no oil on the thermostat sealing ring. Also, be careful not to bend or scratch the sealing ring.
2. Fit each hose all the way onto the fitting of the cooling system pipe (including the inlet).
3. Before connecting the lower radiator hose, it is necessary to align the marks made on the hose and clamp during disassembly.
4. Fill the cooling system with coolant.
Cars with diesel engines
Removal
1. Drain the coolant from the cooling system.
2. Remove the air filter.
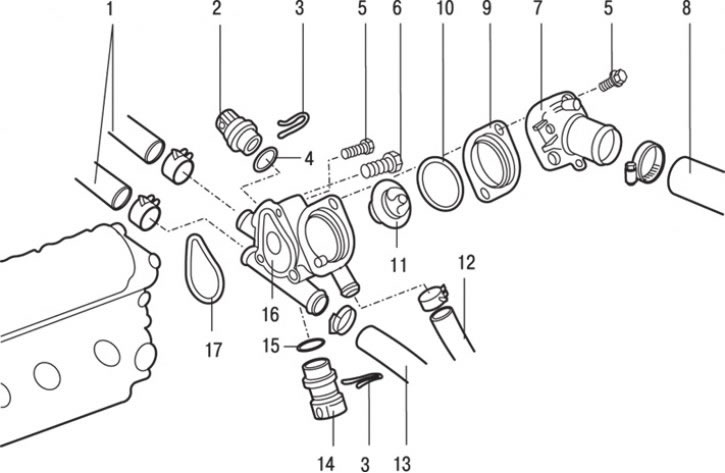
Fig. 6.6. Thermostat for cars with diesel engines: 1 – heater hose connections; 2 – coolant temperature sensor; 3 – clamp; 4 – gasket; 5 – bolt, 10 Nm; 6 – cooling system bleed screw, 0.6 Nm; 7 – cooling system inlet pipe; 8 – connection of the upper radiator hose; 9 – spacer; 10 – gasket; 11 – thermostat; 12 – connection of the lower radiator hose; 13 – Cooling system hose connection; 14 – coolant temperature sensor (on the indicator); 15 – gasket; 16 – thermostat housing; 17 – O-ring gasket
3. Loosen the clamp and remove the upper hose 8 (Fig. 6.6) of the radiator.
4. Place alignment marks on the radiator hose and clamp, then disconnect the radiator hose.
5. Unscrew the bolts and remove the inlet pipe 7 of the cooling system.
6. Remove spacer 9, gasket 10 and thermostat 11.
7. Loosen the clamp and remove hose 13 of the cooling system.
8. Loosen the clamp and remove the lower radiator hose 12.
9. Loosen the clamps and remove the heater hoses 1.
10. Unscrew the bolts and remove the thermostat housing 16.
11. Remove gasket 17.
12. Unscrew bolt 6 to remove air from the cooling system.
13. Remove clamp 3 and remove coolant temperature sensor 2 and O-ring 4.
14. Remove clamp 3 and remove coolant temperature sensor 14 (on the indicator) and gasket 15.
Examination
Checking the thermostat is carried out in the same way as for cars with 4G9 engines.
Installation
Installation is carried out in the reverse order of removal, taking into account the following.
1. Before connecting the lower radiator hose, it is necessary to align the marks made on the hose and clamp during disassembly.
2. Fill the cooling system with coolant.
3. Install the air filter.