



Contents: Removal ⤓ Installation ⤓
Removal
Warning: Fuel may spill when removing the carburetor. Fuel vapors are toxic and flammable, so ensure good ventilation of the work area. Avoid skin contact with fuel. Wear gloves. Do not light a fire. Fire hazard!
Disconnect the ground cable from the battery. Caution: This erases the data in the electronic memory, such as the engine fault memory or the radio receiver code. Disconnect the battery only with the ignition off, otherwise the fuel injection device control unit may be damaged. Before disconnecting the battery, read the instructions in the "Radio Receiver" and "Removing and Installing the Battery" sections.
Remove the air filter, see p. 6.6.
Drain the coolant, see p. 3.3.
Disconnect coolant hose "2" by first loosening the clamp and sliding it back
Disconnect the gas cable and control cable (for automatic transmission). Before doing this, mark the position of the cable sheaths at the clamps with a felt-tip pen. Note: The gas cable must not have any kinks, otherwise it will break during operation. Cables with kinks must be replaced.
Disconnect the vacuum hoses from the carburetor body and mark their installation position with adhesive tape.
Disconnect the electrical wires and mark them with tape.
Disconnect and plug the fuel supply hose. A clean screw of suitable diameter can be used for plugging.
The original article is on the website MITSUBISHIMAN.ru
Loosen the carburetor mounting screws and remove the carburetor.
Remove the intake manifold heater with carburetor gaskets.
Caution: When removing the heater, do not pull the wire harnesses from below or above and do not press too hard on the contacts.
Cover the intake manifold with a clean cloth to prevent dirt from getting into it.
Installation
Remove the rag.
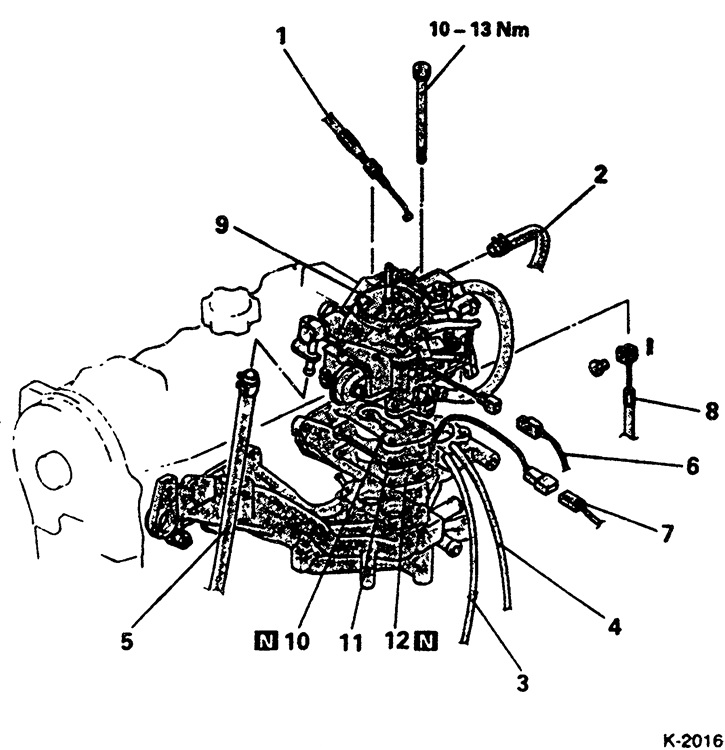
Conventional carburetor: 1 - Throttle cable; 2 - Coolant hose; 3 - Vacuum hose; 4 - Vacuum hose. Only with automatic transmission; 5 - Fuel supply hose; 6 - Fuel cut-off connector; 7 - Intake manifold heating connector; 8 - Control cable. Only with automatic transmission.; 9 - Carburetor; 10 - Gasket; 11 - intake manifold heater; 12 - Gasket
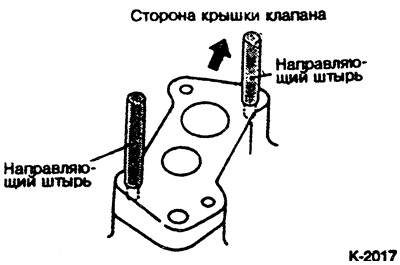
Insert 2 guide pins into 2 diagonally opposite threaded holes in the intake manifold. 2 old carburetor screws can be used as guide pins. To do this, saw off the heads and cut a slot for a narrow screwdriver. The guide pins are needed to correctly install the metal gasket "10".
Place the synthetic gasket "12" on the intake manifold through the guide pins, then the metal gasket "10" and, finally, the carburetor body "9".
Insert the carburetor mounting screws into the 2 free holes and tighten them by hand.
Unscrew the guide pins and tighten the 2 remaining carburetor mounting screws by hand.
Tighten the carburetor mounting screws crosswise with a torque of 10 Nm.
Connect the vacuum hoses to the carburetor body in accordance with the markings made during removal.
Connect the fuel hose and secure with a clamp.
Connect the gas cable and the cold start control cable. Connect the cable sheaths according to the markings made.
Connect the electrical wires.
Connect the coolant hose and secure with a clamp.
Install the air filter, see p. 6.6.
Connect the ground cable to the battery.
Fill with coolant, see p. 3.3.
If they are available, set the time on the clock and enter the security code into the radio.
Check idle speed and CO content, adjust if necessary.