



Contents: Troubleshooting automatic…⤓ Range indicator "N" ⤓ Reading diagnostic trouble codes ⤓ Clearing diagnostic trouble codes ⤓ Troubleshooting by their symptoms ⤓ No connection with the tester ⤓ Table. Automatic transmission…⤓
Troubleshooting automatic transmission
Note:
- Automatic transmission faults may be caused by improper maintenance, improper adjustment or faulty electronic transmission control system, mechanical faulty transmission, faulty hydraulic transmission control system, insufficient engine power or a combination of these faults. Therefore, before starting the inspection, it is necessary to determine the area of the fault (engine, control system or gearbox).
- Troubleshooting should begin with the simplest operations and proceed in order of increasing complexity.
1. Check for signs of automatic transmission malfunctions and the conditions under which they occur.
2. Read diagnostic trouble codes. Write down the trouble codes, and then delete the codes from the memory of the automatic transmission electronic control unit.
3. Perform basic checks and adjustments (checking tire pressure, checking the level and condition of the working fluid (ATF) in the automatic transmission, checking the automatic transmission control mechanism, etc.) for which deviations from the norm can be easily determined.
Note: Analysis of the results of checking the working fluid level:
- If the level of the working fluid in the automatic transmission is below normal, the oil pump will capture the working fluid together with air, which will lead to various malfunctions. Air bubbles that have entered the automatic transmission hydraulic system are the cause of foaming of the working fluid. This will cause unstable pressure in the hydraulic system, which in turn will lead to a delay in gear shifting (late gear engagement) and slippage of clutches or brakes, etc.
- − If the working fluid level is higher than normal, then due to the rotation of the planetary gears, abundant foaming of the working fluid will occur, which will ultimately lead to the same consequences as in the case of a low working fluid level, and will cause premature deterioration of the condition of the automatic transmission working fluid.
- In both cases, air bubbles cause overheating, oxidation of the working fluid and deposition of varnish, which disables valves, couplings and actuators. Foaming also leads to the release of working fluid through the crankcase breather of the automatic transmission, which is mistaken for leaks.
4. Perform road tests to determine whether further diagnostics of the automatic transmission are necessary.
a) Check the correct gear shifting. Check the electrical part of the control system if the gear shifting is normal.
b) Make sure that the fault is confined to the gearbox. If there is noise or vibration, possible sources may be the compressor, engine, driveshaft (4WD models), etc.
5. Read diagnostic trouble codes.
a) If fault codes are displayed when a malfunction symptom is present, refer to the subsection "Diagnostic codes and probable causes of malfunctions".
6) If there is a malfunction symptom (no malfunction codes) or if there is no malfunction symptom, it is necessary to check for the malfunction codes read before the road test. If the malfunction codes are displayed, refer to the subsection "Diagnostic codes and probable causes of malfunctions", if the malfunction codes are not displayed, refer to the subsection "Troubleshooting by their symptoms".
6. If the possible cause is a malfunction in the electronic control system of the automatic transmission, then use a tester or oscilloscope to check the input and output signals of the electronic control unit of the automatic transmission.
a) If there are incorrect input and output signals from the electronic control unit of the automatic transmission, check the wiring according to the corresponding electrical diagram.
b) If no fault is found when checking the electrical wiring, then check the individual components of the system.
7. If the signals from the electronic control system are normal or if the possible cause is a malfunction in the automatic transmission hydraulic control system, check the pressure in the automatic transmission hydraulic control system (hydraulic test). If the condition of the hydraulic system differs from normal, perform the appropriate checks and adjustments in the subsection "Troubleshooting by pressure values in the automatic transmission hydraulic control system".
8. If the pressure in the automatic transmission control hydraulic system is normal or if the possible cause is a malfunction in the main automatic transmission system (mechanical part), then check the engine and torque converter with the vehicle fully braked (stall test), identify the faulty part and perform the necessary major repairs.
9. After completing the repair, perform a road test to ensure that the problem has been corrected.
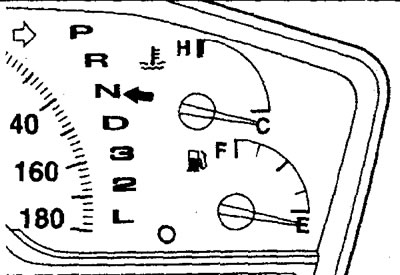
Range indicator "N"
1. If the "N" range indicator flashes at a frequency of 1 time per second (1 Hz), this means that the self-diagnosis system has detected a malfunction.
2. In this case, it is necessary to check the diagnostic trouble codes.
Note: If the "N" range indicator flashes at a frequency of 2 times per second (2 Hz), this indicates an increased temperature of the working fluid in the automatic transmission, so stop the car in a safe place and let the engine idle until the indicator goes out.
Reading diagnostic trouble codes
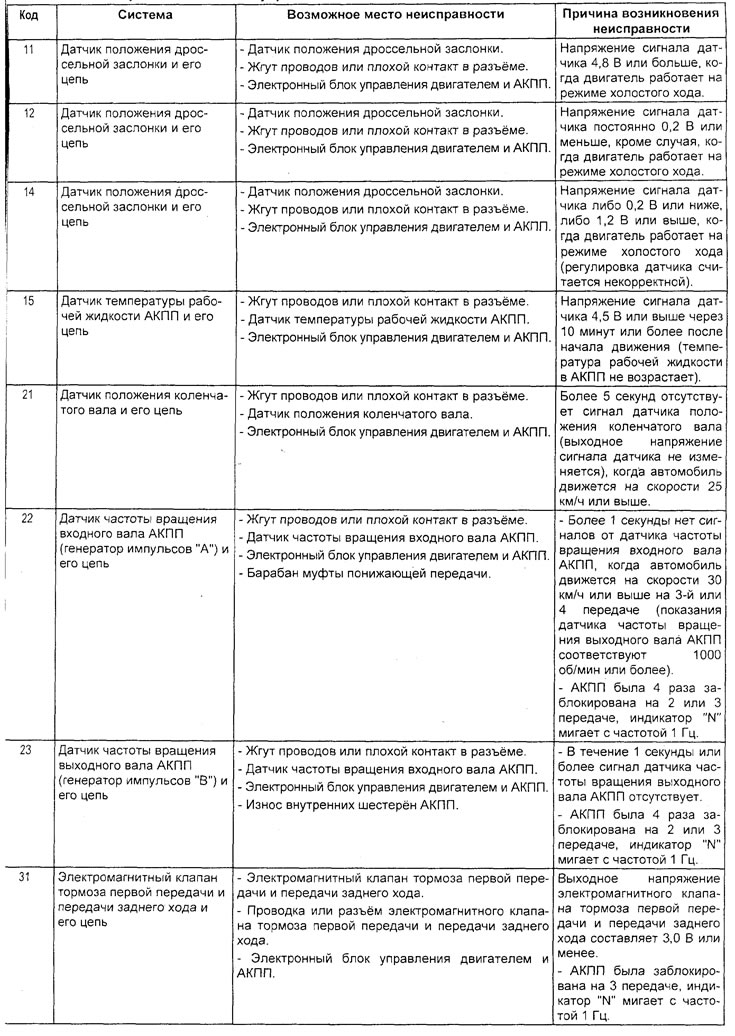
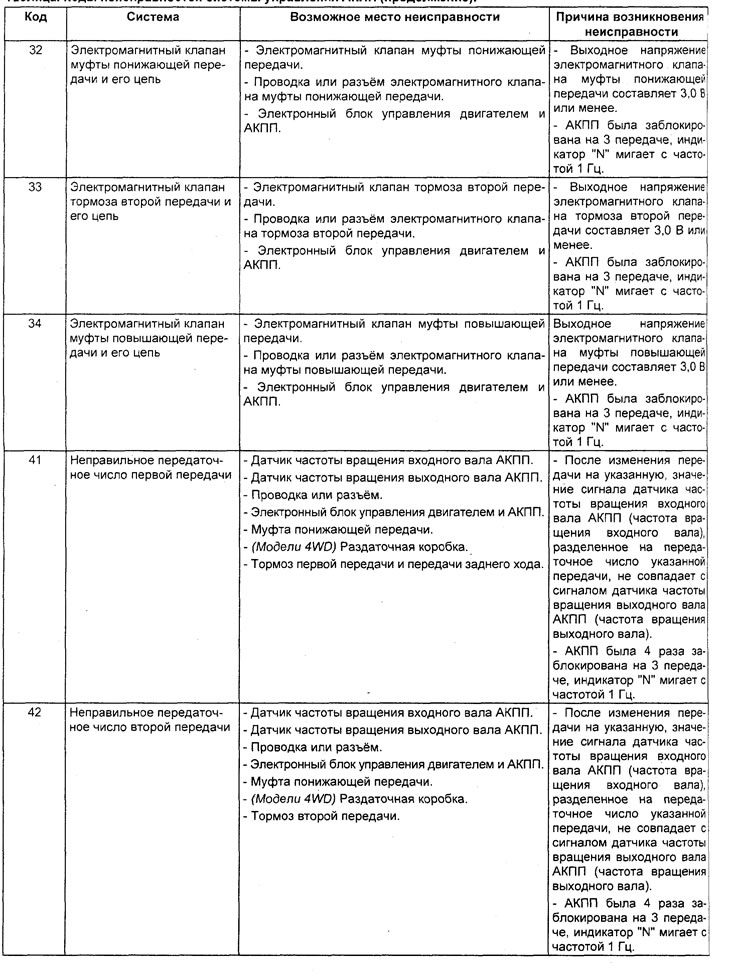
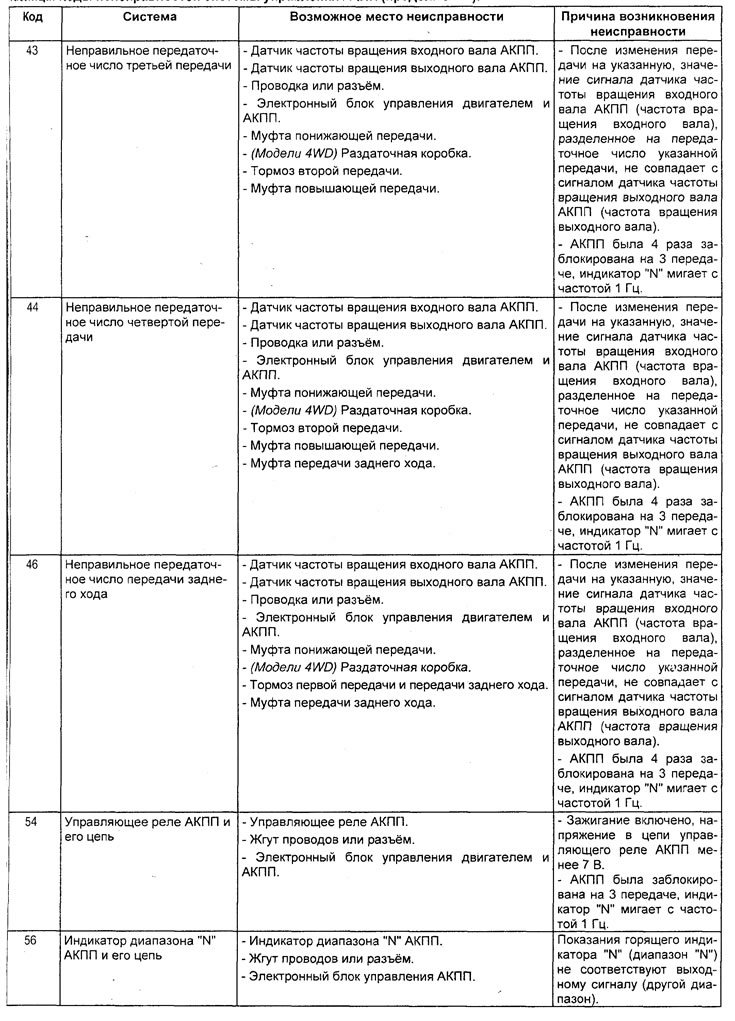
Note: To identify fault codes, use the table "Fault codes of the automatic transmission control system".
1. Prepare the vehicle for inspection as follows.
a) Make sure that the battery is in good condition, as fault detection is impossible if the battery voltage is low.
b) Turn off all additional equipment.
c) Set the automatic transmission selector to position "N".
Caution: Do not disconnect the battery until the diagnostic results have been fully read, as the fault code will be cleared from the ECU memory when the battery or ECU connector is disconnected.
2. Turn the ignition switch to the "OFF" position.
3. When checking with a tester:
a) Connect the tester to the diagnostic connector under the instrument panel.
Caution: When connecting or disconnecting the tester, the ignition must be switched off (ignition key in the "OFF" position).
b) Turn on the ignition and select the automatic transmission control system test mode on the tester.
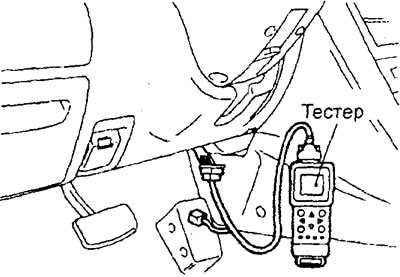
4. Reading codes without using a tester (using the "N" range indicator).
a) Use a special tool to connect to ground.
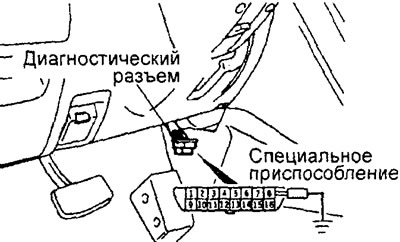
b) Turn on the ignition and read the fault codes by observing the number of flashes of the "N" range indicator on the instrument cluster.
Note:
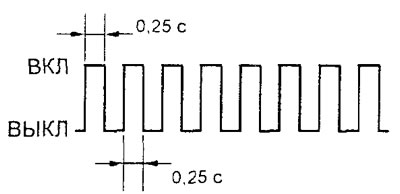
- The fault code consists of two digits, the first digit is determined by the initial series of flashes, then after a pause of 2 seconds, a second series of flashes follows, which corresponds to the second digit of the code.
- If there are two or more fault codes, the lowest code will be displayed first, followed by the others in ascending order. There will be a 3-second pause between codes.
- The figure shows an example of the output of the codes "13" and "33".
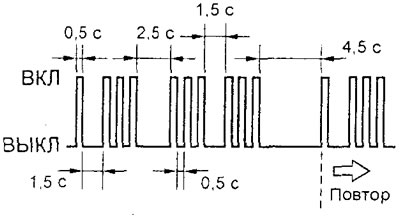
c) If there is no malfunction, the indicator will flash at 0.5 second intervals (normal status code).
5. After completing the check, turn the ignition switch to the "OFF" position and then disconnect the tester or special tools from the diagnostic connector.
Clearing diagnostic trouble codes
1. Turn the ignition switch to the "OFF" position.
2. If a tester is used, connect it to the diagnostic connector and erase the codes.
3. When the tester is not in use, disconnect the cable from the negative terminal of the battery for 10 seconds or more.
Caution: After disconnecting the wire from the negative terminal of the battery, the contents of the memory of the electronic control units of other systems will be lost.
4. After warming up the engine, let it idle for at least 15 minutes.
Troubleshooting by their symptoms
Attention:
- - Automatic transmission malfunctions can be caused by engine system malfunctions, incorrect adjustment or internal malfunction of the electronic or hydraulic transmission control systems, mechanical failure of the transmission. Therefore, ALWAYS start diagnostics with checking the level and condition of the working fluid in the automatic transmission and adjusting the control cables.
- - Checking engine systems means checking the engine management system, ignition system, fuel system, and the engine itself.
- - Checking the gearbox housing parts means checking the clutches, brakes, and internal gears of the gearbox.
- - When checking the control valve block, pay attention to the tightening torques of the bolts, damage or displacement of the sealing rings, valves and their bushings. If the damage that has occurred cannot be repaired, replace the control valve block as a whole.
- Check the torque converter for correct installation (no skewing, etc.) and damage to the splines. If the splines are damaged and repair is not possible, replace the torque converter.
No connection with the tester
Unable to establish connection with tester.
Possible causes of the malfunction:
- - diagnostic line failure,
- - wiring or connector fault,
- - tester malfunction,
- - malfunction of the electronic control unit of the engine and automatic transmission.
Engine cannot start
The engine cannot be started when the automatic transmission selector is in position "P" or "N".
Possible causes of the malfunction:
- - malfunction of the start inhibit switch,
- - malfunction in engine systems,
- - torque converter malfunction,
- - malfunction of the electronic control unit of the engine and automatic transmission, - malfunction of the oil pump.
It is impossible to move forward
When the automatic transmission selector is moved from position "N" to "D", "3", "2", "L", the car does not move forward (with the engine idling).
Possible causes of the malfunction:
- - inadequate pressure in the main line,
- - malfunction of the electromagnetic valve controlling the downshift clutch,
- - failure of the downshift clutch,
- - malfunction of the control solenoid valve unit,
- - malfunction of the electronic control unit of the engine and automatic transmission.
Unable to move in reverse gear
When the automatic transmission selector is moved from "N" to "R", the car does not move backwards (with the engine idling).
Possible causes of the malfunction:
- - insufficient pressure in the reverse clutch line,
- - insufficient pressure in the brake line of the first gear and reverse gear,
- - malfunction of the electromagnetic valve of the first gear and reverse gear brake,
- - reverse gear clutch malfunction,
- - malfunction of the first gear brake and reverse gear, - malfunction of the control valve unit,
- - malfunction of the electronic control unit of the engine and automatic transmission.
It is impossible to move forward or in reverse gear
When the automatic transmission selector is moved from "N" to any other position, the car does not move (with the engine idling).
Possible causes of the malfunction:
- inadequate pressure in the main line, - malfunction of the mechanical part of the automatic transmission,
- - oil pump malfunction, - control valve block malfunction,
- malfunction of the electronic control unit of the engine and automatic transmission.
The engine stalls when the selector is moved to the drive position ("N" → "D" or "N" → "R")
When the automatic transmission selector is moved from "N" to "R" or "D", the car does not move (with the engine idling).
Possible causes of the malfunction:
- a) malfunction in engine systems,
- c) malfunction of the control solenoid valve unit,
- d) malfunction of the torque converter lock-up clutch.
Long shift times only when moving forward
There are jolts or a delay in gear engagement when moving the automatic transmission selector from "N" to "D" of 2 seconds or more (with the engine idling).
Possible causes of the malfunction:
- incorrect pressure in the downshift clutch line,
- malfunction of the electromagnetic valve controlling the downshift clutch,
- downshift clutch failure,
- control valve block malfunction,
- throttle position sensor malfunction,
- malfunction of the electronic control unit of the engine and automatic transmission.
Long shift times only when driving in reverse gear
There are jolts or a delay in gear engagement when moving the automatic transmission selector from "N" to "R" of 2 seconds or more (with the engine idling).
Possible causes of the malfunction:
- - insufficient pressure in the reverse clutch line,
- insufficient pressure in the brake line of the first gear and reverse gear, - malfunction of the electromagnetic valve controlling the brake of the first gear and reverse gear,
- reverse gear clutch malfunction,
- - malfunction of the first gear brake and reverse gear. - malfunction of the control valve unit,
- - malfunction of the fully closed throttle position sensor-switch, - malfunction of the electronic control unit of the engine and automatic transmission.
Table. Automatic transmission control system error codes.
Long shift times when moving forward and in reverse gear
There is a jolt or delay in gear engagement when moving the automatic transmission selector from "N" to "R". Or from "N" to "D" is 2 seconds or more (with the engine idling).
Possible causes of the malfunction:
- inadequate pressure in the main line,
- - oil pump malfunction, - control valve block malfunction,
- - malfunction of the electronic control unit of the engine and automatic transmission.
When changing gears, strong shocks (jolts) are felt
Each upshift or downshift is accompanied by jolts (impacts), and when trying to increase speed, a lack of connection (interaction) between the engine and the automatic transmission is felt.
Possible causes of the malfunction:
- - inadequate pressure in the main line,
- - malfunction of electromagnetic valves,
- - oil pump malfunction, - control valve block malfunction,
- - malfunction of brakes and clutches, - malfunction of the electronic control unit of the engine and automatic transmission.
Incorrect shift points for all gears
When the car is moving, all gear shift points are shifted.
Possible causes of the malfunction:
- - malfunction of the pulse generator "B" (automatic transmission output shaft speed sensor), - malfunction of the throttle position sensor,
- - malfunction of electromagnetic valves,
- - inadequate pressure in the main line,
- - malfunction of the control solenoid valve unit,
- - malfunction of the electronic control unit of the automatic transmission.
Incorrect shifting points for some gears
When the vehicle is moving, some gear shift points are shifted. This is not a malfunction when switching from one operating mode to another.
Possible causes of the malfunction:
- - malfunction of the control solenoid valve unit,
- - malfunction of the electronic control unit of the automatic transmission.
No gear shifting, no diagnostic trouble codes
There are no gear shifts while driving and no diagnostic trouble codes are present.
Causes of malfunction:
- - malfunction of the starter interlock switch.
- - malfunction of the electronic control unit of the automatic transmission.
Poor acceleration (throttle response) only when moving forward
There is no acceleration or deceleration of movement during movement.
Possible causes of the malfunction:
- malfunction in engine systems,
- - failure of clutches and brakes, - failure of the electronic control unit of the automatic transmission.
Vibration
Vibration occurs when driving at a constant speed, accelerating or decelerating.
Possible causes of the malfunction:
- - malfunction in engine systems,
- - torque converter malfunction,
- - malfunction of the control solenoid valve unit,
- - malfunction of the electronic control unit of the automatic transmission.
Defective start inhibit switch or its circuit
Possible causes of the malfunction:
- - malfunction of the start inhibit switch,
- - ignition switch malfunction,
- - faulty connectors or wiring,
- - malfunction of the electronic control unit of the automatic transmission.
Vehicle speed sensor or its circuit defective
Possible causes of the malfunction:
- - Malfunction of the automatic transmission output shaft speed sensor.
- - Instrument cluster malfunction.
- - Faulty connectors or wiring.
- - Malfunction of the electronic control unit of the engine and automatic transmission.
Defective dual refrigerant pressure switch or its circuit
Possible causes of the malfunction:
- - Malfunction of the dual refrigerant pressure switch.
- - Faulty connectors or wiring.
- - Malfunction of the electronic control unit of the engine and automatic transmission.
Checks on the connector of the electronic control unit of the engine and automatic transmission
Note:
- - If any deviation from the nominal value is detected, check the corresponding sensor, actuator and wires.
- - After repairing or replacing a unit, recheck to ensure that the fault has been corrected.
- - Follow the table "Checking the voltage at the terminals of the electronic control unit of the automatic transmission"
1. Disconnect the control unit connector and connect the test lead harness between the connectors or use the voltmeter needle probes to test at the connector on the harness side.
Caution: A short circuit of the positive voltmeter probe connected to the connector terminal to ground may cause damage to the wiring, sensor, electronic control unit, or all of the above.
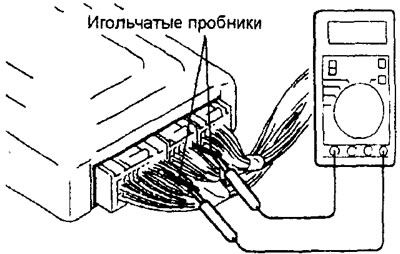
2. With the control unit connector connected, measure the voltage between the control unit ground terminals and each corresponding terminal of the control unit connector.