



Contents: Gear selector position indicators ⤓ Rules for using the range selector…⤓ Lever positions ⤓ AT operating mode switch ⤓ Maximum permissible vehicle speeds…⤓ Overtaking ⤓ Short stop ⤓
The vehicles are equipped with a four-speed hydromechanical automatic transmission with a locking torque converter and an electronic-hydraulic control system. The transmission control system ensures timely and smooth switching of all forward gears. Locking the torque converter improves the fuel efficiency of the vehicle. Subjectively, engaging the locking clutch of the torque converter is similar to the usual gear shifting.
The transmission is equipped with an electronic control system that ensures optimal gear shifting to suit any driving conditions and road surface conditions.
When the vehicle is moving uphill, the ability to shift the transmission to a higher gear is automatically blocked if the control unit determines that the power unit will not ensure further movement of the vehicle at the same speed.
On steep descents, the control unit can automatically shift the transmission to a lower gear, which increases the efficiency of engine braking of the vehicle and reduces the wear rate of the brake mechanisms.
Attention! If automatic transmission downshifting does not occur when driving downhill, the driver must ensure this shifting is done independently!
Gear selector position indicators
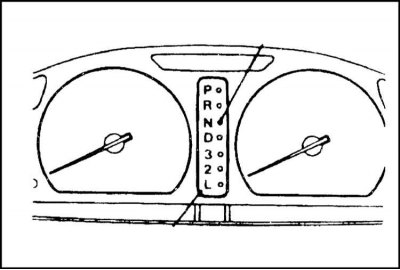
The instrument cluster of models equipped with an automatic transmission includes additional indicator lamps, allowing the driver to easily monitor the position of the AT range selector.
Flashing of the transmission neutral position indicator lamp (N) indicates a malfunction of the AT.
Flashing of the N indicator lamp at a high frequency with the selector lever in position "D", "3", "2" or "L" indicates ATF overheating. The vehicle should be parked in a safe place without turning off the engine, shift the transmission to position "P", then open the hood and let the engine run for some time at idle speed. If after performing this procedure, shifting the lever to any of the specified positions does not trigger the N indicator lamp, you can continue driving, otherwise the vehicle should be driven to the nearest Mitsubishi service station to check the condition of the AT.
Rules for using the range selector lever
The transmission range selector lever can be in one of seven fixed positions. When starting the engine, the lever must be in the "P" or "N" position only. If the car is stopped when one of the "D", "3", "2", "L", "R", or "N" ranges is engaged in the automatic transmission, then it is necessary to fully release the gas pedal and press the brake pedal to reliably brake the car.
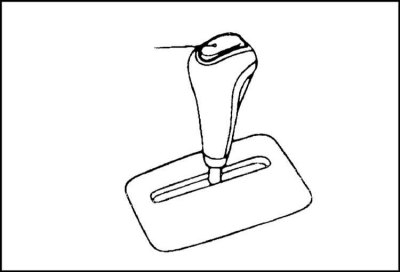
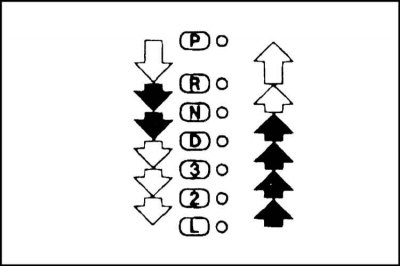
There is a lock button on the top of the handle to prevent the lever from being accidentally moved to an unacceptable position. The rules for using the lock button are shown in the illustration. When moving the selector lever from the "N" position to any of the driving positions, be sure to press the foot brake pedal.
White arrows indicate switches that require pressing the lock button.
Black arrows indicate switching that does not require pressing the lock button.
 |  |
Lever positions
Position "P". In this position of the range selector lever, the secondary shaft of the transmission is mechanically locked. Always move the range selector lever to the "P" position when turning off or starting the engine. In order to move the range selector lever out of the "P" position, it is necessary to depress the brake pedal, having previously released the gas pedal. Move the range selector lever to the right and move it out of the "P" position.
If after performing all the above steps you still cannot move the lever out of the "P" position, you need to unlock it (see below).
To avoid damage to the automatic transmission, move the lever to the "P" position only after the vehicle has come to a complete stop.
Note: Removing the key from the ignition switch becomes possible only after the selector lever is moved to the "P" position.
Position "R". The techniques for operating the range selector lever when moving it to position "R" (Reverse) from position "P" are described above. Only move the lever to position "R" from position "N" (Neutral) after the vehicle has come to a complete stop.
The automatic transmission is equipped with a special safety device that prevents the lever from accidentally moving to the "R" position if the vehicle speed exceeds 10÷12 km/h.
If reverse gear does not engage after the vehicle has come to a complete stop, depress the brake pedal and slowly move the range selector lever first to the "N" position, then to the "R" position.
If the safety device is faulty, or if the battery is disconnected from the vehicle electrical system or discharged, it is impossible to engage the reverse range. In this case, it is necessary to remove the reverse range engagement lock (see below).
Position "N". Use the "N" (Neutral) position when starting a stalled engine while the vehicle is moving and when briefly stopping the vehicle with the engine running. If you need to leave the vehicle for any reason, first move the range selector lever to the "P" (Park) position. When moving the lever from the "N" position, depress the foot brake pedal.
Position "D". This position is used in most cases when driving in unloaded urban conditions and when driving on highways. In this position, the transmission uses the full range of forward gears, and in appropriate situations, the engine braking mode is automatically activated.
Position "3". When the range selector lever is moved to position "3", the automatic transmission functions similarly to the case of range "D". The difference is that the transition to fourth gear is excluded. Range "D3" is recommended for towing a trailer in hilly terrain or for engine braking on a steep descent. Engaging range "3" is also useful for eliminating unnecessary cyclic shifts of the automatic transmission between third and fourth gears. Such cyclic shifts of the gearbox can be observed, for example, when driving in dense traffic with frequent slowdowns and stops of the car.
To accelerate the car sharply when the gearbox is in the "D" or "3" range, press the gas pedal all the way down. The gearbox will automatically shift to the next lower gear. If the car's speed is low, the gearbox may immediately shift down two gears.
Position "2". When range "2" is engaged, the automatic transmission will constantly operate in second gear. When the vehicle stops, the gearbox does not shift to first gear. Constant engagement of second gear ensures good traction dynamics of the vehicle on climbs and the possibility of intensive engine braking on steep descents. Range "2" is recommended to be engaged when starting off on slippery road surfaces, as well as when driving in deep snow. This helps prevent severe slippage of the vehicle's drive wheels.
When the "2" range is engaged while the vehicle is moving, the engagement of the second gear in the transmission is automatically delayed and occurs only after the vehicle speed has decreased to a safe level at which the engine crankshaft speed does not exceed the maximum permissible value.
Position "1". When range "1" is engaged, the automatic transmission will constantly operate in first gear. If range "1" is engaged at a speed of over 50 km/h, the transmission will first switch to second gear. Engaging the intermediate stage allows you to avoid sudden and unexpected engine braking.
AT operating mode switch
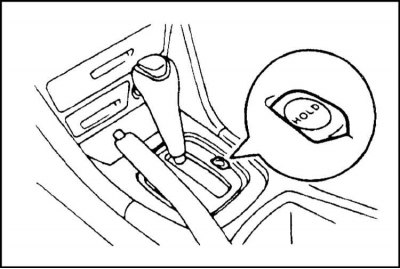 | 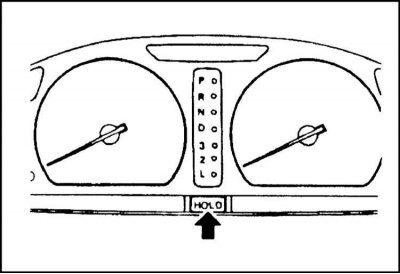 |
The automatic transmissions used in the Mitsubishi models under consideration have two operating modes: "AUTO" and "HOLD". The first of these is the main one and is activated by default. To activate the "HOLD" mode, you should press a special button located to the right of the selector lever. Return to the "AUTO" position by pressing the same button again.
The "AUTO" mode is intended for normal vehicle operation conditions. In this mode, the car moves in an economical mode with moderate pressing of the gas pedal and switches to the high-power mode with full pressing of the pedal.
The "HOLD" mode should be selected to perform a smooth start of the car when starting to move on a slippery road surface. In this case, if you start moving by moving the lever to a position other than the "L" position, the second gear is immediately engaged. Upon reaching a speed of 30-60 km / h (19-37 mph), the transmission will switch to the maximum gear for the selected range, which allows you to use the selector lever in the imitation mode of a manual transmission, with the only difference that when the gas pedal is fully depressed, the transmission will automatically switch to a lower gear (kickdown).
Maximum permissible vehicle speeds in different gear ranges
The Specifications provide the maximum permissible speeds of the vehicle when engaging various ranges of the automatic transmission. When the values specified in the Specifications are exceeded, the tachometer needle enters the red zone of the scale, indicating that the permissible engine speed has been exceeded. At the same time, the electronic unit of the engine control system begins to limit the crankshaft speed, reducing the fuel supply, which can be felt by a change in the engine operating mode. The engine operation returns to normal as soon as the tachometer needle leaves the red zone of the scale.
To avoid engine damage, before changing gears, make sure that the tachometer needle does not go beyond the maximum permissible speed in this gear and is not in the red zone of the scale.
Overtaking
When overtaking, when the gas pedal is pressed to the floor, the transmission automatically switches to the gear closest to the currently selected lower gear (from 4th to 3rd, from 3rd to 2nd, from 2nd to 1st) - there is no need to shift the selector lever in this case.
Short stop
During short stops, such as at a traffic light, you can leave the transmission in gear while holding the car with the brakes.
For longer stops with the engine running, move the selector lever to the "N" position - before starting to move, do not forget to move the lever to the "D" position.
When stopping briefly on an uphill slope, do not hold the vehicle still using the accelerator; use the foot brake or parking brake.
Avoid depressing the accelerator pedal when braking - if the selector lever is not in the "N" or "P" position, this may result in unexpected acceleration.