



Gearbox and transfer case for cars produced in 1992-98.
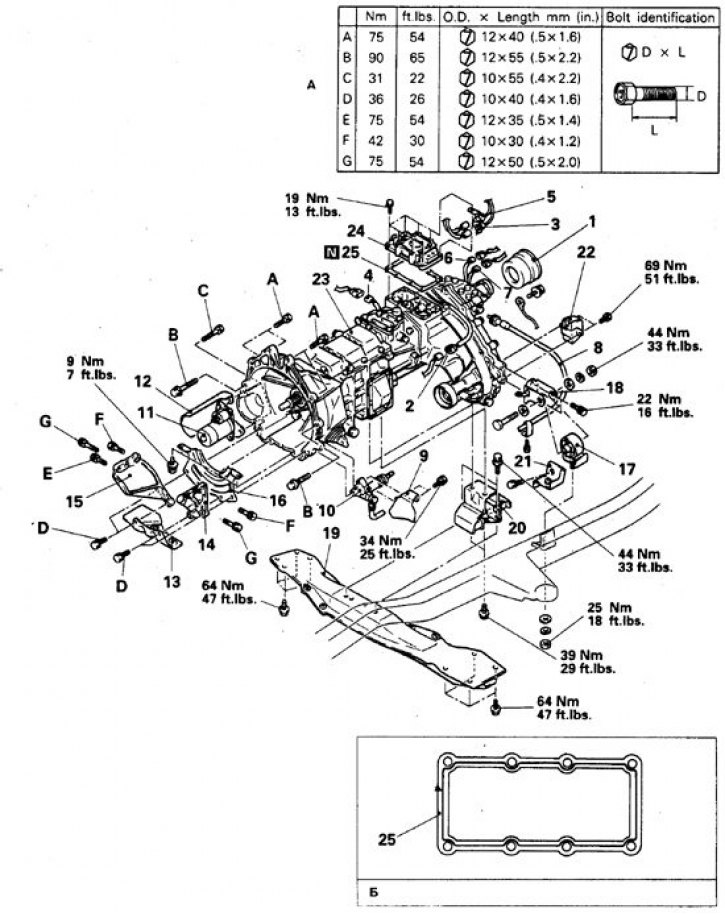
N – the part must be replaced during disassembly and assembly; 1. Casing (cover); 2–6. Connectors; 7. Front drive axle disengagement sensor; 8. Speedometer cable; 9, 12, 13. Shield; 10. Master cylinder; 11. Starter; 14, 15. Side bracket; 16. Clutch housing cover; 17. Gearbox support torsion bar; 18. Bracket; 19. 2nd crossbar; 20. Rear engine mount cushion; 21. Transfer case shield bracket; 22. Damper; 23. Gearbox with transfer case; 24. Gearbox control lever housing; 25. Gasket; a. Dimensions and threads of bolts indicated by letters A, B, etc.
Removal and installation
Cars 1983-89.
1. Move the gearshift lever to neutral position.
2. Remove the gearshift lever and close the hole.
3. Disconnect the battery from ground and raise the vehicle.
4. Mark the position of the cardan shaft flanges and disconnect the shafts from the gearbox.
5. Mark and disconnect all cables and wires from the gearbox housing, disconnect the wires from the starter.
6. Slightly raise the engine by supporting it with a jack on the pallet through a wooden block.
7. Remove the transfer case.
8. Remove the starter.
9. Support the gearbox with a trolley and jack.
10. First unscrew the clutch housing bolts, then the cross member mounting bolts and nuts, remove the cross member and the cross member mounting parts.
11. Lower the engine jack slightly and disconnect the gearbox from the engine by moving the trolley so that the gearbox input shaft comes out of the clutch.
12. Installation is carried out in reverse order.
13. Tighten the connections to the following torques: clutch housing bolts – 49 N·m, starter nuts – 27 N·m, transfer case bolts – 12 N·m.
Cars 1990-98.
1. Move the gearshift lever to neutral position.
2. Remove the gearshift lever and close the hole.
3. Disconnect the battery from ground and raise the vehicle.
4. Remove the transfer case shield.
5. Remove the front exhaust pipe.
6. Drain the oil from the gearbox.
7. Mark the position of the cardan shaft flanges and disconnect the shafts from the gearbox.
8. Remove the cover from the gearbox tailpiece.
9. Mark and disconnect all cables and wires from the gearbox housing.
10. Remove the clutch master cylinder shield, remove the cylinder, move it to the side and secure it.
11. Remove the starter.
12. Slightly raise the engine by supporting it with a jack on the pallet through a wooden block.
13. Support the gearbox with a trolley and jack.
14. Disconnect the side brackets from the gearbox housing.
15. Remove the lower clutch housing cover.
16. Remove the transfer case bracket.
17. First, unscrew the bolts securing the gearbox to the crossmember, lift the gearbox by 6 mm and remove the crossmember.
18. Remove the gearbox with the transfer case.
19. To do this, unscrew the bolts and move the gearbox slightly towards the rear of the car, moving the trolley.
20. Lower and remove the gearbox by slightly tilting the front part and pushing it forward so as not to touch the rear outer cross member.
21. Installation is carried out in reverse order.
22. When installing the gearbox on the engine, align the holes with the guide pins by tilting the engine slightly.
23. Tighten the connections to the required torques.