



Contents: Removal ⤓ Installation ⤓
Removal
1. Remove the floor console assembly.
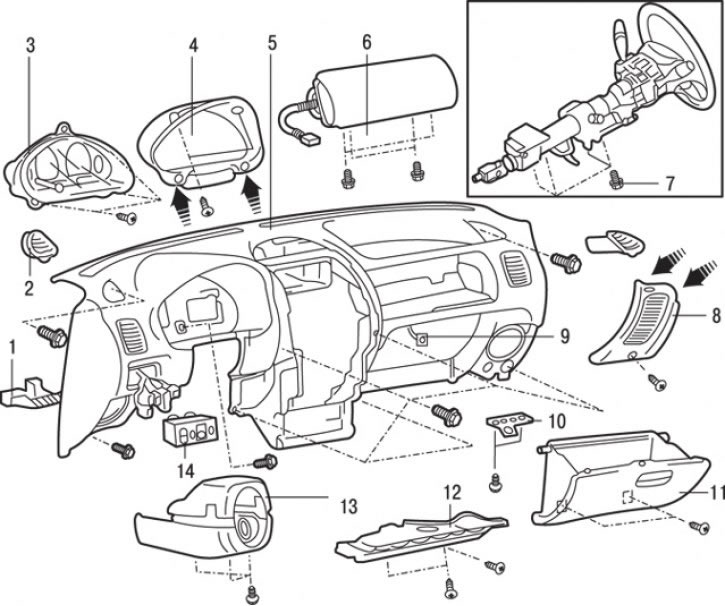
Fig. 17.55. Instrument panel: 1 – wiring connectors; 2 – side window heating grille; 3 – instrument cluster; 4 – instrument cluster bezel; 5 – instrument panel assembly; 6 – Front passenger airbag module assembly; 7 – steering column mounting bolt (25 Nm); 8 - corner panel; 9 – photocell connector; 10 – glove box limiter; 11 – storage box; 12 – bottom cover; 13 – steering column trim covers; 14 – switches on the instrument panel
2. Unscrew the three screws, release the three latches and remove the steering column trim covers 13 (Fig. 17.55).
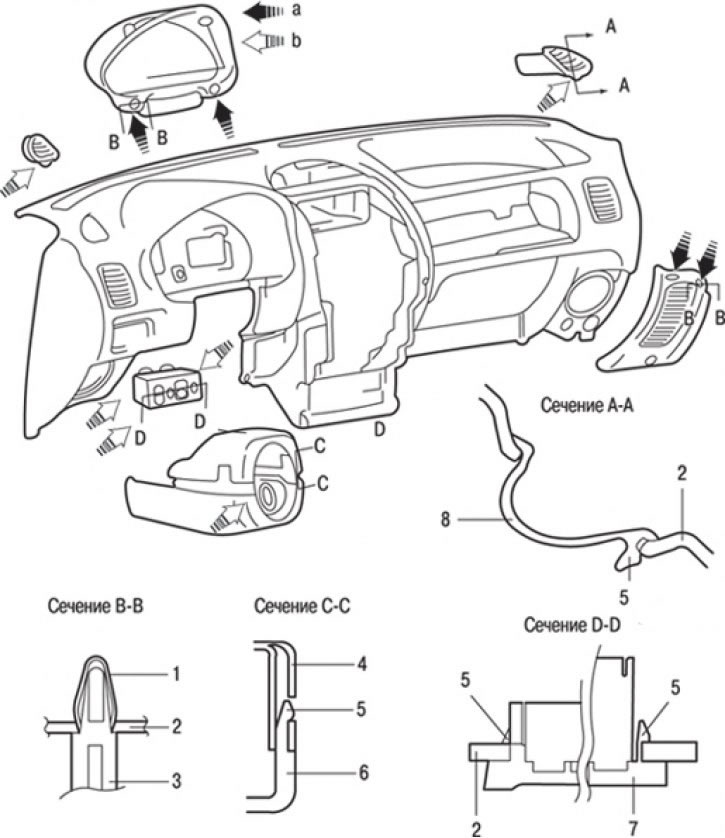
Fig. 17.56. Locations of fasteners (a) and latches (b): 1 – retainer; 2 – instrument panel; 3 – Instrument panel bezel and corner panel; 4 – Upper steering column cover; 5 – latch; 6 – lower steering column cover; 7 – switch on the instrument panel; 8 – Windshield deflector grille
3. Unscrew the two screws, release the two latches (Fig. 17.56) and remove the bezel 4 (see Fig. 17.55) of the instrument cluster.
4. Remove the three screws, remove the instrument cluster 3 and disconnect the electrical connectors and the speedometer cable.
5. Using a screwdriver blade as a lever, remove switches 14 from the instrument panel.
6. Loosen the screws and remove the bottom cover 12.
7. Unscrew the two screws and remove the glove box 11.
8. Unscrew the two screws and remove the glove compartment limiter 10.
9. Remove the screw, then use the blade of a screwdriver as a lever to remove the clips and remove the corner panel 8.
10. Using a screwdriver blade as a lever, remove the clips and remove the side window heating grilles 2.
11. Remove the three screws, disconnect the electrical connectors and remove the airbag module 6 assembly.
12. Unscrew the four bolts 7 securing the steering column and lower it onto the seat.
13. Disconnect connector 9 of the photocell.
The text of the article was obtained from the website MitsubishiMan.ru
14. Disconnect the connectors of 1 wiring.
15. Loosen the mounting screws in the central and side parts and remove the instrument panel 5 as an assembly.
Installation
Installation is carried out in the reverse order of removal.
Install the floor console assembly.