
Disassembly
For disassembly, follow the steps below.
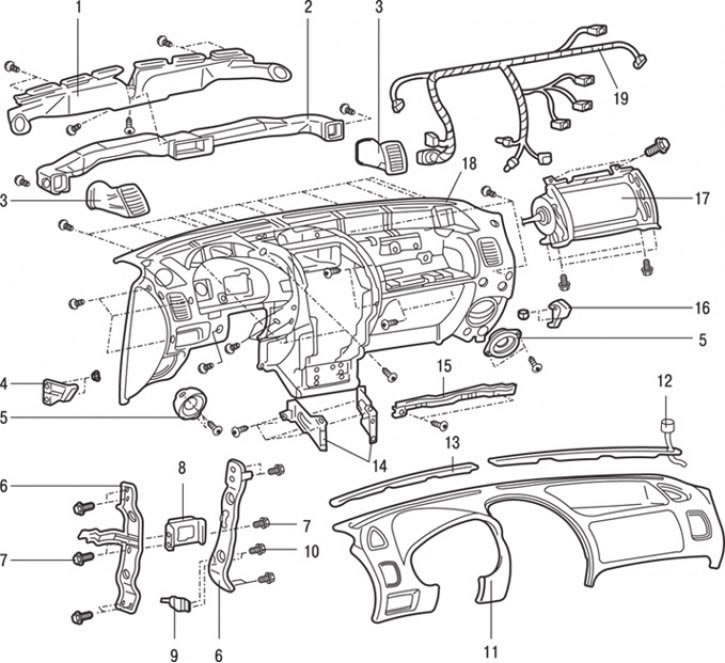
Pic. 17.57. Dashboard details: 1 – a deflector of heating of a windshield; 2 - distribution duct; 3 - outlet pipe for heating the side glass; 4 - lower side bracket on the driver's side; 5 - speaker; 6 – the central amplifier of the panel of devices; 7 - bolt (5 Nm); 8 - cruise control control unit and bracket assembly; 9 - engine control relay; 10 - bolt (2.5 Nm); 11 - overlay of the instrument panel; 12 - photocell; 13 – overlay of heating of a windshield; 14 - reinforcement of the instrument panel; 15 - glove box frame; 16 - lower side bracket on the passenger side; 17 - airbag module; 18 - instrument panel; 19 – a plait of wires of the panel of devices
1. Remove the screws, disconnect the electrical connectors and remove the speakers 5 (pic. 17.57).
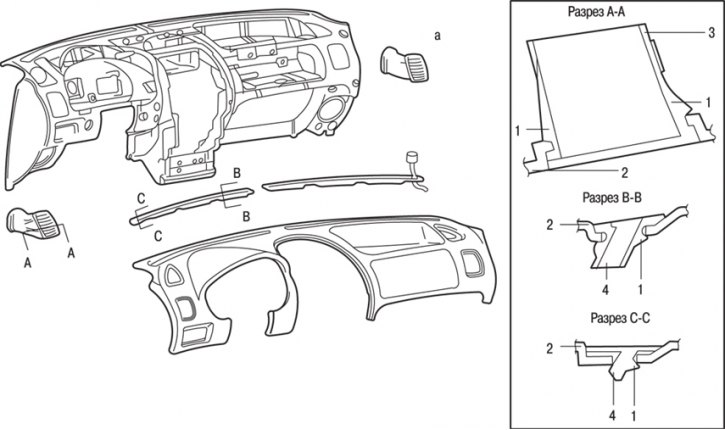
Pic. 17.58. Latches location (A) instrument panels: 1 - latch; 2 - instrument panel; 3 - side deflector; 4 – a pad of a deflector of heating of a windshield
2. Using the blade of the screwdriver as a lever, pry out the latches (pic. 17.58) and remove the outlet pipes 3 (see fig. 17.57) heated side windows from the instrument panel.
3. Turn away screws and remove strengthening 14 of the panel of devices.
4. Turn away screws and remove a frame 15 of a ware box.
5. Remove photocell 12.
6. Using the blade of a screwdriver as a lever, remove the overlay 13 for heating the windshield.
7. Turn away screws and remove an overlay 11 of the panel of devices.
8. Using a screwdriver blade as a lever, remove the windshield heating deflectors 1.
9. Turn away screws and remove a distributive air duct 2.
10. Remove a plait of 19 wires of the panel of devices.
11. Turn away six screws, disconnect an electric socket and remove the airbag module 17.
12. Remove the screws and remove the cruise control control unit and bracket assembly 8.
13. Turn away the screw and remove the relay 9 of management of the engine.
14. Turn away screws and remove the central amplifier 6 of the panel of devices.
15. Turn away nuts and remove the bottom lateral arm 4 from outside the driver.
16. Turn away nuts and remove the bottom lateral arm 16 from outside of the passenger.
Assembly
Assembly is carried out in the reverse order of disassembly.