



Caution! First drain the fluid from the clutch hydraulic drive.
Clutch master cylinder
Removal
To remove the clutch master cylinder, perform the following operations in sequence.
1. Remove the battery and oil pan.
2. Remove the intercooler fan tube.
3. Remove the air filter.
4. Remove the transmission mount and transmission mount brackets.
(The text of the article was taken from the website MitsubishiMan.ru)
5. Remove the fuel filter.
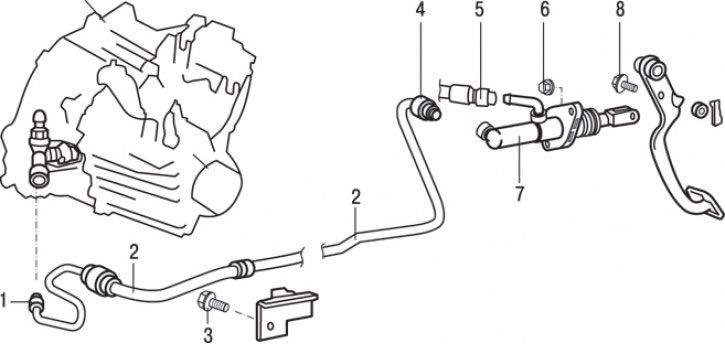
Fig. 10.8. Location of hydraulic clutch control units on vehicles with diesel engines: 1 – connection of the clutch hydraulic tube with the working cylinder; 2 – clutch hydraulic drive pipe; 3 – bolt (20 Nm); 4 – hydraulic drive tube connection; 5 – nipple; 6 – bolt (13 Nm); 7 – clutch hydraulic master cylinder; 8 – pin
6. Remove pin 8 with a hole for a cotter pin (Fig. 10.8).
7. Unscrew the coupling and disconnect the hydraulic drive pipe from the clutch hydraulic drive master cylinder.
8. Unscrew the coupling and disconnect the hydraulic drive pipe from the tank.
9. Loosen the nuts and remove the clutch master cylinder.
Installation
Installation is carried out in the reverse order of removal. Fill the clutch hydraulic drive with brake fluid and remove air from it. Adjust the clutch pedal if necessary.