



Contents: Removal ⤓ Checking the continuity of the seat…⤓ Checking the front seat back heater ⤓ Checking the seat cushion heater ⤓ Installation ⤓ Disassembling and assembling the…⤓ Assembly ⤓
Removal
- Remove the floor console.
- Use a screwdriver blade to pry the seat heater switches off and disconnect the electrical connectors from them (Fig. 17.92). To prevent damage to the floor console, wrap a cloth around the screwdriver blade.
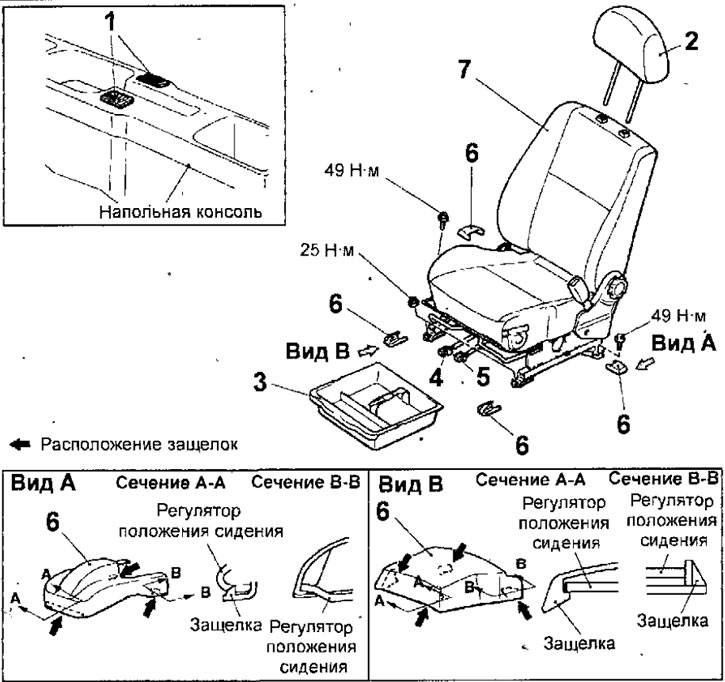
Fig. 17.92. Front seat: 1 - seat heater switch; 2 - headrest; 3 - drawer (car with a drawer located under the front seat); 4 Wiring harness connector (vehicle with heated front seats); 5 - connector of the wiring harness of the safety system (vehicle with side airbags located in the seat backs); 6 - seat runner cover; 7 - front seat
- Remove the headrest.
- Remove the drawer from under the front passenger seat.
- Disconnect the connector from the seat heater.
- Remove the seat rail protective covers.
- On a vehicle with seat-mounted side airbags, disconnect the restraint system wiring harness connectors.
- Remove the nuts and bolts and remove the front seat.
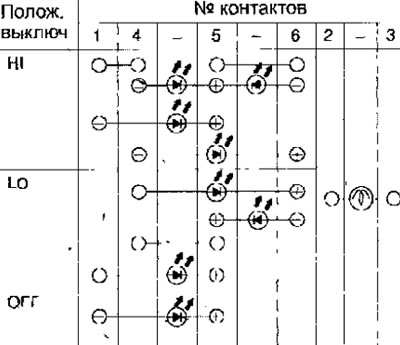
- Checking the seat heater switch.
- Use an ohmmeter to check the conductivity between the contacts of the seat heater switch connector (Fig. 17.93).
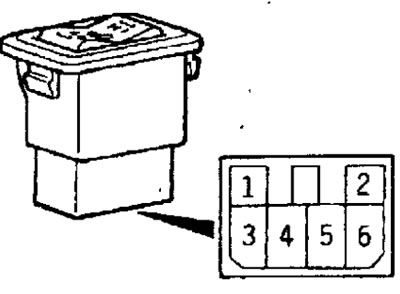
Fig. 17.93. Seat heater switch connector pin location
Note: To test diodes, change the polarity of the ohmmeter from (+) to (-) and re-measure.
Checking the continuity of the seat heater switch
Checking the front seat back heater
- Use an ohmmeter to measure the resistance between the contacts of the front seat back heater connector (Fig. 17.94).
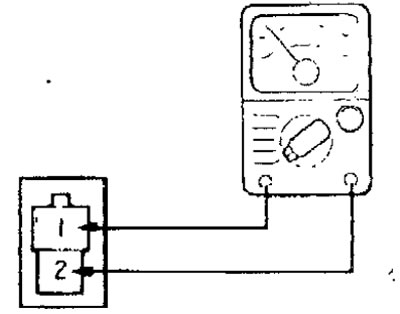
Fig. 17.94. Measuring the resistance of the front seat back heater
Resistance of the front seat back heater at an ambient temperature of 20°C: 6.84-7.92 Ohm
Checking the seat cushion heater
- Using an ohmmeter, measure the resistance between the contacts of the front seat cushion heater connector (Fig. 17.95).
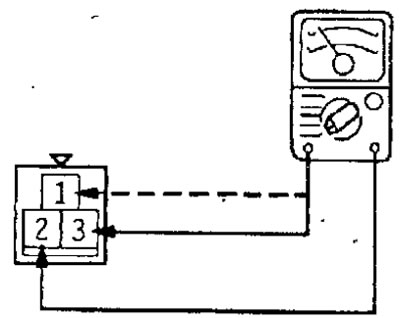
Fig. 17.95. Measuring the resistance of the front seat cushion heater
Resistance of the front seat cushion heater at an ambient temperature of 20°C:
- between contacts 1 and 2: 0.39-0.44 Ohm
- between contacts 2 and 3: 6.84-7.92 Ohm
- between contacts 1 and 3: 6.46-7.48 Ohm
Installation
- Installation is carried out in the reverse order of removal.
- Tighten the front seat mounting bolts in the sequence A, B, C and D shown in Figure 17.96.
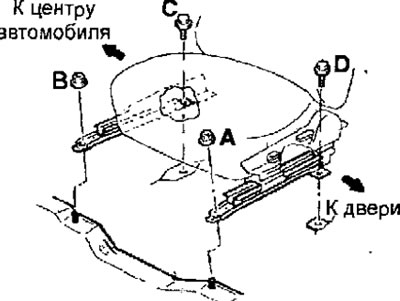
Fig. 17.96. Sequence (A, B, C and D) of tightening the bolts and nuts securing the front seat
- After pre-tightening the seat fastening elements (bolts and nuts), after installing them in place, finally tighten the nuts to a torque of 25 N·m and the bolts to a torque of 49 N·m.
Disassembling and assembling the front seat
Disassembly
- Remove the plug, unscrew the screw and remove the seat back tilt adjustment handle (Fig. 17.97).
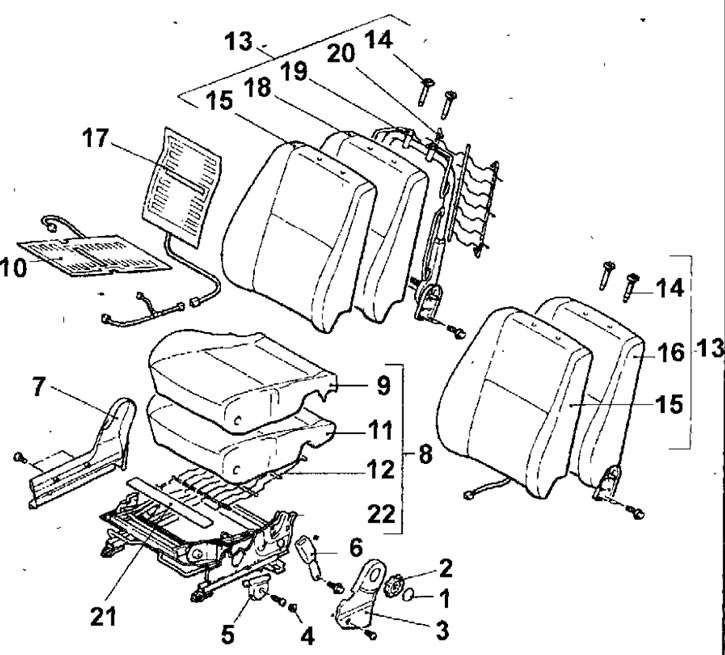
Fig. 17.97. Front seat: 1 - plug; 2 - seat backrest tilt adjustment handle; 3 - inner side cover; 4 - lid; 5 - Automatic lock handle; 6 - Front seat belt lock; 7 - inner cover; 8-front seat cushion; 9-pillow upholstery; 10-pillow heater; 11 - pillow stuffing; 12 - pillow suspension; 13 - back of the front seat; 14-headrest guide; 15-back upholstery; 16 - backrest padding and airbag (on a car with side airbags); 17 - backrest heater; 18 - back padding; 19 - back support; 20 - back spring: 21 - felt protection; 22 - seat position regulator
- Remove the screw and remove the inner side cover of the front seat.
- Remove the cover, unscrew the screw and remove the automatic lock handle.
- Remove the bolt and the front seat belt buckle.
- Remove the screws and remove the inner cover of the front seat.
- Remove the bolts and remove the seat back.
- Bend back the clips and remove the cushion cover, cushion warmer and cushion stuffing.
- Through the back padding, squeeze the split lower parts of the headrest guides and remove them from the seat back (Fig. 17.98).
- If necessary, bend back the clips and remove the backrest trim with the airbag and the backrest heater.
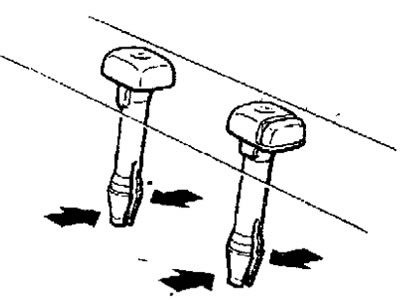
Fig. 17.98. Directions of compression when removing the headrest guides
[The text of the article was taken from the website: www.mitsubishiman.ru]
Assembly
- The seat is assembled in the reverse order of disassembly.