



To prevent fuel leakage in the event of a vehicle collision, a protection valve is installed to prevent fuel leakage in the event of the vehicle overturning (rollover valve).
The fuel tank is made of plastic, which reduces weight and improves anti-corrosion properties.
Removal
- Before removing the fuel tank, drain the fuel from it. Clean the fuel tank from fuel vapors.
- Reduce the pressure in the fuel system.
- Remove the rear seat and protective cover.
- Disconnect the fuel hoses and electrical connector from the fuel pump unit.
- Using a special key, unscrew the cover and remove the fuel pump unit (Fig. 6.64).
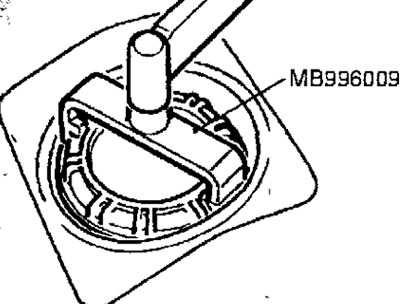
Fig. 6.64. Using a special key to unscrew the fuel pump hatch cover
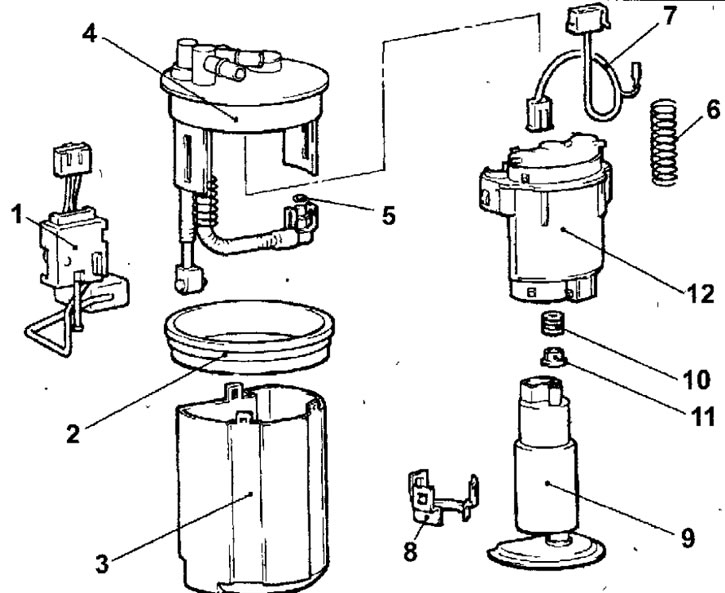
Fig. 6.65. Fuel pump unit: 1 - fuel level sensor; 2 - rubber gasket; 3 - cup; 4 - pump base unit; 5 - sealing ring (must be moistened in fuel before installation); 6 - spring; 7 - pump wiring harness; 8 - locking bracket; 9 - fuel pump; 10 - sealing ring; 11 - gasket; 12-fuel filter
- Disconnect the fuel supply flanges from the fuel tank.
- Remove the bolts and the toe adjustment rod.
- Remove the bolts and heat shields.
- Disconnect the fuel tank filler hose and the fuel tank pressure equalization hose from the fuel tank.
- Place a jack under the fuel tank. Support the fuel tank, loosen the nuts and remove the fuel tank mounting straps. Lower the fuel tank and remove it from under the vehicle.
- Installation is carried out in the reverse order of removal, taking into account the following.
- Make sure the rubber gasket of the fuel tank is not damaged or deformed, then securely fasten the gasket.
Warning: If the rubber gasket is installed on the fuel pump unit, the working edge of the rubber gasket will be damaged when installing the fuel pump unit into the fuel tank, which will result in fuel leakage (Fig. 6.66).
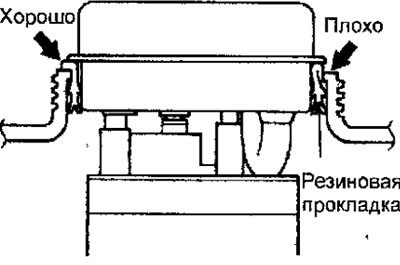
Fig. 6.66. Location of the fuel tank rubber gasket
Note: If the rubber gasket is damaged or deformed, replace it.
- Apply soapy water to the inside surface of the gasket. Align the marks on the fuel pump unit and the fuel tank and install the fuel pump unit into the fuel tank (Fig. 6.67).
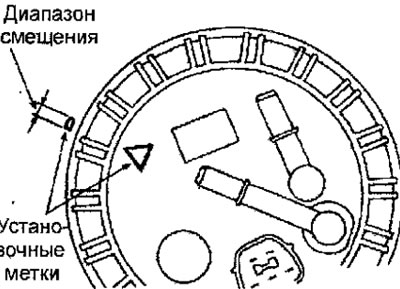
Fig. 6.67. Alignment of the timing marks on the fuel pump unit and fuel tank
Warnings
- (1) Do not tilt the fuel pump when installing it.
- (2) Avoid jamming the gasket when installing it.
- Apply a soap solution to the threads of the fuel pump block cover and use a special key to screw on and tighten the cover to a torque of 49 N·m (see Fig. 6.64).
Warnings: When tightening the cap, do not allow the fuel pump unit to rotate.
- Fill the tank with fuel.
- Check the fuel system for leaks.