



Contents: Mirage models up to 1997 and Galant…⤓ Galant models since 1994 and Mirage…⤓ Diamante Models ⤓
Mirage models up to 1997 and Galant models up to 1993.
Removal
1. Disconnect the negative cable from the battery.
Warning! If the car stereo system is equipped with a security code, make sure you have the correct combination to activate the audio system before disconnecting the battery!
2. Disconnect the AT selector drive cable from the lever.
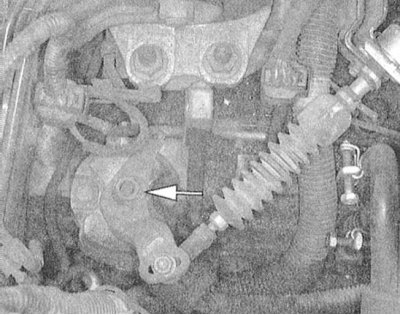
3. Remove the two mounting screws and remove the sensor switch.
Installation
1. Install the sensor-switch in its regular place. Screw in the mounting bolts, but do not tighten them until the sensor-switch adjustment is complete.
2. Connect the electrical wiring to the sensor switch and adjust it (see below).
3. Connect the negative cable to the battery.
4. Make sure that the engine can only be started in the "P" and "N" positions of the transmission. Also check that the reverse lights operate properly when the selector lever is moved to the "R" position.
Adjustment
1. Disconnect the negative cable from the battery.
Warning! If the car stereo system is equipped with a security code, make sure you have the correct combination to activate the audio system before disconnecting the battery!
2. Set the parking brake and support the vehicle wheels with wheel chocks.
3. Locate the start enable switch sensor mounted on top of the transmission housing.
4. Loosen the shift cable adjusting nut on the transmission housing. Inside the vehicle, move the selector lever to the "N" position.
5. Also move the manual transmission shift control lever to the "N" position.
6. Loosen the screws securing the sensor switch and rotate the latter so that the 5 mm hole in its housing aligns with the corresponding hole (also 5 mm) in the manual shift lever.
7. Tighten the sensor-switch mounting bolts with the required force (10÷12N m).
8. Pull the drive cable in the area of the adjusting nut, completely remove its slack, then tighten the nut with a force of 12 N·m.
9. Make sure that the switch-sensor lever moves to the appropriate position when switching AT modes from the passenger compartment.
10. Connect the negative cable to the battery.
11. Make sure that the engine can only be started in the "P" and "N" positions of the transmission. Also check that the reverse lights operate correctly when the selector lever is moved to the "R" position.
Galant models since 1994 and Mirage since 1998.
Removal
1. The start enable switch sensor on these models is also located on top of the transmission housing.
2. Disconnect the negative cable from the battery.
Warning! If the car stereo system is equipped with a security code, make sure you have the correct combination to activate the audio system before disconnecting the battery!
3. Disconnect the AT selector drive cable from the lever.
4. Loosen the transmission shift control cable mounting nut to the transmission manual lever. Move the cable to the side.
5. Move the hand lever to the "N" position, then loosen the nut on the lever.
6. Disconnect the electrical wiring from the start enable switch sensor.
7. Unscrew the mounting bolts and remove the sensor switch.
Installation
1. Install the sensor switch in its regular place. Screw in, but do not tighten the mounting bolts yet.
2. Connect the hand lever to the switch sensor and secure it with a nut, making sure that the lever remains in the "N" position.
3. Adjust the sensor-switch (see below), then finally tighten the sensor-switch mounting bolts to the required torque (11 N·m).
4. Connect the electrical wiring to the sensor switch.
5. Connect the shift cable, take up any slack, check the lever for freedom of movement, and tighten the cable mounting nut.
6. Connect the negative cable to the battery.
7. Make sure that the engine can only be started in the "P" and "N" positions of the transmission. Also check that the reverse lights operate properly when the selector lever is moved to the "R" position.
Adjustment
1. Disconnect the negative cable from the battery.
Warning! If the car stereo system is equipped with a security code, make sure you have the correct combination to activate the audio system before disconnecting the battery!
2. Set the parking brake and support the vehicle wheels with wheel chocks.
3. Locate the start enable switch sensor mounted on top of the transmission housing.
4. Loosen the shift cable adjusting nut on the transmission housing. Inside the vehicle, move the selector lever to the "N" position.
5. Also move the manual transmission shift control lever to the "N" position.
6. Loosen the screws securing the sensor-switch and turn the latter so that the 5 mm hole in its housing aligns with the corresponding hole (also 5 mm) in the manual shift lever - insert a drill of a suitable diameter into the holes and tighten the bolts securing the sensor-switch with the required force (11 N·m).
7. Pull the drive cable in the area of the adjusting nut, completely remove its slack, then tighten the nut with a force of 12 N·m.
8. Check the freedom of movement of the hand lever.
9. Connect the negative cable to the battery.
10. Make sure that the engine can only be started in the "P" and "N" positions of the transmission. Also check that the reverse lights operate correctly when the selector lever is moved to the "R" position.
Diamante Models
Removal
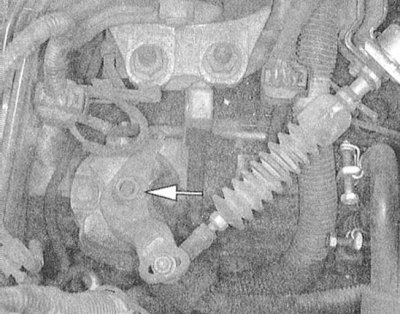
1. The location of the sensor switch is shown in the illustration.
2. Disconnect the negative cable from the battery.
Warning! If the car stereo system is equipped with a security code, make sure you have the correct combination to activate the audio system before disconnecting the battery!
3. Unscrew the two mounting bolts and remove the sensor switch.
Installation
1. Install the sensor switch in its regular place. Screw in, but do not tighten the mounting bolts yet.
2. Adjust the sensor-switch (see below), then finally tighten the sensor-switch mounting bolts with the required force (10÷12 N·m).
3. Connect the shift cable.
4. Connect the negative cable to the battery.
5. Connect the electrical wiring to the sensor switch.
6. Make sure that the engine can only be started in the "P" and "N" positions of the transmission. Also check that the reverse lights operate properly when the selector lever is moved to the "R" position.
Adjustment
1. Adjustment, as before, is made by aligning the 5 mm holes in the body of the sensor-switch and the body of the manual shift lever.
2. Finally, make sure that the engine can only be started in the "P" and "N" positions of the transmission. Also check that the reverse lights operate properly when the selector lever is moved to the "R" position.