
English Русский
Български
Беларускі
Український
Српски
Hrvatski
Română
Polski
Slovenský
Magyar
Articles Bookmark Contacts Sitemap   
Company Audi Company Ford Company Hyundai Company Kia Company Mazda Company Mercedes-Benz Company Nissan
MitsubishiMan.ru


Home Colt Lancer Galant L200 Outlander Pajero Others
Lancer 9 (2000-2007, petrol) Lancer 3 and 5 (1984-1992)

Replacing breaker contacts (Mitsubishi Lancer 3)

  • Home
  • Lancer
  • 3 (1984-1992)
  • Power unit
  • Ignition system
  • Replacing breaker contacts
0
Contents: Removal ⤓ Installation ⤓
Over time, burnouts are formed on the contact surface of the breaker, visible by elevations and craters. In addition, the plastic slider wears out. Because of this, the contact gap decreases. The consequence is a weak ignition spark. The contact gap should be checked as part of the maintenance schedule and adjusted if necessary. When the contacts are worn to a certain extent, the breaker must be replaced.

Removal


Turn off the ignition.

Remove the distributor cap and set it aside. To do this, use a screwdriver to pry the two retaining clips off the side of the distributor cap.

Remove the runner from the distributor shaft by hand and, if present, remove the boot.

Caution: Do not allow fasteners to fall into the distributor, otherwise the distributor will have to be removed to retrieve the fallen part.


Turn the crankshaft to the position where the cam on the distributor shaft opens the breaker contact as much as possible. Turning the crankshaft see p. 1.6.
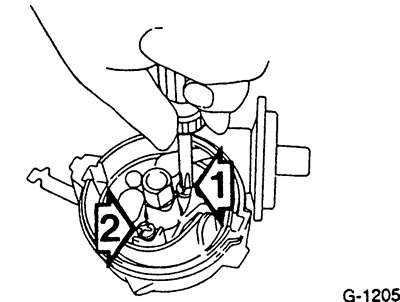


Loosen the mounting screws.

Disconnect the low voltage wires and remove the breaker contact.


Installation


Insert the breaker contact and screw in the mounting screws, do not tighten screw "2".

Connect the wires.

Apply a very thin layer of distributor grease to the working surface of the cam and the plastic slider. The grease is usually included with the supplied set of contacts, otherwise use BOSCH distributor grease.

Caution: Carefully remove any grease that accidentally gets on the contact surfaces, otherwise the engine will not start. You can use blotting paper to remove it.


Adjust the contact gap (or closing angle) and tighten the mounting screws.

If present, install the boot.

Put on the distributor runner. Check by lightly turning it in both directions whether it has jumped onto the distributor shaft.

Put on the distributor cap, making sure that the cap nose fits into the recess at the edge of the distributor, and put on the retaining clips.
This article is available at: russian, bulgarian, belarusian, ukrainian, serbian, croatian, romanian, polish, slovak, hungarian
This article was reviewed by: Dmitry Vasiliev
Share with friends:
◀ Previous
Lancer 3 and 5: Ignition system
Next ▶

Checking the ignition wires
Checking the ignition coil
Ignition distributor — device
Precautions when working with the ignition system
Ignition system — general information
Checking/adjusting the closing angle
Checking/setting ignition timing
Removal and installation the ignition distributor
Spark plugs — general information
Recommended spark plug parameters for COLT / LANCER
Similar materials for other Mitsubishi models

➤ Cleaning and replacing the air filter Mitsubishi Colt 4 and 5 (1991-2003)
➤ Checking the condition and replacing the hoses located in… Mitsubishi Galant 6 and 7 (1987-1998)
➤ Replacing the coolant Mitsubishi L200 4 (2005-2014, diesel)
➤ Replacing bulbs in headlights and taillights Mitsubishi Outlander 1 (2003-2008)
➤ Replacing the remote control battery Mitsubishi Pajero 1 and 2 (1982-1999)
➤ Replacing the oil filter Mitsubishi Carisma (1995-2004)
Link in different formats to this article
Comments and feedback from visitors
No comments yet


Add up two numbers 14 + 20


Lancer 9 (2000-2007, petrol) 
  • General information
  • User manual
  • Maintenance
  • Power unit
  • Repair of MPI engines
  • Repair of GDI engines
  • Engine overhaul
  • Cooling and lubrication system
  • MPI fuel injection system
  • GDI fuel injection system
  • Intake and exhaust system
  • Starting and charging system
  • Transmission
  • Automatic gearbox
  • Variator (CVT)
  • Drive shafts and gearbox
  • Chassis and running gear
  • Front suspension
  • Rear suspension
  • Steering
  • Brake system
  • Body and interior
  • Doors, locks and windows
  • Exterior (external elements)
  • Interior (internal elements)
  • Electrical equipment
  • Heater and air conditioner
  • Security system SRS
  • Equipment and devices
  • Wiring diagrams (saloon)
  • Wiring diagrams (wagon)
Lancer 3 and 5 (1984-1992) 
  • General information
  • Maintenance
  • Power unit
  • Engine repair
  • Lubrication system
  • Cooling system
  • Ignition system
  • Fuel system
  • Carburetor
  • Fuel injection
  • Diesel power system
  • Exhaust system
  • Transmission
  • Clutch
  • Car gearbox
  • Chassis and running gear
  • Front suspension
  • Rear suspension
  • Steering
  • Brake system
  • Wheels and tires
  • Body and interior
  • Exterior (external elements)
  • Interior (internal elements)
  • Heating system
  • Electrical equipment
  • Equipment and devices
  • Power devices
  • Electrical circuits
MitsubishiMan.ru © 2018–2026 • Mobile version • Articles about Mitsubishi • Contacts • Sitemap: EN BG BY UA RS HR RO PL SK HU • Site search • Bookmark
Colt 2 and 3 (1983-1993) · Colt 4 and 5 (1991-2003) · Colt 5 (1995-2003) · Lancer 3 and 5 (1984-1992) · Lancer 9 (2000-2007) · Galant 5 (1983-1989) · Galant 6 and 7 (1987-1998) · L200 4 (2005-2014) · Outlander 1 (2003-2008) · Pajero 1 and 2 (1982-1999) · Pajero 4 (2006-2021) · Carisma (1995-2004) · Space Star (1998-2005) ·
This resource sets cookies 🍪 to avoid bothering you with repeated data entry.