
Removing
− Remove the side door trim and waterproof film before beginning to remove parts.
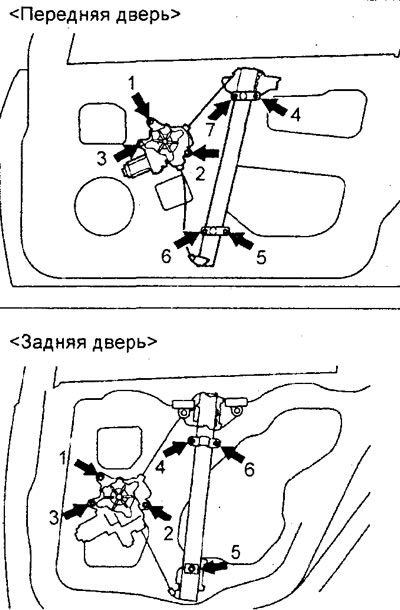
− Removal of parts is carried out in the order of numbers indicated in the figure "Removing the side door glass and power window".
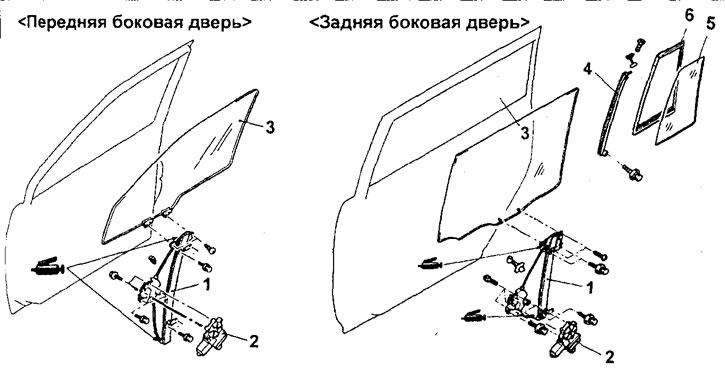
Removing the side door glass and power window (sedan). 1 - power window assembly, 2 - power window motor assembly (remove the glass guide), 3 - side door glass, 4 - rear side door glass central guide, 5 - rear side door fixed glass, 6 - rear side door fixed glass seal.
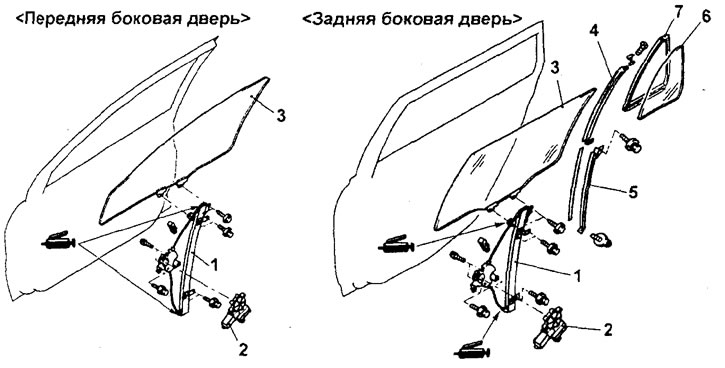
Removing the side door glass and power window (station wagon).1 - power window assembly, 2 - power window motor assembly (remove the glass guide), 3 - side door glass, 4 - central rear side door glass guide, 5 - rear lower side door glass guide, 6 - rear side door fixed glass, 7 - rear side door fixed glass seal.
− When removing parts, pay attention to the following operations:
1. Removing the power window and power window assembly.
- A) Turn away bolts of fastening of glass of a lateral door.
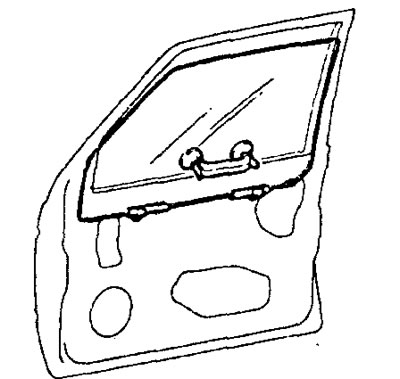
- b) Raise the side door glass and install the special tool on the glass as shown in the figure to prevent the side door glass from falling.
Note: If there is a film on the glass, install a special tool on the outside of the car to prevent the film from peeling off.
- V) Remove the power window and power window assembly.
2. Removal of the central guide glass of the rear side door.
A) Remove the part of the outer seal of the side door at the mounting point of the central rail of the glass of the rear side door, as shown in the figure.
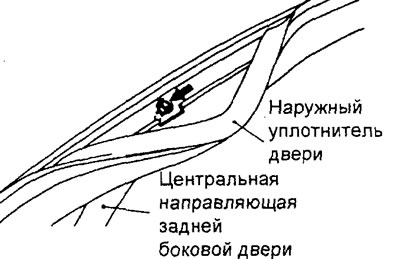
b) Turn away a bolt of fastening of the central directing glass of a back lateral door and remove directing.
Checking the power window motor
1. Check for smooth operation of the power window slider when connecting battery power directly to the motor connector terminals.
2. Check up that at change of polarity of connection of food from the storage battery, the slider of a window regulator moves in an opposite direction.
3. Replace the power window assembly if necessary.
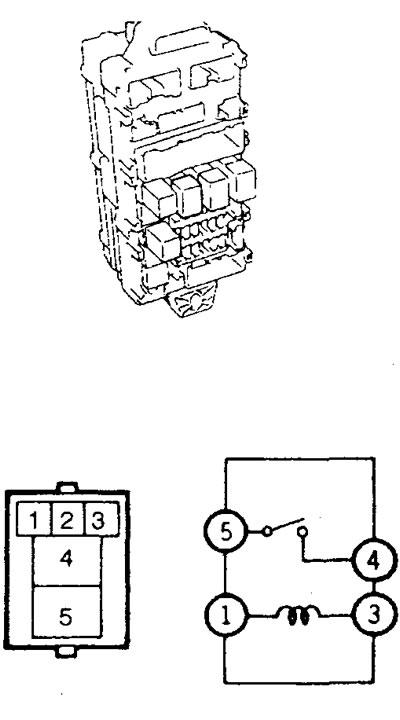
Checking the power window relay
1. Remove the power window relay from the relay box in the passenger compartment (under the dashboard).
2. Check that the circuit is permanently closed between the terminals "1" - "3" relay.
3. Connect the negative battery cable to the terminal "3" relay, and the positive terminal wire to the output "1" relay and check that the circuit is closed between the terminals "4" - "5" relay.
Installation
− Installation of parts is carried out in the reverse order of removal.
− Pay attention to the following operations when installing parts.
1. Installation of the central guide glass of the rear side door.
Firmly insert the rear side door center glass guide into the rear glass guide.
2. Installing the power window and power window assembly.
When installing the window lifter and power window lifter assembly, tighten the window lifter and power window lifter mounting bolts to the rated torque in the sequence shown in the figure.
3. Initialization of safety window function.
Attention:
- - Do not turn on the power window before installing the glass.
- - The power window safety mechanism will not operate until the safety function has been initialized.
A) Attach the glass to the power window assembly.
b) Press the power window switch to fully lower the side door glass.
V) While pressing the power window switch, fully raise the side door glass. When the switch is pressed momentarily, the window lifter will start to rise for a distance of approximately 30 mm and a period of 0.5 seconds, and then stop automatically. The initialization of the electronic power window control unit will be completed when the window is fully raised.
− After completing the installation of the parts, perform the following operations:
- A) Adjust the side door glass.
- b) Install side door trim and waterproof film.