



Contents: Front Door Window Regulator (1983-91) ⤓ Rear Door Glass (1983-91) ⤓ Front door ⤓ Back door ⤓
Front Door Window Regulator (1983-91)
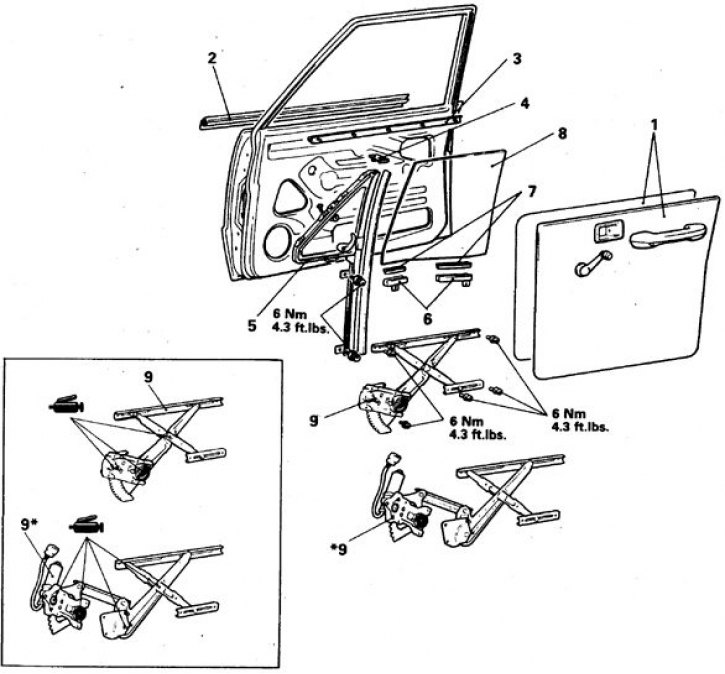
1. Inner panel and water-resistant screen; 2, 3. Seals; 4. Fuse; 5. Window; 6. Holder; 7. Lining; 8. Glass; 9. Window lifter
Rear Door Glass (1983-91)
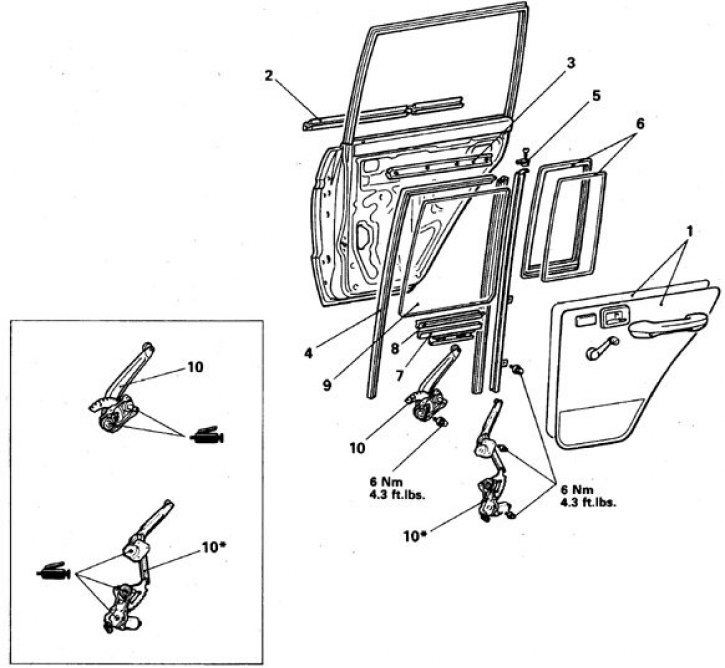
1. Inner panel and water-resistant screen; 2, 3. Seals; 4. Gutters; 5. Central guide; 6. Corner; 7. Holder; 8. Lining; 9. Glass; 10. Window lifter
* – applies to vehicles with electric windows
Front door
1. Lower the window.
2. Remove the inner panel and water shield.
3. Carefully pry and remove the glass seals.
4. Remove the window fuse, unscrew the 3 bolts in the door (1 bolt in the front), hold the window and remove the window with the frame.
5. Unscrew the holder bolts and remove the glass.
6. Unscrew the window lift bolts and disconnect the electric motor wires.
7. Remove the window regulator, remove the electric motor if necessary.
8. Installation is carried out in reverse order.
9. Tighten the fasteners to the required torques. Tighten the two window frame mounting bolts to a torque of 6 Nm.
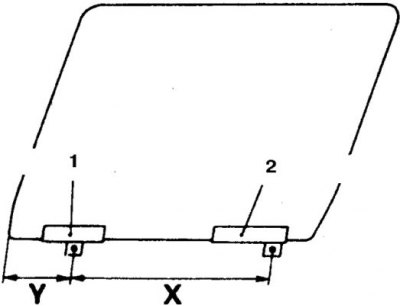
10. When installing the glass, maintain the dimensions Y=76.5–77.5 mm and X=466.5–467.5 mm, first securing holder B (1), and then holder A (2).
[The text of the article was taken from the website: MITSUBISHIMAN.ru]
11. Adjust the glass as follows.
12. Raise the glass completely and loosen the bolts and screws securing the glass and rear lower guide.
13. Move the glass, rear guide and auxiliary roller (if a window is not provided) so that the glass fits against the door frame along the entire perimeter.
14. Tighten the bolts.
Back door
1. Lower the window.
2. Remove the inner panel and water shield.
3. Carefully pry and remove the glass seals.
4. Carefully remove the felt and rubber gutters.
5. Unscrew the two screws at the top of the window and the two bolts securing the central guide to the door and remove the guide by pushing it vertically upwards.
6. Remove the corner together with the seal.
7. Remove the glass holder from the window regulator and take out the glass.
8. Disconnect the electric drive wires (if provided), unscrew the bolts and remove the window lifter, remove the electric motor if necessary (remove the spring first, otherwise after removing the electric motor, the window lifter may suddenly straighten out and cause injury).
9. Installation is carried out in reverse order, taking into account the following.
10. The window lifter is installed together with the electric motor, tighten the mounting bolts to a torque of 6 Nm.
11. Lightly lubricate the grooves with general purpose grease, do not apply excess grease.
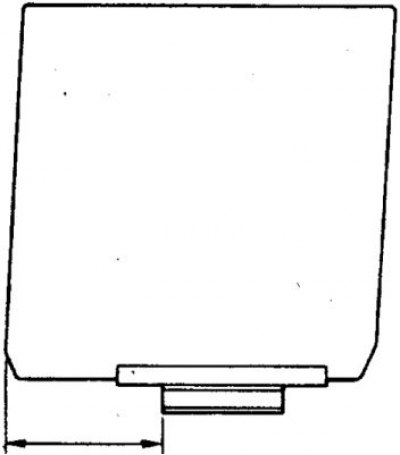
12. When installing glass, maintain a size of 231–239 mm.
13. If necessary, adjust the glass by moving the central guide with the bolts loosened.