



Contents: Automatic transmission KM148…⤓ Automatic transmission KM148…⤓ Automatic transmission V4AW2…⤓ Automatic transmission V4AW2…⤓ Automatic transmission V4AW3…⤓ Automatic transmission V4AW3…⤓ Cars 1983-89. ⤓ Cars 1990-98. ⤓
Automatic transmission KM148 (1987-89)
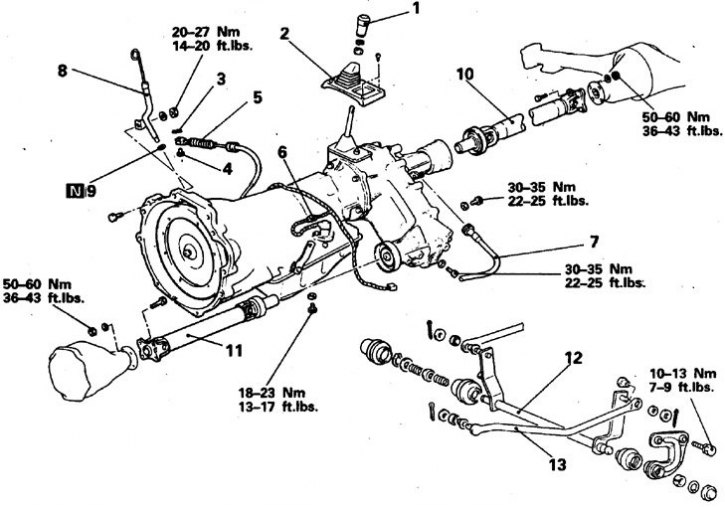
1. Handle; 2. Panel; 3. Cotter pin; 4. Axis; 5. Throttle cable; 6. High gear solenoid valve connector (overdrive valves); 7. Speedometer cable; 8. Pipe for filling and checking the liquid level; 9. Ring; 10. Rear propeller shaft; 11. Front propeller shaft; 12. Transverse traction shaft; 13. Traction
Automatic transmission KM148 (1987-89), continued
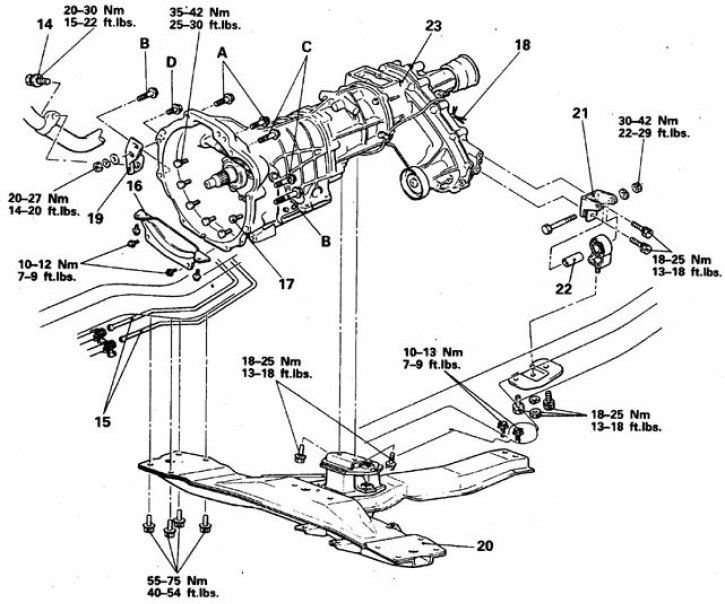
14. Exhaust pipe mounting bolt; 15. Transmission fluid cooler tubes; 16. Torque converter access cover; 17. Special bolts; 18. Connector of the front drive axle indicator lamp sensor; 19. Exhaust pipe bracket; 20. Crossbar; 21. Transfer case bracket; 22. Bushing; 23. Transmission assembly with transfer case
Automatic transmission V4AW2 (1990-98)
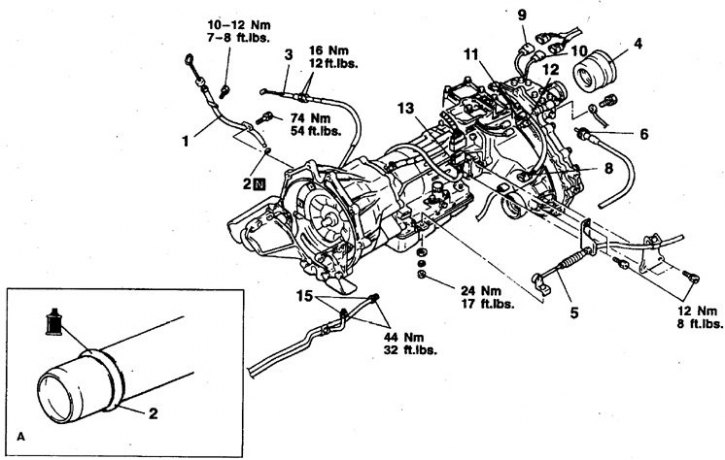
1. Pipe for filling and checking the liquid level; 2. Ring; 3. Throttle cable tip; 4. Dust cover; 5. Transmission control cable; 6. Speedometer cable; 8. HIGH/LOW position switch connector; 9. All-wheel drive indicator lamp sensor connector; 10. Connector of the sensor of operation of the center differential in the locking mode; 11. Center differential lock sensor connector; 12. Front axle engagement sensor connector; 13. Locking switch connector; 15. Cooler tube; A. Lubricate with DIAMOND ATF SP fluid or equivalent; N – subject to replacement
Automatic transmission V4AW2 (1990-98), continued
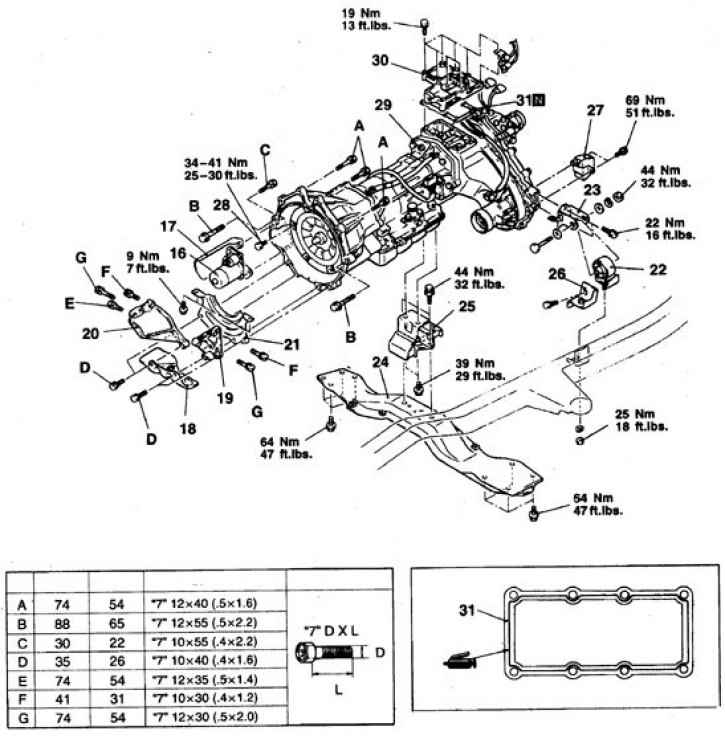
16. Starter; 17, 18. Shield; 19, 20. Brackets; 21. Torque converter access cover; 22. Transmission support torsion bar; 23. Transfer case bracket; 24. Crossbar; 25. Engine support buffer; 26. Transfer case shield bracket; 27. Buffer; 28. Torque converter bolt; 29. Transmission assembly with transfer case; 31. Gasket; A. Bolt designation; B. Tightening torque; B. Bolt dimensions L and D
Automatic transmission V4AW3 (1994-98)
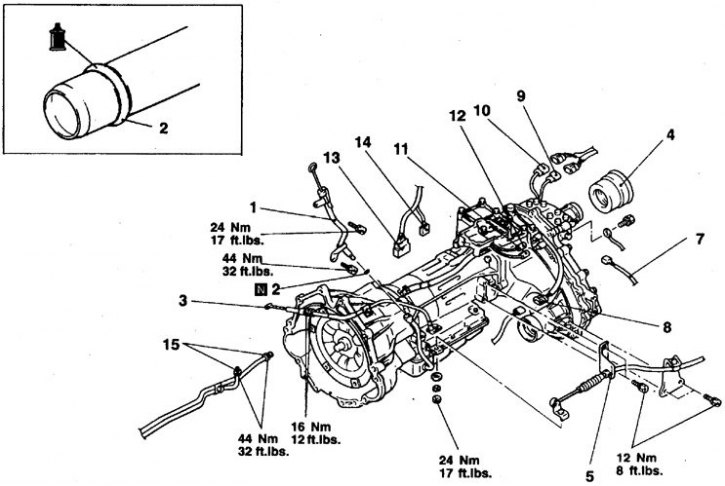
1. Pipe for filling and checking the liquid level; 2. Ring; 3. Throttle cable tip; 4. Dust cover; 5. Transmission control cable; 7. Speed sensor connector; 8. Transfer case HIGH/LOW position switch connector; 9. All-wheel drive indicator lamp sensor connector; 10. Connector of the sensor of operation of the center differential in the locking mode; 11. Connector of the interaxle differential lock sensor-detector; 12. Front axle engagement sensor-detector connector; 13. Locking switch connector; 14. Solenoid valve connector; 15. Cooler tube; A. Lubricate with DIAMOND ATF SP fluid or equivalent; N – subject to replacement
Automatic transmission V4AW3 (1994-98), continued
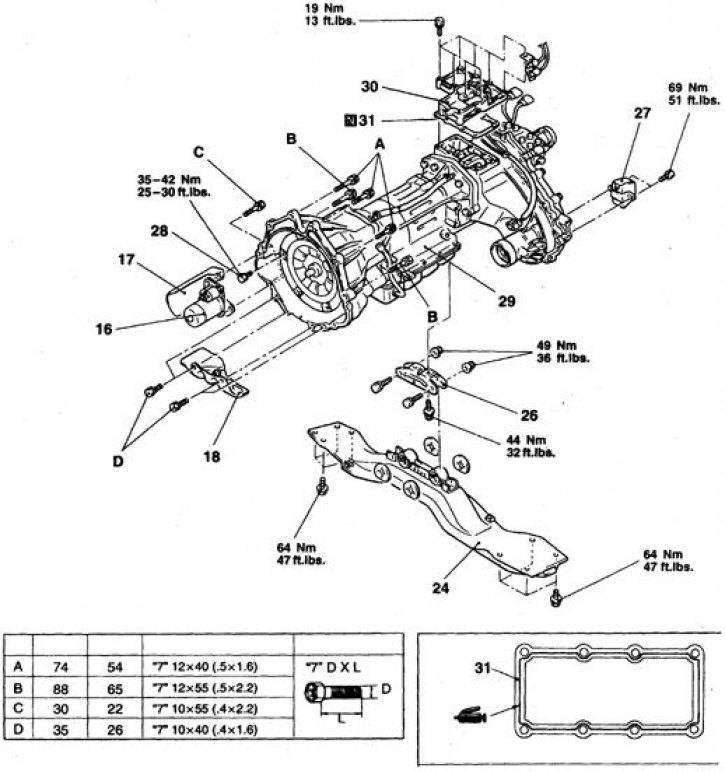
16. Starter; 17, 18. Starter shield; 24. Crossbar; 26. Rear engine mount bracket; 27. Buffer; 28. Torque converter mounting bolt; 29. Transmission assembly with transfer case; 30. Transmission control mechanism housing; 31. Gasket; A. Bolt designation; B. Tightening torque; B. Bolt dimensions L and D
Cars 1983-89.
1. Disconnect the battery from ground.
2. Remove the front exhaust pipe by disconnecting it from the manifold and neutralizer.
3. Disconnect the kick-down rod.
4. Remove the selector cover and selector panel, remove the selector.
5. Raise the vehicle and remove the transfer case shield.
6. Remove the transmission gear shift mechanism and transfer case control.
7. Drain the transmission fluid.
8. Disconnect the cooler tubes, plug them and secure them in a vertical position.
9. Disconnect the cardan shafts.
10. Disconnect the wires and cables from the transmission.
11. Loosen the torque converter mounting bolts by removing the cover and turning the crankshaft, loosening the bolts sequentially.
12. Remove the starter, set it aside and secure it (it is recommended to disconnect the wires first).
13. Remove the rear transmission support from the crossmember.
14. Remove the crossbar, taking into account the significant weight and dimensions of this part.
15. Remove the transfer case support, unscrew the bell housing mounting bolts and remove the transmission by moving it back, lowering it and removing it from the guide pins.
16. Installation is carried out in reverse order.
17. Replace all gaskets and seals, tighten connections to the torques shown in the illustration.
18. Tighten the torque converter to flywheel mounting bolts to 35–42 N·m.
19. Adjust the rods and cables.
Cars 1990-98.
1. Disconnect the battery from ground.
2. Remove the transfer case control mechanism.
3. Raise the vehicle and remove the transfer case shield.
4. Remove the front exhaust pipe by disconnecting it from the manifold and neutralizer.
5. Drain the transmission fluid and transfer case oil.
6. Disconnect the cardan shafts, marking their position.
7. Move the front shaft forward, tilt it and remove it from the gearbox.
8. Remove the filler neck.
9. Disconnect the rods from the transmission, remove the cover from the crankcase tailpiece.
10. Identify and disconnect the wires and cables from the transmission, including the speedometer cable.
11. Disconnect the cooler pipes from the transmission.
12. Remove the starter and heat shield (if provided).
13. Place a jack under the engine sump.
14. Place a dolly with a jack under the transmission, but do not raise the transmission yet.
The source of the article is available at MITSUBISHIMAN.ru
15. Slightly raise the engine and remove the right and left front mounts.
16. Remove the lower bell housing cover.
17. Remove the transfer case bracket, torsion bar, buffer and shield bracket.
18. Raise the transmission slightly.
19. Unscrew the 2 crossmember bolts, raise the jack by 6 mm and remove the crossmember.
20. Remove the transmission. When removing, do the following.
21. Remove the cover
22. Unscrew the 6 torque converter mounting bolts, asking an assistant to turn the crankshaft.
23. Carefully lower the rear of the transmission and transfer case assembly and remove it from the engine.
24. Tilt the front of the transmission and carefully lower it, being careful not to hit the rear outer crossmember, and remove it from under the vehicle.
25. Installation is carried out in reverse order.
26. Replace all gaskets and seals, tighten connections to the torques shown in the illustration
27. Tighten the torque converter to flywheel mounting bolts to 34–41 N·m, the transmission mounting bolts to 75 N·m, and the crossmember bolts to 6 N·m.
28. Adjust the transmission control drives.