
English Русский
Български
Беларускі
Український
Српски
Hrvatski
Română
Polski
Slovenský
Magyar
Articles Bookmark Contacts Sitemap   
Company Audi Company Ford Company Hyundai Company Kia Company Mazda Company Mercedes-Benz Company Nissan
MitsubishiMan.ru


Home Colt Lancer Galant L200 Outlander Pajero Others
Lancer 9 (2000-2007, petrol) Lancer 3 and 5 (1984-1992)

Checking the thickness of brake discs (Mitsubishi Lancer 3)

  • Home
  • Lancer
  • 3 (1984-1992)
  • Chassis and running gear
  • Brake system
  • Checking the thickness of brake discs
0
Brake discs must not be treated. If the grooves are deeper than 0.5 mm or if they are heavily worn, the brake disc must be replaced. Both discs on one axle must be replaced at the same time.

Mark the position of the wheel disk on the wheel hub with paint. This ensures that the balanced wheel can be reinstalled in its original position.

Loosen the wheel nuts on the vehicle while it is on the ground.

Raise the front of the car, see item 29.

Remove the wheel.
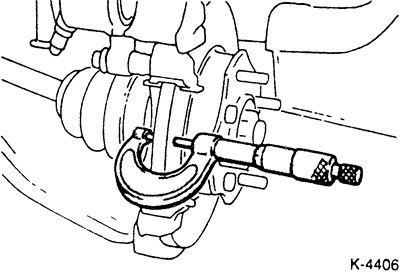


Measure the thickness of the brake disc. In workshops, a special caliper or a caliper with a micrometer is used for this, since when the brake disc wears out, a protrusion forms on its edge. The thickness of the brake disc can also be measured with a regular caliper, but in this case, spacers of a known thickness should be placed on both sides of the disc and the thickness of the two spacers should be subtracted from the measured value.

Attention: Measure at least 4 points on the brake disc.


If the wear limit is reached, replace the brake disc. Wear limit values, see paragraph 18.17.

If there are significant scratches and grooves deeper than 0.5 mm, replace the disc.
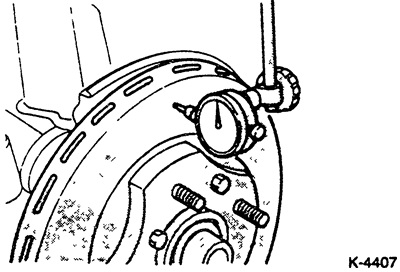


If you have a dial indicator, measure the lateral runout of the brake disc. Set the dial indicator at a distance of 5 mm from the edge. Required value: maximum 0.15 mm. Too much lateral runout can be caused by a broken front wheel bearing; visit a service station to check.

Give away the wheel nuts.

Position the wheels according to the markings, screw in the wheel nuts. Lower the car and tighten the nuts crosswise. Tightening force see item 19.4.
This article is available at: russian, bulgarian, belarusian, ukrainian, serbian, croatian, romanian, polish, slovak, hungarian
This article was reviewed by: Dmitry Vasiliev
Share with friends:
◀ Previous
Lancer 3 and 5: Brake system
Next ▶

Removal and installation front brake pads
Front wheel brakes — device
Brake system — general information
Removal and installation rear disc brake pads
Removal and installation the brake caliper
Checking the power steering
Rear wheel drum brake — device
Removal and installation rear brake pads/brake drums
Similar materials for other Mitsubishi models

➤ Checking the thickness and lateral runout of the front… Mitsubishi Colt 4 and 5 (1991-2003)
➤ Checking the proper functioning of the parking brake Mitsubishi Galant 6 and 7 (1987-1998)
➤ Checking the thickness of the rear drum brake shoes and… Mitsubishi L200 4 (2005-2014, diesel)
➤ Checking the level of working fluid in the brake hydraulic… Mitsubishi Outlander 1 (2003-2008)
➤ Checking the brake and clutch hydraulic fluid level Mitsubishi Pajero 1 and 2 (1982-1999)
➤ Checking the thickness of the brake disc Mitsubishi Carisma (1995-2004)
Link in different formats to this article
Comments and feedback from visitors
No comments yet


Add up two numbers 10 + 36


Lancer 9 (2000-2007, petrol) 
  • General information
  • User manual
  • Maintenance
  • Power unit
  • Repair of MPI engines
  • Repair of GDI engines
  • Engine overhaul
  • Cooling and lubrication system
  • MPI fuel injection system
  • GDI fuel injection system
  • Intake and exhaust system
  • Starting and charging system
  • Transmission
  • Automatic gearbox
  • Variator (CVT)
  • Drive shafts and gearbox
  • Chassis and running gear
  • Front suspension
  • Rear suspension
  • Steering
  • Brake system
  • Body and interior
  • Doors, locks and windows
  • Exterior (external elements)
  • Interior (internal elements)
  • Electrical equipment
  • Heater and air conditioner
  • Security system SRS
  • Equipment and devices
  • Wiring diagrams (saloon)
  • Wiring diagrams (wagon)
Lancer 3 and 5 (1984-1992) 
  • General information
  • Maintenance
  • Power unit
  • Engine repair
  • Lubrication system
  • Cooling system
  • Ignition system
  • Fuel system
  • Carburetor
  • Fuel injection
  • Diesel power system
  • Exhaust system
  • Transmission
  • Clutch
  • Car gearbox
  • Chassis and running gear
  • Front suspension
  • Rear suspension
  • Steering
  • Brake system
  • Wheels and tires
  • Body and interior
  • Exterior (external elements)
  • Interior (internal elements)
  • Heating system
  • Electrical equipment
  • Equipment and devices
  • Power devices
  • Electrical circuits
MitsubishiMan.ru © 2018–2026 • Mobile version • Articles about Mitsubishi • Contacts • Sitemap: EN BG BY UA RS HR RO PL SK HU • Site search • Bookmark
Colt 2 and 3 (1983-1993) · Colt 4 and 5 (1991-2003) · Colt 5 (1995-2003) · Lancer 3 and 5 (1984-1992) · Lancer 9 (2000-2007) · Galant 5 (1983-1989) · Galant 6 and 7 (1987-1998) · L200 4 (2005-2014) · Outlander 1 (2003-2008) · Pajero 1 and 2 (1982-1999) · Pajero 4 (2006-2021) · Carisma (1995-2004) · Space Star (1998-2005) ·
This resource sets cookies 🍪 to avoid bothering you with repeated data entry.