



Contents: Removal ⤓ Installation ⤓
Removal
Mark the position of the wheel disk on the wheel hub with paint. This ensures that the balanced wheel can be reinstalled in its original position.
Raise the front of the car, see item 29.
Remove the wheel.
Caution: Do not swap the pads from the outer to the inner side and vice versa, or from the right to the left wheel and vice versa. Swapping the pads may result in uneven braking. Always replace all pads on one axle at the same time. If you need to reinstall the pads, mark the pads before removing them.
(The material was borrowed from the website: www.mitsubishiman.ru)
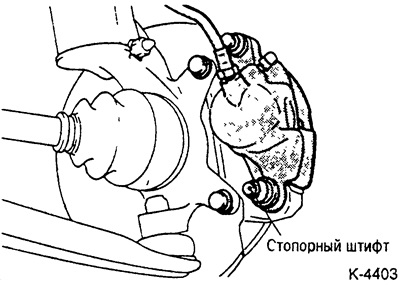
Unscrew the locking pin, tilt the brake caliper upwards and secure it to the car with wire. Make sure that the brake hose is not stretched.
Caution: Do not remove the brake hose, otherwise you will have to bleed the brake system. The locking pin is coated with a special grease. Do not remove the grease under any circumstances. Make sure that no dirt gets in there.
Remove the brake pads with spacer springs, spacer washers and anti-squeak linings.
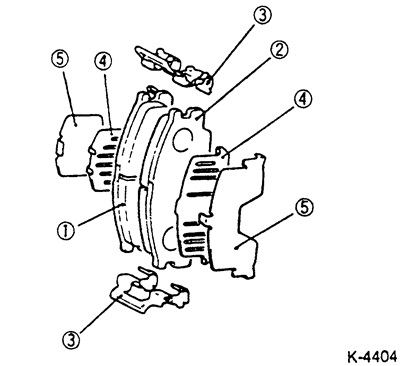
1 - Brake pad with wear indicator
2 - Brake shoe
3 - Bracket
4 - Inner spacer washer
5 - Outer spacer washer
Note: Brake pads and components (brake calipers and linings) vary depending on the model and year of the vehicle. The illustration shows a repair kit for vehicles manufactured from 9.90 to 3.92. If the vehicle is equipped with brake pad components other than those shown in the illustration, be sure to note their installation position. In addition, it is recommended to first remove the brake pads on only one wheel and only after they have been correctly installed should the pads be replaced on the other wheel.
Installation
Caution: When the brake pads are removed, do not press the brake pedal, otherwise the piston will be pushed out of the housing.
Clean the guide surfaces and the pad seats with a soft metal brush or wash with a cloth soaked in alcohol. Do not use any solvents containing mineral oils or tools with sharp edges.
Before installing the pads, check with your fingers for grooves on the brake disc. If there are grooves or scratches, replace the brake disc.
Measure the thickness of the brake disc, see paragraph 18.3.
Make sure there are no tears or cracks in the dust boot and seals in the caliper. Replace a damaged dust boot immediately, as penetrating dirt quickly leads to depressurization of the brake caliper. To do this, the caliper must be removed and disassembled (work in a workshop).
Press the piston down with a strong wooden rod (hammer handle), paying particular attention to ensure that the piston does not become warped and that the dust boot is not damaged.
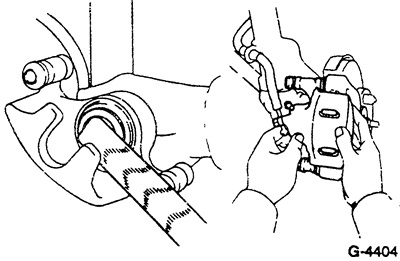
Note: When the piston is pressed, brake fluid is squeezed out of the brake cylinders into the reservoir. Monitor the fluid level in the reservoir, and suck out the brake fluid if necessary.
When sucking, use a plastic bottle that is only for brake fluid. Do not use beverage bottles! Brake fluid is poisonous and should never be sucked out through a hose by mouth. Use suction devices. After replacing the pads, the brake fluid level in the reservoir should not exceed the MAX mark, since the fluid expands when heated. Leaking brake fluid flows onto the master cylinder, destroys the paint and causes corrosion.
Note: If the brake pads are heavily worn, check the ease of movement of the piston. To do this, insert a wooden block into the brake caliper and have an assistant slowly press the brake pedal. The wooden block is installed to prevent the piston from coming out completely. The brake piston should go in and out easily; another caliper can be installed for testing. Make sure that the piston does not come out completely. If the piston is accidentally pushed out completely, the air should be bled from the brake system after installing the piston, see item 18.11.
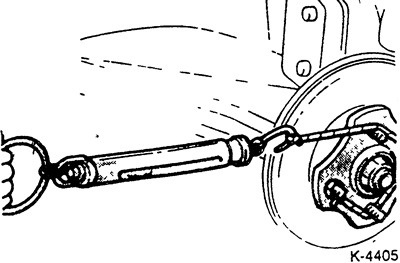
Measure the wheel hub breakaway torque as shown in the figure and record the measured value.
Secure the brackets to the brake caliper bracket.
To prevent disc brakes from squeaking, coat the backs of the brake pads and anti-squeal linings with a thin layer of lubricant (e.g. Plastilube, Tunap VC 582/S, ChevronJSRJ/2, Liqui Moly LM-36 or LM-508-ASC, brake paste SAE J310 NLGI No.1). Under no circumstances should the lubricant come into contact with the working surface of the brake pad or the brake disc. If it does come into contact with the lubricant, wipe it off immediately and clean the surface with alcohol. Apply the paste in such a thin layer that when the brake pad is pressed down during braking, it does not protrude beyond the edge.
Note: Paste is included in some repair kits.
Slide both brake pads with new anti-squeal linings into the retaining springs in the caliper bracket.
Tilt the piston housing downwards and insert and tighten the locking pin with a force of 30 Nm.
Start the engine, press and hold the brake pedal for about 5 seconds. This will cause the brake pads to engage. Switch off the engine and rotate the wheel hub 10 revolutions forward. Then measure the wheel hub breakaway torque, see Fig. K-4405. Compare the measured value with the breakaway torque measured with the old brake pads. If the difference exceeds the required value, disassemble and repair the brake caliper (workshop work).
Required value for a standard brake disc:
- 35 N (3.5 kg) or less.
Required value for a blown brake disc:
- 70 N (7.0 kg) or less.
Position the wheels according to the markings, screw in the wheel nuts. Lower the car and tighten the nuts crosswise. Tightening force see item 19.4.
Caution: Press the brake pedal hard several times until you feel strong resistance.
Check the fluid level in the tank and, if necessary, top up to the MAX mark.
Carefully break in the new brake pads by applying light pressure to the brake pedal several times, from 80 km/h to 40 km/h. Allow the brakes to cool between brakings.
Attention: Avoid full braking during the first 200 km.