English Русский
Български
Беларускі
Український
Српски
Hrvatski
Română
Polski
Slovenský
Magyar
Articles Bookmark Contacts Sitemap   
Company Audi Company Ford Company Hyundai Company Kia Company Mazda Company Mercedes-Benz Company Nissan
MitsubishiMan.ru


Home Colt Lancer Galant L200 Outlander Pajero Others
Pajero 4 (2006-2021) Pajero 1 and 2 (1982-1999)

Front Disc Brake Pads — Removal and Installation (Mitsubishi Pajero 1)

  • Home
  • Pajero
  • 1 (1982-1999)
  • Chassis and running gear
  • Brake system
  • Front Disc Brake Pads — Removal and Installation
0
Contents: Operation diagram of the pad wear…⤓ Removal and installation ⤓ Installation ⤓

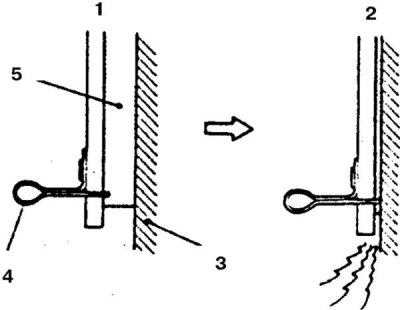
Operation diagram of the pad wear indicator


1. New pad; 2. Worn out; 3. Disk; 4. Indicator; 5. Block


Most vehicles are equipped with a brake pad wear indicator. If you hear a characteristic squealing sound when using the brakes, check the wear of the pads. If the indicator touches the brake disc, the pads should be replaced.
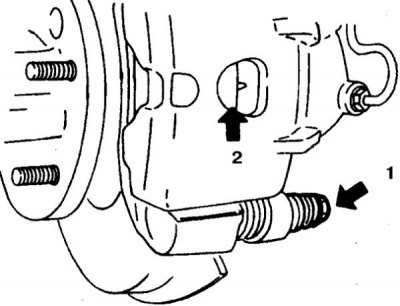


The remaining thickness of the pads can be checked through the window in the caliper (1 – caliper pin, 2 – window).

For a more detailed inspection (uniformity of wear on the plane and checking the condition) the pads need to be removed. The maximum residual thickness of the pads is 1 mm (1983-86) and 2 mm (since 1987).


The original article is on the website MitsubishiMan.ru

Removal and installation


1. Raise the front of the car and remove the wheel.
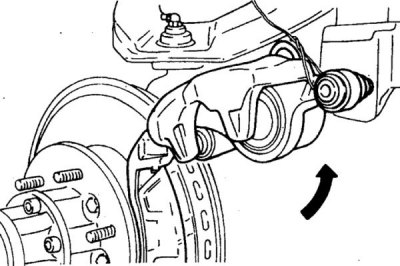


2. Unscrew the lower pin, fold back the caliper and secure it. Do not allow the caliper pin protective grease to be removed or exposed to dirt.


3. Remove the pads, plates and brackets, remember the location of these parts (1 - bracket, 2 - inner plate, 3 - outer plate).

Installation


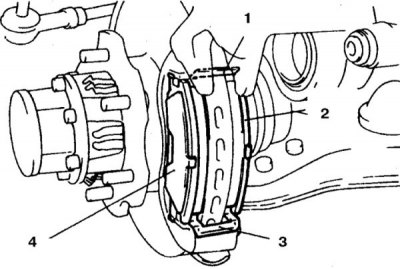
Correct orientation of anti-noise plates and pads during assembly
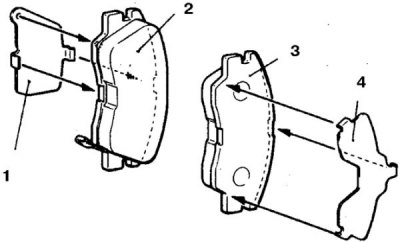


1. Inner plate; 2. Inner shoe; 3. Outer shoe; 4. Outer plate


1. Press the piston into the caliper cylinder using a clamp, monitoring the fluid level in the reservoir (when installing new pads, the piston should be retracted a significant distance).

2. Install the plates and brackets in the same order.

3. Install the pads on the caliper. If upper and lower brackets are provided, they should be replaced together with the pads.

4. Install the caliper, wheel and lower the car.

5. Press the pedal several times to press the pads against the disc. Check the fluid level and top up if necessary.

6. Start the engine and press the brake pedal several times again, check the pedal stiffness. During the first 15 km of driving with new pads, avoid sudden braking.
This article is available at: russian, bulgarian, belarusian, ukrainian, serbian, croatian, romanian, polish, slovak, hungarian
This article was reviewed by: Arseny Pavlov
Share with friends:
◀ Previous
Pajero 1 and 2: Brake system
Next ▶

Bleeding the brake hydraulic system
Hoses, tubes and check valve
Rear Brake Pressure Regulator (1992-98)
Dosing valve — removal and installation
Brake Master Cylinder — Removal and Installation
Front Brake Caliper — Removal and Installation
Front Brake Disc — Removal, Checking and Installation
Rear brake drums — removal, inspection and installation
Replacing rear drum brake shoes
Rear drum brake wheel cylinder
Similar materials for other Mitsubishi models

➤ Measuring the thickness of the front disc brake pads Mitsubishi Colt 4 and 5 (1991-2003)
➤ Removal and installation front brake pads Mitsubishi Lancer 3 and 5 (1984-1992)
➤ Disc brake pads (front and rear) — replacement Mitsubishi Galant 5 (1983-1989, petrol)
➤ Removal the front wheel brake disc Mitsubishi L200 4 (2005-2014, diesel)
➤ Checking the brake disc Mitsubishi Outlander 1 (2003-2008)
➤ Checking and replacing front disc brake pads Mitsubishi Carisma (1995-2004)
Link in different formats to this article
Comments and feedback from visitors
No comments yet


Add up two numbers 34 + 46


Pajero 4 (2006-2021) 
  • General information
  • User manual
  • Troubleshooting
  • Maintenance
  • Technical specifications
  • Power unit
  • Engine repair
  • Cooling system
  • Lubrication system
  • Fuel system
  • Engine management system
  • Intake and exhaust system
  • Engine electrical equipment
  • Transmission
  • Clutch
  • Manual gearbox
  • Automatic gearbox
  • Drive shafts
  • Chassis and running gear
  • Front suspension
  • Rear suspension
  • Brake system
  • Steering
  • Body and interior
  • Exterior (external elements)
  • Interior (internal elements)
  • Doors, locks and windows
  • Body dimensions
  • Electrical equipment
  • Safety system (SRS)
  • Air conditioner
  • Equipment and devices
  • Electrical diagrams
Pajero 1 and 2 (1982-1999) 
  • General information
  • User manual
  • Seats and seat belts
  • Instruments and controls
  • Driving and operation
  • Maintenance
  • Power unit
  • Gasoline engines
  • Diesel engines
  • Ignition system
  • Engine electrical equipment
  • Cooling and lubrication system
  • Power and exhaust system
  • Fuel system (gasoline)
  • Fuel system (diesel)
  • Transmission
  • Clutch
  • Mechanical gearbox
  • Automatic gearbox
  • Drive shafts and axles
  • Chassis and running gear
  • Front suspension
  • Rear suspension
  • Steering
  • Brake system
  • Body and interior
  • Exterior (external elements)
  • Interior (internal elements)
  • Doors, locks and windows
  • Electrical equipment
  • Equipment and devices
  • Heater and air conditioner
  • Cruise control
  • Headlights and lighting
  • Electrical circuits
MitsubishiMan.ru © 2018–2026 • Mobile version • Articles about Mitsubishi • Contacts • Sitemap: EN BG BY UA RS HR RO PL SK HU • Site search • Bookmark
Colt 2 and 3 (1983-1993) · Colt 4 and 5 (1991-2003) · Colt 5 (1995-2003) · Lancer 3 and 5 (1984-1992) · Lancer 9 (2000-2007) · Galant 5 (1983-1989) · Galant 6 and 7 (1987-1998) · L200 4 (2005-2014) · Outlander 1 (2003-2008) · Pajero 1 and 2 (1982-1999) · Pajero 4 (2006-2021) · Carisma (1995-2004) · Space Star (1998-2005) ·
This resource sets cookies 🍪 to avoid bothering you with repeated data entry.