



Removal the front windshield
1. Remove the front body trim.
2. Remove the front ceiling molding.
3. Remove the front pillar trim.
4. Remove the interior rearview mirror.
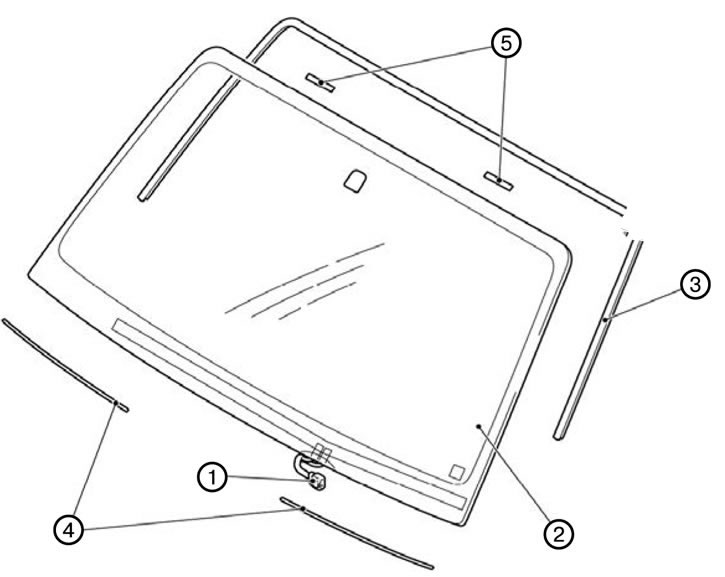
5. Disconnect the windshield wiper de-icer connector (1).
6. Remove the windshield (2).
1) Remove the front windshield sealing panel using a blade.
Note: Be careful not to cut the body structure.
2) Remove the vestigial type cladding.
3) To protect the painted surfaces of the body from scratches and damage, cover them with fabric tape around the installed windshield.
4) Using a sharp, thin drill, make a hole in the windshield adhesive layer.
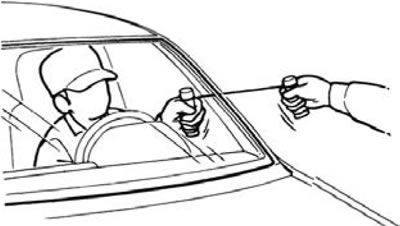
5) Pass a steel string through this hole.
6) Pull the string alternately from the inside and outside along the windshield to cut the glue.
Caution: Do not allow the string to touch the edge of the windshield.
7) Apply installation marks on the body opening and windshield.
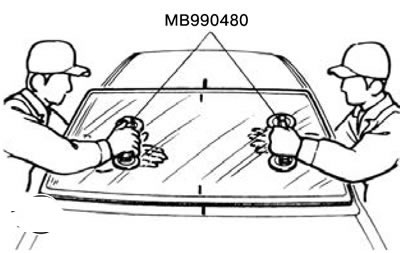
8) Apply mounting marks to the body and windshield surfaces, remove the windshield using suction cups as shown in the figure.
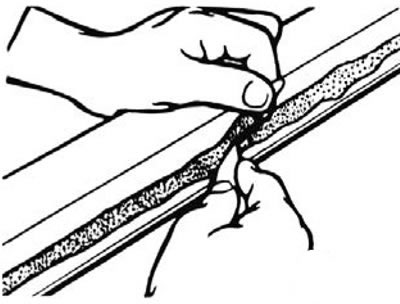
9) Use a knife to cut away the remaining adhesive so that the thickness is 2mm around the entire edge of the body opening.
10) Sand the edges of the body opening flanging to remove sharp burrs.
Caution: Do not remove more old adhesive than necessary. Be careful not to damage the painted surfaces of the car body with the knife; in case of damage, touch up with paint from the repair kit or treat with an anti-corrosion compound.
7. Remove the windshield molding (3). 8. Remove the windshield gasket (4).
9. Remove the glass limiter (5).
Installing the front windshield
1. Install the glass limiter (5).
2. Install the windshield gasket (4).
3. Install the windshield molding (3).
4. Install the windshield (2).
1) Wipe the inner and outer surfaces of the glass and the body opening with alcohol.
2) Wet the sponge in the primer and apply the primer in an even layer to the places on the glass and the body opening as shown in the figure.
3) Then dry for 3 to 30 minutes.
Attention. The primer strengthens the adhesive joint, so it is necessary to apply it evenly in a thin layer along the entire perimeter. However, keep in mind that too thick a layer of primer will weaken the adhesive bond. Do not touch primed surfaces.
4) Install the upper windshield molding onto the windshield.
5) Place the spacer on the windshield so that it tilts towards the windshield and the gaps on the right and left are equal.
6) Install the glass retainer in accordance with the specified dimensions.
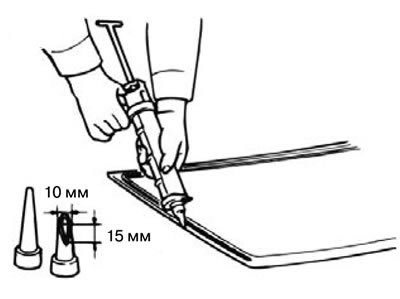
7) Fill the gun with glue. Then apply the adhesive evenly around the windshield within 30 minutes of applying the primer.
Note: Cut the tip of the syringe at an angle (as shown in the picture) to facilitate the application of glue.
Note:
- Start from the edge of the glass.
- Proceed with caution to avoid damaging the primer layer. Press the glass firmly to the body as soon as possible after applying the sealant. To install and transport glass after applying the sealant, use special holders. Check the tightness of the glass and body adhesion. Follow the sealant manufacturer's instructions when treating surfaces and during drying.
8) After applying the glue, align the assembly marks on the windshield and body, and then gently press the windshield to install it in place.
[The original material is here: mitsubishiman.ru]
9) Use a putty knife or similar tool to remove excess adhesive. Then clean the surface with isopropyl alcohol. Install the roof seal molding before the adhesive dries.
10) Try not to move the car until the glue has dried. After the sealant has hardened, pour water from a hose onto the glass to check the tightness of the joints. If a leak is detected, wipe and dry the glass and fill the leak areas with sealant. If the leak continues after applying the sealant, remove the glass and repeat the installation procedure described above.
Caution: Do not move the vehicle unless absolutely necessary. When checking for leaks, do not pinch the tip of the water spray hose.
Note: Do not apply water under high pressure. During drying, do not direct the compressed air stream directly at the sealant. Do not use infrared lamps or other heating devices during the drying process. After installation is complete, pay attention to the following points: Do not close the car doors abruptly until the primer and sealant have completely dried to avoid weakening the joint or even the windshield falling out. Open and close doors only when necessary, and do so carefully. If the seal comes off after installation, press it down with adhesive tape until the sealant is completely dry. The curing time of different types of sealants is not the same. Follow the sealant manufacturer's instructions strictly. Do not start the car engine or move the car until the sealant and primer have completely hardened.
5. Install the ceiling trim.
6. Install the front pillar trim.
7. Connect the windshield wiper de-icer connector (1).
8. Install the interior rearview mirror.
9. Install the front pillar trim.
10. Install the front ceiling molding.
11. Install the front body trim.