



Removal the door assembly
Short wheelbase
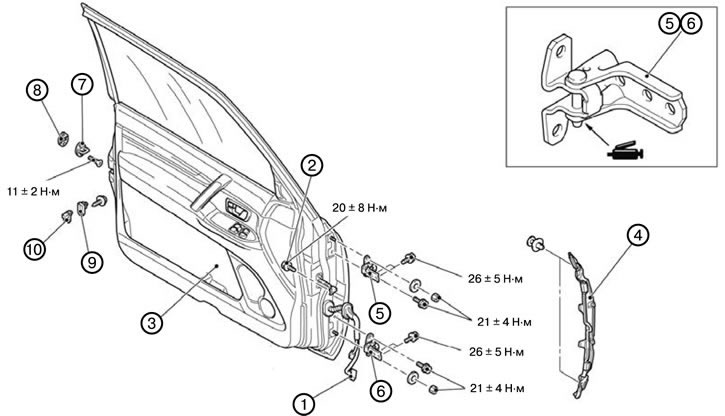
1. Remove the side trim of the hood.
2. Disconnect the electrical wiring connection (1).
3. Loosen the connecting bolt of the front door safety catch (2).
4. Remove the front door assembly (3).
Long wheelbase
5. Remove the rear wing guard (4).
6. Remove the upper hinge of the front door (5).
7. Remove the lower hinge of the front door (6).
8. Remove the striker (7).
9. Remove the striker cover (8).
10. Remove the front door switch cover (9).
11. Remove the rear lower square trim.
12. Remove the front door switch (10).
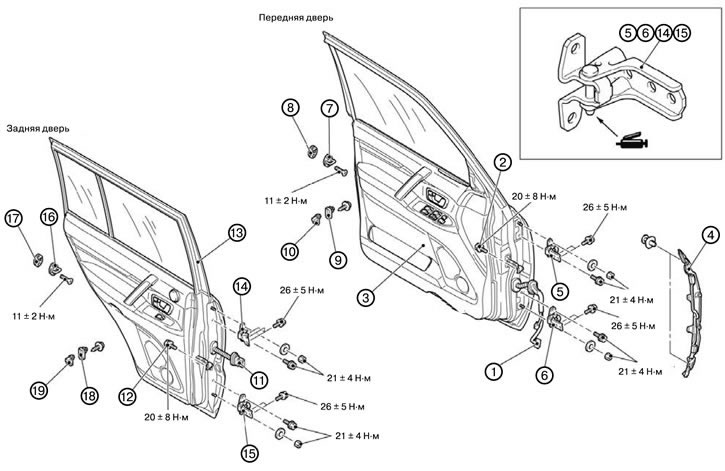
1. Remove the side trim of the hood.
2. Disconnect the electrical wiring connection (1).
3. Loosen the connecting bolt of the front door safety catch (2).
4. Remove the front door assembly (3).
5. Remove the rear wing guard (4).
6. Remove the upper hinge of the front door (5).
7. Remove the lower hinge of the front door (6).
8. Remove the striker (7).
9. Remove the striker cover (8).
10. Remove the front door switch cover (9).
11. Remove the front door switch (10).
12. Remove the center pillar trim.
13. Disconnect the electrical wiring connection (11).
14. Unscrew the connecting bolt of the rear door safety catch (12).
15. Remove the rear door assembly (13).
16. Remove the upper hinge of the rear door (14).
17. Remove the lower hinge of the rear door (15).
18. Remove the rear door striker (16).
19. Remove the rear door striker cover (17).
20. Remove the rear door switch cover (18).
21. Remove the rear lower square trim.
22. Remove the rear door switch (19).
Installing the door assembly
Short wheelbase
Note: When installing, tighten the bolts to the tightening torques shown in the figure.
1. Install the front door switch (10).
2. Install the rear lower square trim.
3. Install the front door switch cover (9).
4. Install the striker plate (8).
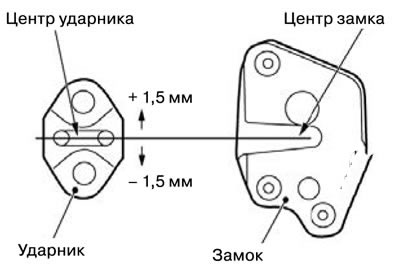
5. Install the striker (7).
1) Install the striker so that its center is offset from the center of the lock by no more than 1.5 mm.
The article is based on data from the website: MitsubishiMan.ru
6. Install the lower hinge of the front door (6).
7. Install the upper hinge of the front door (5).
8. Install the rear wing guard (4).
9. Install the front door assembly (3).
10. Tighten the connecting bolt of the front door safety catch (2).
11. Connect the electrical wiring connection (1).
12. Install the hood side trim.
13. Adjust the position of the front door.
Long wheelbase
Note: When installing, tighten the bolts to the tightening torques shown in the figure.
1. Install the rear door switch (19).
2. Install the rear lower square trim.
3. Install the rear door switch cover (18).
4. Install the rear door striker cover (17).
5. Install the rear door striker (16).
6. Install the lower hinge of the rear door (15).
7. Install the upper hinge of the rear door (14).
8. Install the rear door assembly (13).
9. Tighten the rear door safety catch connecting bolt (12).
10. Connect the electrical wiring connection (11).
11. Install the center pillar trim.
12. Install the front door switch (10).
13. Install the front door switch cover (9).
14. Install the striker plate (8).
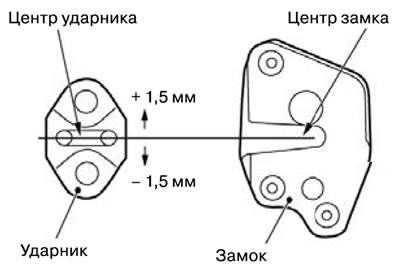
15. Install the striker (7).
1) Install the striker so that its center is offset from the center of the lock by no more than 1.5 mm.
16. Install the lower hinge of the front door (6).
17. Install the upper hinge of the front door (5).
18. Install the rear wing guard (4).
19. Install the front door assembly (3).
20. Tighten the connecting bolt of the front door safety catch (2).
21. Connect the electrical wiring connection (1).
22. Install the hood side trim.
23. Adjust the position of the front door.
24. Adjust the position of the rear door.