



Removal the door handle and lock
Short wheelbase
1. Remove the door trim.
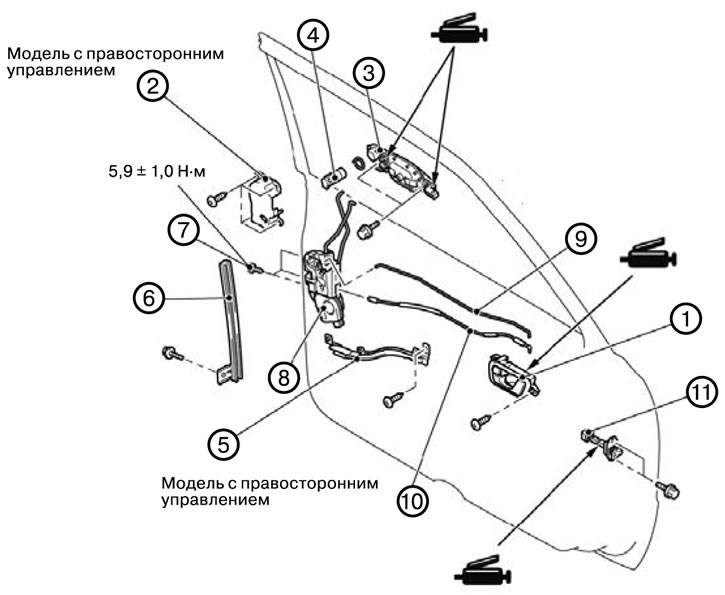
2. Remove the inner door handle (1).
3. Remove the water-repellent film.
4. Remove the door lock cylinder cover (from the driver's side) (2).
5. Remove the outer door handle (3).
6. Remove the door lock cylinder (from the driver's side) (4).
7. Remove the inner locking cable cover (5).
8. Remove the rear lower guide (6).
9. Remove the screw (7).
10. Remove the door lock assembly (8).
11. Remove the inner handle rod (9).
12. Remove the internal locking cable (10).
13. Remove the front door speaker.
14. Remove the door opening limiter (11).
Long wheelbase
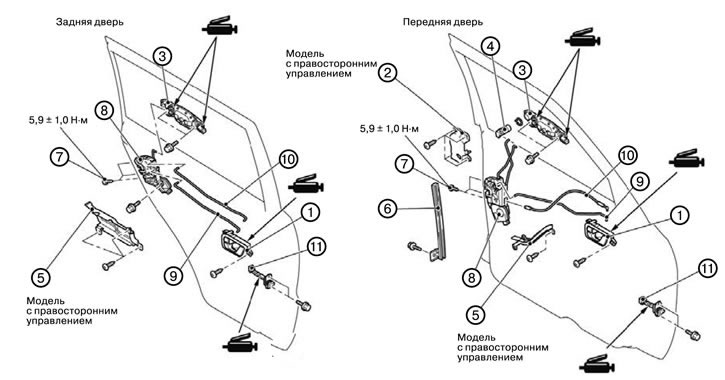
1. Remove the door trim.
2. Remove the inner door handle (1).
3. Remove the water-repellent film.
4. Remove the door lock cylinder cover (from the driver's side) (2).
5. Remove the outer door handle (3).
6. Remove the door lock cylinder (from the driver's side) (4).
7. Remove the inner locking cable cover (5).
8. Remove the rear lower guide (6).
9. Remove the screw (7).
10. Remove the door lock assembly (8).
11. Remove the inner handle rod (9).
12. Remove the internal locking cable (10).
13. Remove the front and rear door speaker.
14. Remove the door opening limiter (11).
Installing a door handle and lock
Short wheelbase
Note: When installing, tighten the bolts to the tightening torques shown in the figure.
1. Install the door opening limiter (11).
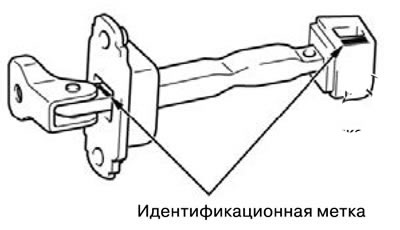
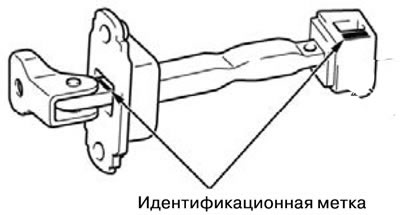
1) Install the door opening limiter in accordance with the marks.
| Name | Label | |
| Front door | Left door | 20L |
| Right door | 20R | |
2. Install the front door speaker.
3. Install the internal locking cable (10).
4. Install the inner handle rod (9).
5. Install the door lock assembly (8).
6. Unscrew the screw (7).
7. Install the rear lower guide (6).
1) Insert the rear lower guide firmly into the rear glass guide.
8. Install the inner locking cable cover (5).
9. Install the door lock cylinder (from the driver's side) (4).
10. Install the outer door handle (3).
11. Install the door lock cylinder cover (from the driver's side) (2).
12. Install water-repellent film.
13. Install the inner door handle (1).
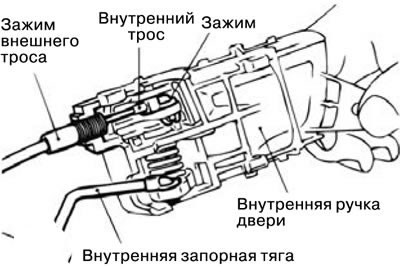
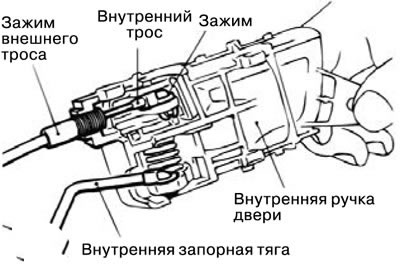
1) Install the inner locking cable into the inner handle.
(1) Install the end of the inner cable into the inner door handle clamp.
(2) Set the interior lock button to the position where the door is locked.
(3) Install the end of the outer cable into the inner door handle.
(4) Install the clamp on the inner cable.
2) Install the internal locking rod into the internal door handle.
3) Install the interior door handle onto the door.
14. Check the movement of the inner door handle.
15. Check the movement of the outer door handle.
16. Install the door trim.
Long wheelbase
Note: When installing, tighten the bolts to the tightening torques shown in the figure.
1. Install the door opening limiter (11).
1) Install the door opening limiter in accordance with the marks.
| Name | Label | |
| Front door | Left door | 20L |
| Right door | 20R | |
| Back door | Left door | 26L |
| Right door | 26R | |
2. Install the front and rear door speaker.
3. Install the internal locking cable (10).
(The article was obtained from this portal: «MITSUBISHIMAN.ru»)
4. Install the inner handle rod (9).
5. Install the door lock assembly (8).
6. Unscrew the screw (7).
7. Install the rear lower guide (6).
1) Insert the rear lower guide firmly into the rear glass guide.
8. Install the inner locking cable cover (5).
9. Install the door lock cylinder (from the driver's side) (4).
10. Install the outer door handle (3).
11. Install the door lock cylinder cover (from the driver's side) (2).
12. Install water-repellent film.
13. Install the inner door handle (1).
1) Install the inner locking cable into the inner handle.
(1) Install the end of the inner cable into the inner door handle clamp.
(2) Set the interior lock button to the position where the door is locked.
(3) Install the end of the outer cable into the inner door handle.
(4) Install the clamp on the inner cable.
2) Install the internal locking rod into the internal door handle.
3) Install the interior door handle onto the door.
14. Check the movement of the inner door handle.
15. Check the movement of the outer door handle.
16. Install the door trim.