
English Русский
Български
Беларускі
Український
Српски
Hrvatski
Română
Polski
Slovenský
Magyar
Articles Bookmark Contacts Sitemap   
Company Audi Company Ford Company Hyundai Company Kia Company Mazda Company Mercedes-Benz Company Nissan
MitsubishiMan.ru


Home Colt Lancer Galant L200 Outlander Pajero Others
Carisma (1995-2004) Space Star (1998-2005)

Rear wheel hub — removal, inspection and installation (Mitsubishi Carisma)

  • Home
  • Mitsubishi
  • Carisma (1995-2004)
  • Chassis and running gear
  • Rear suspension
  • Rear wheel hub — removal, inspection and installation
0
Contents: Removal ⤓ Examination ⤓ Installation ⤓

Removal


To remove the rear wheel hub, perform the following operations in sequence.
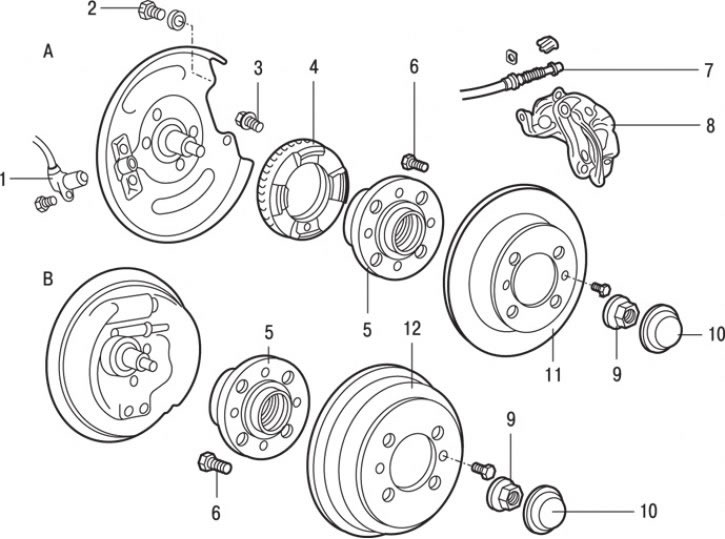


Fig. 16.3. Rear wheel hub design: A - cars with rear disc brakes; B - vehicles with rear drum brakes; 1 – rear wheel speed sensor (cars with ABS); 2 – bolt (49–59 Nm); 3 – bolt (25 Nm); 4 – wheel speed sensor rotor (cars with ABS); 5 – rear wheel hub assembly; 6 – hub mounting bolt; 7 – Parking brake cable connection; 8 – caliper assembly; 9 – hub mounting nut (177 Nm); 10 – hub cap; 11 – brake disc; 12 – brake drum


1. Loosen the mounting bolt and remove sensor 1 (Fig. 16.3) of the rear wheel speed (vehicles with ABS).

2. Disconnect the parking brake cable.

3. Unscrew the two bolts and remove the caliper 8 as a unit. Without disconnecting the brake hose from the caliper, use soft wire to tie the caliper to the body. Do not stretch or twist the brake hose.

4. Remove the brake disc 11.

5. Loosen the screw and remove the brake drum 12.

6. Using a screwdriver as a lever, remove the hub cap 10.

7. Unscrew hub mounting nut 9.

8. Remove the rear wheel hub 5 as an assembly.


9. Replace the rear wheel hub assembly if the inner race of the hub bearing is worn.

10. Remove rotor 4 of the wheel speed sensor (vehicles with ABS).

11. If necessary, unscrew bolt 6 of the hub mounting.

Warning! The rear wheel hub bearing unit must not be disassembled. No damage or scratches are allowed on the teeth of the wheel speed sensor rotor. Do not drop the rotor. If a part of the tooth breaks off as a result of rotor deformation, this will lead to the impossibility of correctly determining the wheel speed and disruption of the ABS system as a whole.


Examination


1. Check the hub seal for cracks and damage.

2. Check the hub bearings for wear or damage.

3. Check for chips on the teeth of the wheel speed sensor rotor.

Installation


Installation is carried out in the reverse order of removal, taking into account the following.

1. Temporarily install the wheel speed sensor into the sensor bracket.

2. With the caliper and brake disc removed, insert a feeler gauge into the gap between the rotor tooth and the wheel speed sensor pole, adjust the gap to 0.3–0.9 mm, and secure the sensor bracket.

3. Adjust the parking brake (vehicles with rear disc brakes).
This article is available at: russian, bulgarian, belarusian, ukrainian, serbian, croatian, romanian, polish, slovak, hungarian
This article was reviewed by: Dmitry Vasiliev
Share with friends:
◀ Previous
Carisma: Rear suspension
Next ▶

General information about the rear suspension
Specifications and data
Checking and adjusting the rear wheel alignment angles
Adjusting, upper and lower rear suspension arms
Replacing the lower arm bushing
Rear Suspension Trailing Arm — Removal, Checking and Installation
Rear strut — removal, inspection and installation
Similar materials for other Mitsubishi models

➤ Rear wheel hub — removal and installation Mitsubishi Colt 4 and 5 (1991-2003)
➤ Rear wheel bearings Mitsubishi Lancer 3 and 5 (1984-1992)
➤ Removal and installation the rear axle hub journal, wheel… Mitsubishi Galant 6 and 7 (1987-1998)
➤ Checking the front and rear wheel hub bearings Mitsubishi L200 4 (2005-2014, diesel)
➤ Rear (fifth) door Mitsubishi Outlander 1 (2003-2008)
➤ Checking the moment of resistance at the start of rotation… Mitsubishi Pajero 4 (2006-2021)
Link in different formats to this article
Comments and feedback from visitors
No comments yet


Add up two numbers 46 + 35


Carisma (1995-2004) 
  • General information
  • User manual
  • Maintenance
  • Power unit
  • Petrol engines 4G9
  • Diesel engines FBQT
  • Diesel engines F9Q
  • Cooling system
  • Injection system (MPI)
  • Injection system (GDI)
  • Engine electrical equipment
  • Transmission
  • Clutch
  • Mechanical gearbox
  • Automatic gearbox
  • Chassis and running gear
  • Steering
  • Brake system
  • Front suspension and shafts
  • Rear suspension
  • Body and interior
  • Exterior (external elements)
  • Interior (internal elements)
  • Doors, locks and windows
  • Air conditioner
  • Electrical equipment
  • Equipment and devices
  • Headlights and lighting
  • Electrical circuits
Space Star (1998-2005) 
  • General information
  • User manual
  • Maintenance
  • Power unit
  • Petrol engines 4G9
  • Petrol engines 4G1
  • Diesel engines F9Q1
  • Cooling system
  • Fuel injection system GDI
  • Fuel injection system MPI
  • Diesel supply system F9Q1
  • Ignition system
  • Diesel preheating
  • Transmission
  • Clutch
  • Mechanical gearbox
  • Automatic gearbox
  • Chassis and running gear
  • Suspension and drive shafts
  • Brake system
  • Steering
  • Body and interior
  • Exterior (external elements)
  • Interior (internal elements)
  • Doors, locks and windows
  • Heating and air conditioning
  • Electrical equipment
  • Power devices
  • Equipment and devices
MitsubishiMan.ru © 2018–2026 • Mobile version • Articles about Mitsubishi • Contacts • Sitemap: EN BG BY UA RS HR RO PL SK HU • Site search • Bookmark
Colt 2 and 3 (1983-1993) · Colt 4 and 5 (1991-2003) · Colt 5 (1995-2003) · Lancer 3 and 5 (1984-1992) · Lancer 9 (2000-2007) · Galant 5 (1983-1989) · Galant 6 and 7 (1987-1998) · L200 4 (2005-2014) · Outlander 1 (2003-2008) · Pajero 1 and 2 (1982-1999) · Pajero 4 (2006-2021) · Carisma (1995-2004) · Space Star (1998-2005) ·
This resource sets cookies 🍪 to avoid bothering you with repeated data entry.