



Note: The (*) symbol indicates parts that must be pre-tightened and then finally tightened with the unloaded vehicle lowered onto the wheels.
Removal
To remove the rear pillar, perform the following operations in sequence.
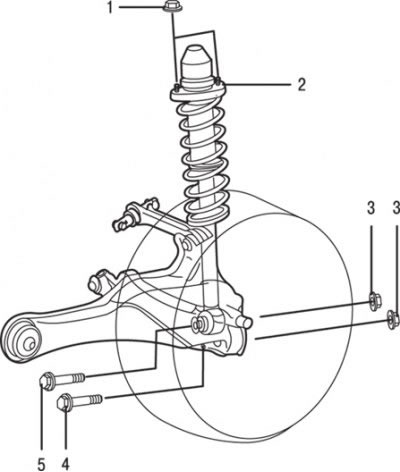
Fig. 16.16. Rear suspension strut: 1 – self-locking flange nut (49 Nm); 2 – rear strut assembly; 3* – nut (98 Nm); 4 – bolt connecting the lower and longitudinal arms; 5 – bolt connecting the rear shock absorber strut assembly and the lower arm
1. Unscrew the self-locking flange nuts 1 (Fig. 16.16).
2. After installing the jack under the lower suspension arm, unscrew the fastening elements.
3. Unscrew and remove bolt 4 connecting the lower and longitudinal arms.
4. Unscrew and remove bolt 5 connecting the rear shock absorber strut assembly and the lower arm.
5. Remove the rear pillar 2 assembly from under the vehicle arch.
Examination
1. Check rubber parts for wear and cracks.
2. Check the shock absorber for faults, fluid leaks and extraneous noise during operation.
(Information copied from the website: MITSUBISHIMAN)
Installation
Installation is carried out in the reverse order of removal.
Attention! The nuts securing the shock absorber strut, longitudinal and lower arms must be pre-tightened, and then the final tightening must be carried out by lowering the unloaded vehicle onto the wheels.