
English Русский
Български
Беларускі
Український
Српски
Hrvatski
Română
Polski
Slovenský
Magyar
Articles Bookmark Contacts Sitemap   
Company Audi Company Ford Company Hyundai Company Kia Company Mazda Company Mercedes-Benz Company Nissan
MitsubishiMan.ru


Home Colt Lancer Galant L200 Outlander Pajero Others
Carisma (1995-2004) Space Star (1998-2005)

Brake pedal (Mitsubishi Space Star)

  • Home
  • Mitsubishi
  • Space Star (1998-2005)
  • Chassis and running gear
  • Brake system
  • Brake pedal
0
Contents: Removal ⤓ Installation ⤓

Removal


  • Disconnect the cable from the negative terminal of the battery
  • Remove the lower instrument panel trim.
  • Remove the steering column assembly.
  • Remove the brake booster.
  • Disconnect the connector from the brake light switch (Fig. 15.31, 15.32).
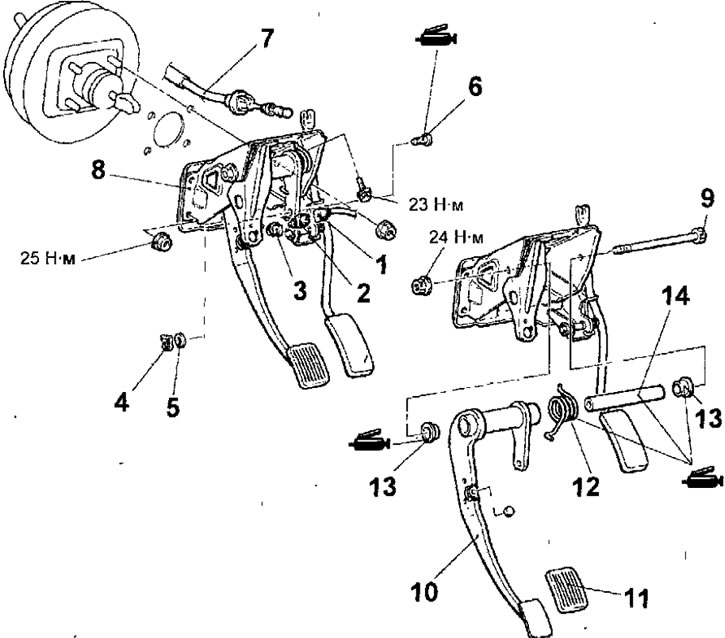


Fig. 15.31 - Brake pedal for cars produced since 1999 with left-hand steering wheel: 1 - brake light switch connector; 2 - brake light switch; 3 - ring; 4 - retainer; 5 - washer; 6 - locking bolt; 7 - accelerator cable; 8 - brake pedal assembly; 9 - brake pedal lever axle bolt; 10 - brake pedal; 11 - brake pedal pad; 12 - brake pedal return spring; 13 - bushing; 14 - sleeve
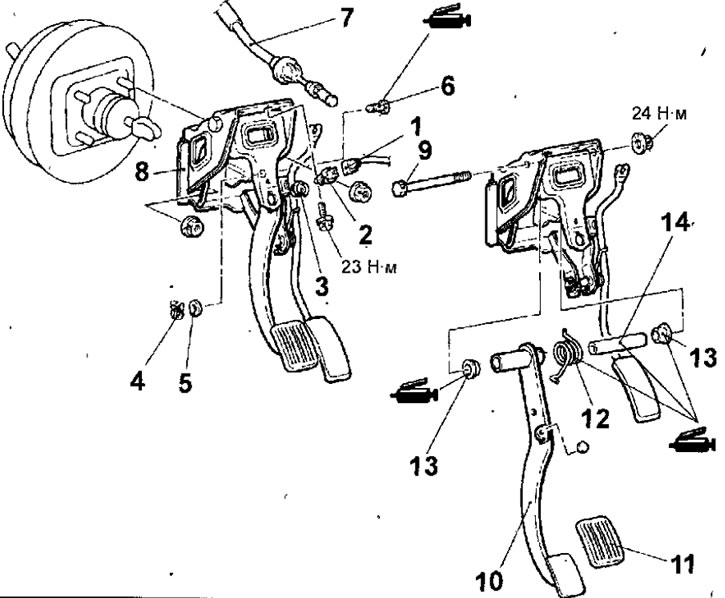


Fig. 15.32. Brake pedal for cars produced since 1999 with right-hand steering wheel: 1 - brake light switch connector; 2 - brake light switch; 3 - ring; 4 - retainer; 5 - washer; 6 - locking bolt; 7 - accelerator cable; 8 - brake pedal assembly; 9 - brake pedal lever axle bolt; 10 - brake pedal; 11 - brake pedal pad; 12 - brake pedal return spring; 13 - bushing; 14 - sleeve


  • Unscrew the brake light switch.
  • Remove the ring.
  • Remove the spring clip and washer.
  • Remove the retaining bolt
  • Disconnect the cable from the accelerator pedal.
  • Remove the bolts and the accelerator pedal assembly.
  • Unscrew the nut and remove the brake pedal lever axle bolt.
  • Remove the brake pedal, brake pedal return spring, bushings and sleeve.

Installation


  • Installation is carried out in the reverse order of removal, taking into account the following.
  • On vehicles manufactured since 2000, tighten the brake booster mounting nuts A, then the brake pedal mounting bolts B (Fig. 15.33). The brake pedal base cannot be installed correctly if the brake pedal mounting bolts are tightened first, as the bolt holes are elongated.
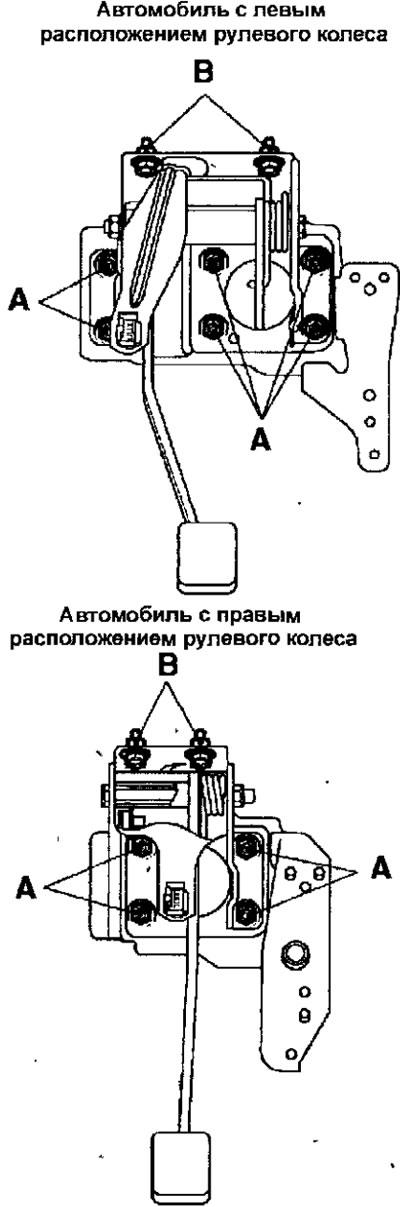


Fig. 15.33. Location of nuts (A) for mounting the brake booster and bolts (B) for mounting the brake pedal on a vehicle manufactured since 2000

  • Adjust the position of the brake pedal.
  • Install the brake booster.
  • Install the steering column assembly.
  • Install the lower instrument panel trim.
  • Connect the cable to the negative terminal of the battery.

(The article is based on data from the website mitsubishiman.ru)
This article is available at: russian, bulgarian, belarusian, ukrainian, serbian, croatian, romanian, polish, slovak, hungarian
This article was reviewed by: Miroslav Rakov
Share with friends:
◀ Previous
Space Star: Brake system
Next ▶

Checking the inner diameter of the brake drum
Checking the thickness of the brake shoe linings of drum brakes
Checking the brake disc
Checking and replacing front disc brake pads
Bleeding the hydraulic brake drive system
Master cylinder and brake booster
Front disc brake
Rear drum brakes
Working brake cylinder
Rear disc brakes
Similar materials for other Mitsubishi models

➤ Brake pedal free play Mitsubishi Colt 5 (1995-2003, petrol)
➤ Adjusting the brake light switch / brake pedal height Mitsubishi Lancer 3 and 5 (1984-1992)
➤ Adjusting the foot brake pedal Mitsubishi Galant 6 and 7 (1987-1998)
➤ Checking the free travel of the brake pedal Mitsubishi L200 4 (2005-2014, diesel)
➤ Checking and adjusting the brake pedal Mitsubishi Outlander 1 (2003-2008)
➤ Brake pedal Mitsubishi Pajero 1 and 2 (1982-1999)
Link in different formats to this article
Comments and feedback from visitors
No comments yet


Add up two numbers 15 + 23


Carisma (1995-2004) 
  • General information
  • User manual
  • Maintenance
  • Power unit
  • Petrol engines 4G9
  • Diesel engines FBQT
  • Diesel engines F9Q
  • Cooling system
  • Injection system (MPI)
  • Injection system (GDI)
  • Engine electrical equipment
  • Transmission
  • Clutch
  • Mechanical gearbox
  • Automatic gearbox
  • Chassis and running gear
  • Steering
  • Brake system
  • Front suspension and shafts
  • Rear suspension
  • Body and interior
  • Exterior (external elements)
  • Interior (internal elements)
  • Doors, locks and windows
  • Air conditioner
  • Electrical equipment
  • Equipment and devices
  • Headlights and lighting
  • Electrical circuits
Space Star (1998-2005) 
  • General information
  • User manual
  • Maintenance
  • Power unit
  • Petrol engines 4G9
  • Petrol engines 4G1
  • Diesel engines F9Q1
  • Cooling system
  • Fuel injection system GDI
  • Fuel injection system MPI
  • Diesel supply system F9Q1
  • Ignition system
  • Diesel preheating
  • Transmission
  • Clutch
  • Mechanical gearbox
  • Automatic gearbox
  • Chassis and running gear
  • Suspension and drive shafts
  • Brake system
  • Steering
  • Body and interior
  • Exterior (external elements)
  • Interior (internal elements)
  • Doors, locks and windows
  • Heating and air conditioning
  • Electrical equipment
  • Power devices
  • Equipment and devices
MitsubishiMan.ru © 2018–2026 • Mobile version • Articles about Mitsubishi • Contacts • Sitemap: EN BG BY UA RS HR RO PL SK HU • Site search • Bookmark
Colt 2 and 3 (1983-1993) · Colt 4 and 5 (1991-2003) · Colt 5 (1995-2003) · Lancer 3 and 5 (1984-1992) · Lancer 9 (2000-2007) · Galant 5 (1983-1989) · Galant 6 and 7 (1987-1998) · L200 4 (2005-2014) · Outlander 1 (2003-2008) · Pajero 1 and 2 (1982-1999) · Pajero 4 (2006-2021) · Carisma (1995-2004) · Space Star (1998-2005) ·
This resource sets cookies 🍪 to avoid bothering you with repeated data entry.