
English Русский
Български
Беларускі
Український
Српски
Hrvatski
Română
Polski
Slovenský
Magyar
Articles Bookmark Contacts Sitemap   
Company Audi Company Ford Company Hyundai Company Kia Company Mazda Company Mercedes-Benz Company Nissan
MitsubishiMan.ru


Home Colt Lancer Galant L200 Outlander Pajero Others
Carisma (1995-2004) Space Star (1998-2005)

Checking and adjusting the brake pedal position (Mitsubishi Space Star)

  • Home
  • Mitsubishi
  • Space Star (1998-2005)
  • Chassis and running gear
  • Brake system
  • Checking and adjusting the brake pedal position
0


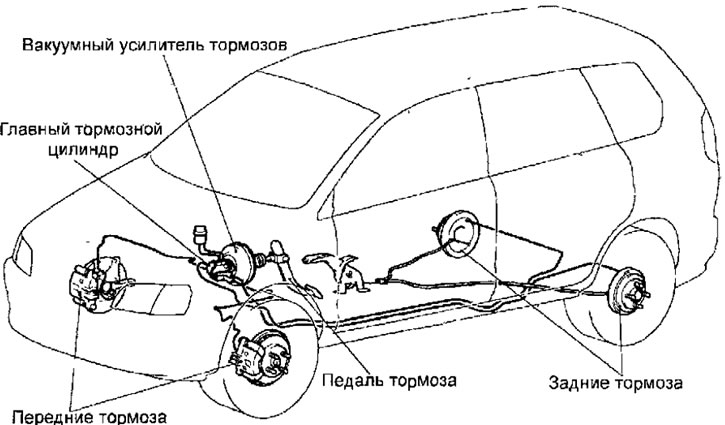
Fig. 15.1. Location of brake system components without ABS
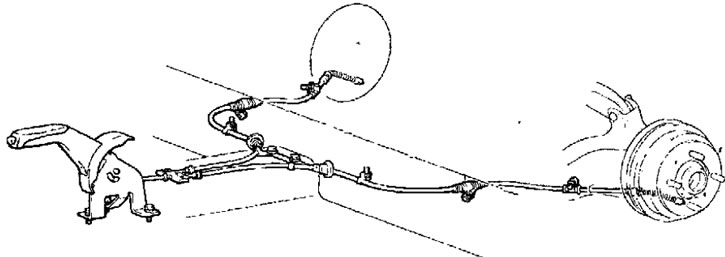


Fig. 15.2. Elements of the parking brake system


1. Remove the floor carpet and measure the brake pedal installation height above the floor (Fig. 15.3). If the pedal installation height is not correct, adjust it as follows.
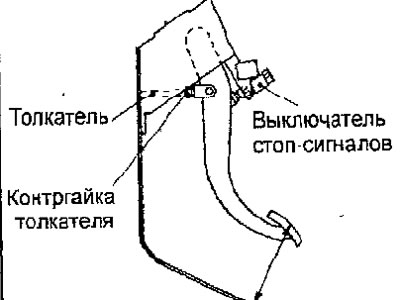


Fig. 15.3. Measuring the brake pedal installation height


Brake pedal installation height: 163.5-166.5 mm

(1) Disconnect the connector from the brake light switch.

(2) Loosen the pusher lock nut and, using pliers, turn the pusher in one direction or the other to adjust the height of the brake pedal above the floor (Fig. 15.4).
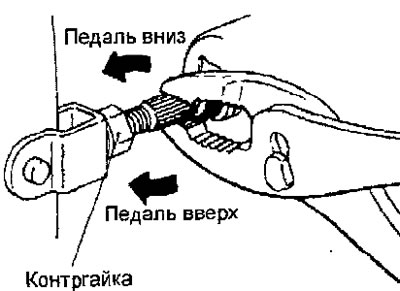


Fig. 15.4. Adjusting the height of the brake pedal above the floor


(3) Tighten the push rod lock nut.

(4) Press the brake light switch fully towards the brake pedal. The switch will only move when pressed firmly.

(5) Raise the brake pedal until the plunger comes out completely, then move the brake light switch to the required position. Rotate the brake light switch to adjust its position so that the gap is within 0.5-1.0 mm (Fig. 15.5).
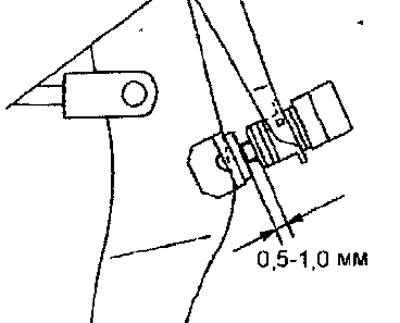


Fig. 15.5. Location for measuring the gap between the brake light switch rod and the brake pedal


(6) Connect the connector to the brake light switch.

(7) Check that the brake lights go out when you release the brake pedal.

2. With the engine off, press the brake pedal several times to remove the vacuum in the brake booster. Press the brake pedal by hand until you feel a noticeable resistance and measure the free travel of the pedal (Fig. 15.6).
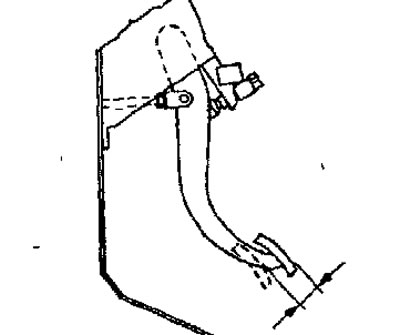


Fig. 15.6. Location for measuring free travel of the brake pedal


Brake pedal free play: 3-8 mm

If the brake pedal free play exceeds the permissible value, the gap in the connection between the brake pedal and the pedal bracket is probably increased. Check the gap and, if necessary, replace damaged parts.

3. Start the engine, press the brake pedal with a force of 490 N and measure the distance between the pedal and the floor (Fig. 15.7).
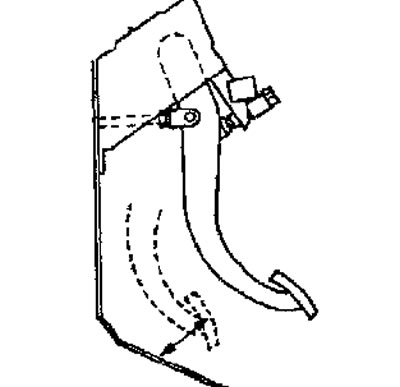


Fig. 15.7. Location for measuring the distance between the floor and the brake pedal when pressed


Distance between the floor and the brake pedal when pressed: not less than 80

If the measured distance is not as required, check for air in the hydraulic brake system, clearance between the brake shoes and drum, or parking brake drag. Adjust and replace faulty parts as necessary.
This article is available at: russian, bulgarian, belarusian, ukrainian, serbian, croatian, romanian, polish, slovak, hungarian
This article was reviewed by: Miroslav Rakov
Share with friends:
◀ Previous
Space Star: Brake system
Next ▶

Brake system — technical data
Checking the brake light switch
Checking the brake booster
Checking the one-way vacuum valve
Checking the rear brake pressure regulator
Checking the brake fluid level sensor
Similar materials for other Mitsubishi models

➤ Checking and adjusting the brake pedal Mitsubishi Colt 5 (1995-2003, petrol)
➤ Checking and adjusting the brake pedal Mitsubishi Lancer 9 (2000-2007, petrol)
➤ Adjusting the foot brake pedal Mitsubishi Galant 6 and 7 (1987-1998)
➤ Checking the free travel of the brake pedal Mitsubishi L200 4 (2005-2014, diesel)
➤ Checking and adjusting the brake pedal Mitsubishi Outlander 1 (2003-2008)
➤ Checking and adjusting the brake pedal Mitsubishi Pajero 4 (2006-2021)
Link in different formats to this article
Comments and feedback from visitors
No comments yet


Add up two numbers 20 + 45


Carisma (1995-2004) 
  • General information
  • User manual
  • Maintenance
  • Power unit
  • Petrol engines 4G9
  • Diesel engines FBQT
  • Diesel engines F9Q
  • Cooling system
  • Injection system (MPI)
  • Injection system (GDI)
  • Engine electrical equipment
  • Transmission
  • Clutch
  • Mechanical gearbox
  • Automatic gearbox
  • Chassis and running gear
  • Steering
  • Brake system
  • Front suspension and shafts
  • Rear suspension
  • Body and interior
  • Exterior (external elements)
  • Interior (internal elements)
  • Doors, locks and windows
  • Air conditioner
  • Electrical equipment
  • Equipment and devices
  • Headlights and lighting
  • Electrical circuits
Space Star (1998-2005) 
  • General information
  • User manual
  • Maintenance
  • Power unit
  • Petrol engines 4G9
  • Petrol engines 4G1
  • Diesel engines F9Q1
  • Cooling system
  • Fuel injection system GDI
  • Fuel injection system MPI
  • Diesel supply system F9Q1
  • Ignition system
  • Diesel preheating
  • Transmission
  • Clutch
  • Mechanical gearbox
  • Automatic gearbox
  • Chassis and running gear
  • Suspension and drive shafts
  • Brake system
  • Steering
  • Body and interior
  • Exterior (external elements)
  • Interior (internal elements)
  • Doors, locks and windows
  • Heating and air conditioning
  • Electrical equipment
  • Power devices
  • Equipment and devices
MitsubishiMan.ru © 2018–2026 • Mobile version • Articles about Mitsubishi • Contacts • Sitemap: EN BG BY UA RS HR RO PL SK HU • Site search • Bookmark
Colt 2 and 3 (1983-1993) · Colt 4 and 5 (1991-2003) · Colt 5 (1995-2003) · Lancer 3 and 5 (1984-1992) · Lancer 9 (2000-2007) · Galant 5 (1983-1989) · Galant 6 and 7 (1987-1998) · L200 4 (2005-2014) · Outlander 1 (2003-2008) · Pajero 1 and 2 (1982-1999) · Pajero 4 (2006-2021) · Carisma (1995-2004) · Space Star (1998-2005) ·
This resource sets cookies 🍪 to avoid bothering you with repeated data entry.