



Contents: Removal ⤓ Installation ⤓
Removal
Warning: When removing and installing the gearshift lever and rod, be careful not to hit the electronic control unit of the additional passive safety system (SRS-ECLf).
- Remove the air filter.
- Remove the center console.
- Remove the gear shift lever handle by pulling it upwards (Fig. 12.11).
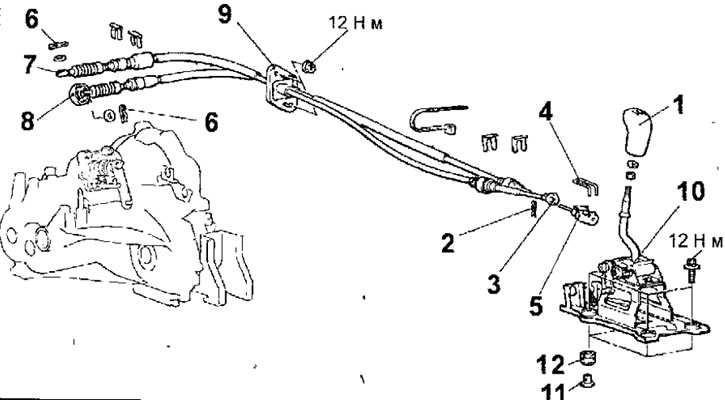
Fig. 12.11. Gear shift mechanism of the F5M42 gearbox: 1 - gear shift lever handle; 2 - cotter pin; 3 - gear shift cable tip (gear shift lever side); 4 - retainer; 5 - gear selector cable tip (gear shift lever side); 6 - cotter pin; 7 - gear selection cable tip (gearbox side); 8- gear shift cable tip (gearbox side); 9 - gear shift and selection cables assembly; 10 — gear shift lever assembly; 11 - spacer sleeve; 12 - bushing
- Remove the bushing.
- Disconnect the gear selector cable from the gear shift lever (gear shift lever side).
- Remove the retainer and disconnect the gear shift cable (from the gear shift lever side).
- Remove the cotter pins, disconnect (from the gearbox side) the gear selection and shift cables.
- Loosen the nuts securing the torso seals to the body and remove the cables from the vehicle.
- Remove the bolts, bushings, spacers and gear shift lever assembly.
[The original was published on the website: mitsubishiman.ru]
Installation
- Installation is carried out in the reverse order of removal, taking into account the following.
- Set the gear shift lever on the gearbox and the gear shift lever in the passenger compartment to neutral position (Fig. 12.12).
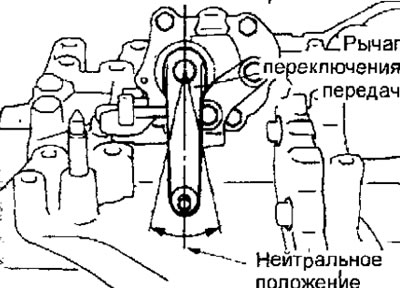
Fig. 12.12. Setting the gearshift lever on the gearbox to neutral position
- On the gearbox side, use the quick and yellow marks to identify the ends of the shift and gear selection cables and secure them with cotter pins.
- Inside the vehicle, connect the shift and selector cables to the gear shift lever.
- Move the gearshift lever to all operating positions and check its functionality. Shifting should be smooth and without sticking.