



Removal
1. Disconnect the negative battery cable
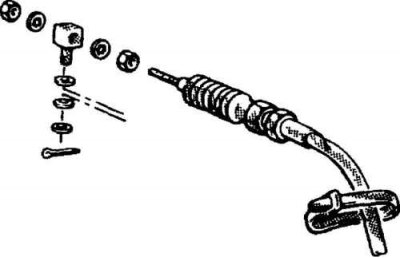
5.2 The selector cable is attached to the lever on the gearbox using a pin and washers and to the bracket using a clamp or two nuts (located on the sides of the bracket)
2. In the engine compartment, remove the air filter, disconnect the cable from the lever on the gearbox and remove it from the bracket (5.2)
3. Raise the vehicle and place it on supports.
4. From underneath the vehicle, unscrew the cable mounting bolts and nuts.
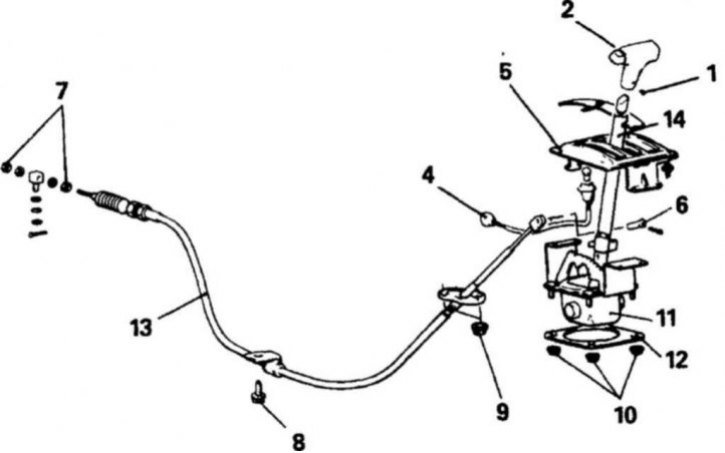
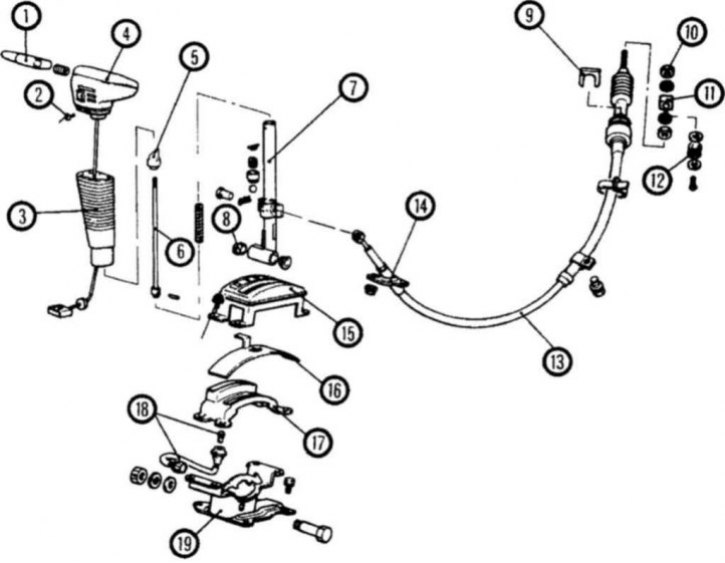
5.5a Automatic transmission selector lever components for Cordia/Tredia models, as well as early Colt, Lancer, Mirage and Precis
1. Mounting screw; 2. Handle; 3. Console (not shown); 4. Light bulb; 5. Selector panel; 6. Bolt; 7. Cable adjusting nuts; 8. Mounting bolt; 9. Cable mounting bracket nuts; 10. Selector lever mounting nuts; 11. Selector mechanism; 12. Gasket; 13. Cable; 14. Selector lever
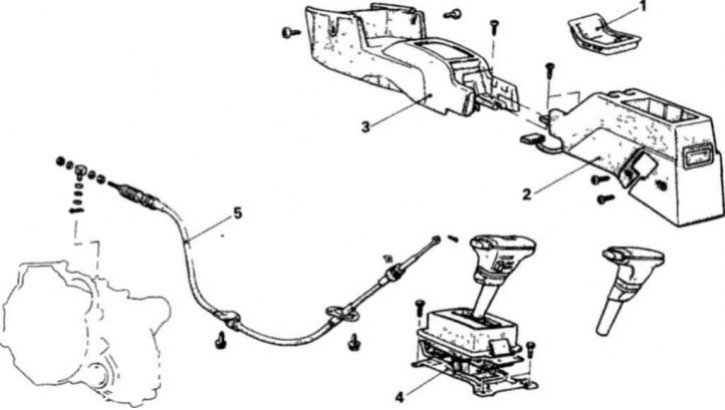
5.5b Components of the automatic transmission selector of late-model Colt, Lancer, Mirage and Precis models
1. Console shelf; 2. Rear console; 3. Front console; 4. Selector; 5. Cable
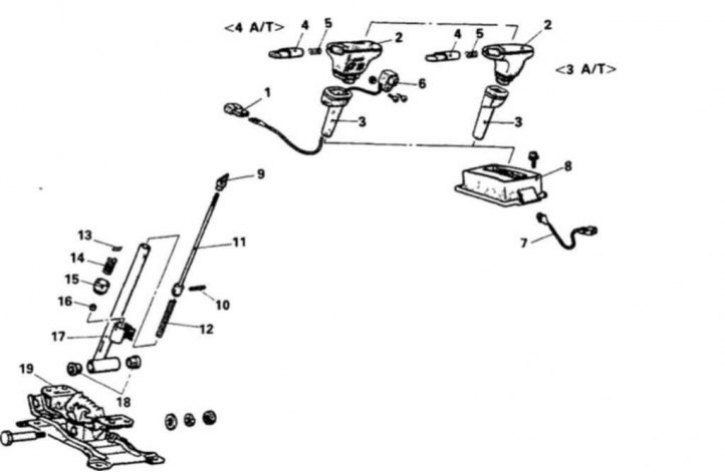
5.5v Automatic transmission selector elements for late model Colt, Lancer, Mirage and Precis
1. Overdrive switch connection connector; 2. Handle; 3. Casing; 4. Button; 5. Spring; 6. Overdrive switch; 7. Light bulb; 8. Selector panel; 9. Bushing; 10. Spring pin; 11. Rod; 12. Lower spring; 13. Pin; 14. Spring; 15. Fastening; 16. Steel ball; 17. Lever; 18. Bushings; 19. Bracket
5.5g Elements of the automatic transmission selector of the early Galant model
1. Button; 2. Screw; 3. Casing; 4. Handle; 5. Bushing; 6. Rod; 7. Selector lever; 8. Bushing; 9. Clamp; 10. Adjusting nut; 11. Regulator; 12. Bushing; 13. Cable; 14. Cable tip; 15. Panel; 16. Pointer; 17. Selector panel; 18. Light bulb; 19. Bracket
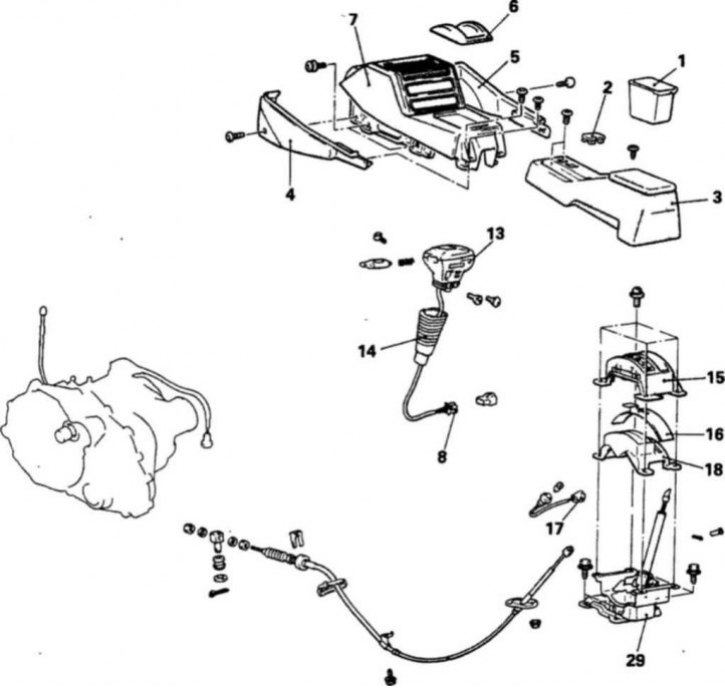
5.5d Automatic transmission selector lever components for 1987 and 1988 Galant models
1. Inner box; 2. Plug; 3. Rear console; 4. Left casing; 5. Right casing; 6. Trim panel; 7. Front console; 8. Overdrive switch connection connector; 9. Screw; 10. Handle mounting screw; 11. Button; 12. Spring; 13. Handle; 14. Casing; 15. Selector panel; 16. Pointer; 17. Light bulb connection socket; 18. Lower selector panel; 19. Split retaining ring; 20. Pin; 21. Air filter; 22. Winding the cable; 23. Clamp; 24. Check; 25. Bushing; 26. Cable; 27. Adjusting nut; 28. Regulator; 29. Selector lever
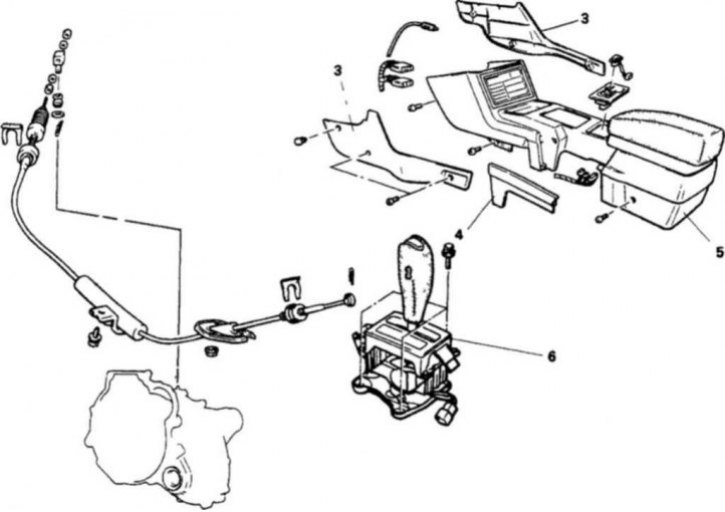
5.5e 1989 and later Galant automatic transmission selector lever components
1. Selector panel; 2. Gearbox mode switch; 3. Side casing; 4. Handbrake side panel; 5. Console; 6. Selector lever; 7. Clamp; 8. Fastening clamp; 9. Clamp; 10. Fastening clamp; 11. Cable; 12. Bushing
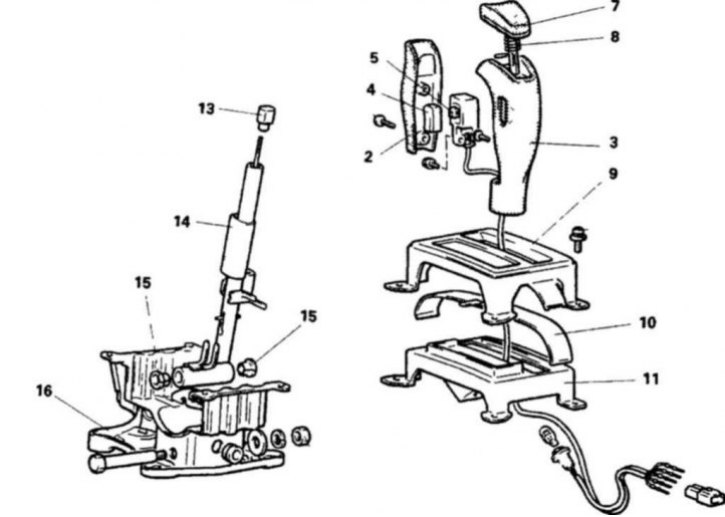
5.5zh Automatic transmission selector components for 1989 and later Galant models
1. Switch connection connector; 2. Casing; 3. Handle; 4. Button; 5. Overdrive switch; 6. Pin; 7. Button; 8. Spring; 9. Selector panel; 10. Pointer; 11. Lower selector panel; 12. Nest; 13. Bushing; 14. Selector lever; 15. Bushing; 16. Bracket
5. Unscrew the fastening bolts and nuts of the selector lever (5.5a, 5.5b, 5.5c, 5.5g, 5.5d, 5.5e and 5.5g)
6. In the passenger compartment, remove the selector lever handle and console. Disconnect the cable from the lever and remove the selector lever (5.5a, 5.5b, 5.5c, 5.5g, 5.5d, 5.5e and 5.5g).
7. Remove the selector cable from the vehicle.
Installation
8. Installation is carried out in the reverse order of removal.
Adjustment
9. Move the selector lever to the neutral position.
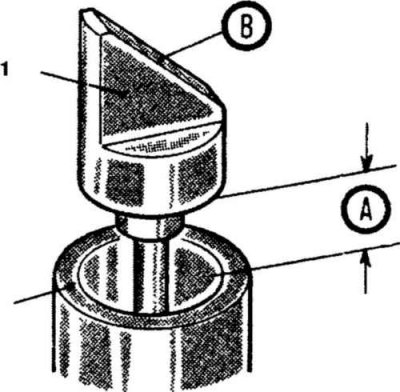
5.10 Turn the selector lever to obtain the required clearance (A), the beveled side (B) of the bushing should face the driver
1. Bushing; 2. Lever
10. Tighten the bushing to adjust the gap between the bushing and the lever (5.10).
11. Install the console and selector lever handle.
12. Eliminate the slack in the cable by tightening the adjusting nuts on the gearbox lever (5.5a, 5.5b, 5.5c, 5.5g, 5.5d, 5.5e and 5.5g).
13. Check the operation of the selector mechanism. Adjust the locking switch if necessary.