



Share with friends:
Car engine overhaul Mitsubishi Colt 2 and 3
This chapter describes the operations for rebuilding the cylinder block and cylinder head.

Engine specifications
General Compression pressure (at 250 rpm) 192 psi Oil pressure (engine warm) minimum 11 psi at idle 1.5L engines Cylinder head deformation Nominal 0.05 mm Maximum...
General Compression pressure (at 250 rpm) 192 psi Oil pressure (engine warm) minimum 11 psi at idle 1.5L engines Cylinder head deformation Nominal 0.05 mm Maximum...

Engine Overhaul — General Notes
It is not always easy to come to a conclusion about the advisability of a complete engine overhaul, since it is necessary to rely on a number of objective indicators....
It is not always easy to come to a conclusion about the advisability of a complete engine overhaul, since it is necessary to rely on a number of objective indicators....

Engine diagnostics using a vacuum gauge, compression testing and power unit dismantling
Measuring vacuum is a reliable and relatively cheap way to diagnose an engine. The vacuum gauge readings can provide information on the condition of the piston group,...
Measuring vacuum is a reliable and relatively cheap way to diagnose an engine. The vacuum gauge readings can provide information on the condition of the piston group,...

Installing the piston of cylinder N 1
1. Put the transmission in neutral, set the parking brake, disconnect the center wire from the distributor cap and ground it to the cylinder block. Remove the spark...
1. Put the transmission in neutral, set the parking brake, disconnect the center wire from the distributor cap and ground it to the cylinder block. Remove the spark...
Engine Removal — General Description
Before removing the engine, clean the engine and engine compartment. Prepare the necessary tools, including a lift, jack, wrenches, wooden blocks and rags. You will also...
Before removing the engine, clean the engine and engine compartment. Prepare the necessary tools, including a lift, jack, wrenches, wooden blocks and rags. You will also...

Engine — removal and installation
Removal 1. If your vehicle has an air conditioning system, have it discharged by a professional. 2. Cover the front wings with old blankets. 3. Remove the hood. 4....
Removal 1. If your vehicle has an air conditioning system, have it discharged by a professional. 2. Cover the front wings with old blankets. 3. Remove the hood. 4....
Engine Overhaul — Alternative Methods
When overhauling the engine, evaluate the condition of all engine components, the availability and cost of spare parts, the complexity of the repair, and the time...
When overhauling the engine, evaluate the condition of all engine components, the availability and cost of spare parts, the complexity of the repair, and the time...

Engine overhaul — disassembly procedure
1. Place the engine on a stand or on the floor. 8.2a 1.5L engine - view from the timing belt side 8.2b 1.5L engine - fork from the intake manifold side 8.2v 1.5L Engine...
1. Place the engine on a stand or on the floor. 8.2a 1.5L engine - view from the timing belt side 8.2b 1.5L engine - fork from the intake manifold side 8.2v 1.5L Engine...

Cylinder head — disassembly
1. Remove the rocker arm shafts and rocker arms. 9.2 To store the valve mechanism components, use small plastic bags with the appropriate label to avoid mixing up the...
1. Remove the rocker arm shafts and rocker arms. 9.2 To store the valve mechanism components, use small plastic bags with the appropriate label to avoid mixing up the...

Cylinder head — cleaning and inspection
Cleaning 1. Remove traces of old gasket and sealant from the surface of the head. Remove scale from the water channels. Clean all other channels. Clean the threaded...
Cleaning 1. Remove traces of old gasket and sealant from the surface of the head. Remove scale from the water channels. Clean all other channels. Clean the threaded...

Cylinder head — assembly
1. Clean the head thoroughly before starting assembly. 12.2 A deep groove bushing or special tool is required to install the valve seal 1. Special tool; 2. Compaction;...
1. Clean the head thoroughly before starting assembly. 12.2 A deep groove bushing or special tool is required to install the valve seal 1. Special tool; 2. Compaction;...

Pistons and connecting rods — removal
13.1 A special tool is required to remove the shoulder at the top of the cylinder - remove the shoulder before removing the piston 1. Check for the presence of a ledge...
13.1 A special tool is required to remove the shoulder at the top of the cylinder - remove the shoulder before removing the piston 1. Check for the presence of a ledge...

Crankshaft — Removal
14.1 Check the crankshaft axial play using a dial gauge 1. Main bearing cap; 2. Dial gauge 1. Before removing the crankshaft, check the axial play using a dial gauge...
14.1 Check the crankshaft axial play using a dial gauge 1. Main bearing cap; 2. Dial gauge 1. Before removing the crankshaft, check the axial play using a dial gauge...

Cylinder Block — Cleaning
15.1 Use a puller to remove the plugs 1. Drill holes in the plugs and remove them using the puller (15.1). 2. Remove traces of old gasket and sealant from the surface of...
15.1 Use a puller to remove the plugs 1. Drill holes in the plugs and remove them using the puller (15.1). 2. Remove traces of old gasket and sealant from the surface of...

Cylinder Block — Inspection
1. Before inspecting the unit, clean it. 2. Inspect the block for cracks and corrosion. Check the threads in the threaded holes. 3. Inspect the cylinders for scratches...
1. Before inspecting the unit, clean it. 2. Inspect the block for cracks and corrosion. Check the threads in the threaded holes. 3. Inspect the cylinders for scratches...

Cylinder honing
1. Before honing the cylinders, install the main bearing caps and tighten the mounting bolts to the specified torque. 17.2a If you do not have much experience in honing...
1. Before honing the cylinders, install the main bearing caps and tighten the mounting bolts to the specified torque. 17.2a If you do not have much experience in honing...

Pistons and connecting rods — inspection
18.1 Use a special tool to remove piston rings 1. Carefully remove the rings from the pistons (18.1), being careful not to scratch the pistons. 18.2a The piston grooves...
18.1 Use a special tool to remove piston rings 1. Carefully remove the rings from the pistons (18.1), being careful not to scratch the pistons. 18.2a The piston grooves...

Crankshaft — inspection
1. Clean the crankshaft with solvent and dry it with compressed air. 2. Inspect the journals for wear, scratches, corrosion and cracks. 19.3 Run a copper coin along the...
1. Clean the crankshaft with solvent and dry it with compressed air. 2. Inspect the journals for wear, scratches, corrosion and cracks. 19.3 Run a copper coin along the...
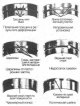
Main and connecting rod bearing shells — inspection
20.1 Different types of wear of plain bearing liners 1. The condition of the bearing shells will allow you to determine the cause of their failure (20.1). After removal,...
20.1 Different types of wear of plain bearing liners 1. The condition of the bearing shells will allow you to determine the cause of their failure (20.1). After removal,...
Engine overhaul — assembly order
1. Before starting assembly, check that all necessary spare parts, gaskets and seals, as well as the necessary tools, are available. The engine assembly must be carried...
1. Before starting assembly, check that all necessary spare parts, gaskets and seals, as well as the necessary tools, are available. The engine assembly must be carried...

Piston rings — installation
1. Before installing new piston rings, it is necessary to check the end and side clearances. 22.2 When checking the end clearance of the piston ring, it must be...
1. Before installing new piston rings, it is necessary to check the end and side clearances. 22.2 When checking the end clearance of the piston ring, it must be...

Crankshaft — Installation and Checking of Main Bearing Lubrication Clearance
1. Turn the engine over and remove the main bearing caps. 2. Remove the old liners and wipe the surface of the cylinder block and covers. They must be perfectly clean....
1. Turn the engine over and remove the main bearing caps. 2. Remove the old liners and wipe the surface of the cylinder block and covers. They must be perfectly clean....

Installing the rear crankshaft oil seal
1. Inspect the crankshaft journal for scratches or nicks that could damage the new seal. 24.2a Place the gland housing on wooden blocks and knock out the old gland 2....
1. Inspect the crankshaft journal for scratches or nicks that could damage the new seal. 24.2a Place the gland housing on wooden blocks and knock out the old gland 2....

Pistons and connecting rods — installation and checking of bearing lubrication clearance
1. Before installing the pistons and connecting rods, clean the cylinders and install the crankshaft in place. 2. Remove the first connecting rod cover. Checking the...
1. Before installing the pistons and connecting rods, clean the cylinders and install the crankshaft in place. 2. Remove the first connecting rod cover. Checking the...
First engine start after overhaul
Attention! When starting the engine for the first time, check that you have a fire extinguisher! 1. After installing the engine, check all the cooling and lubrication...
Attention! When starting the engine for the first time, check that you have a fire extinguisher! 1. After installing the engine, check all the cooling and lubrication...
This section is available on: russian, bulgarian, belarusian, ukrainian, serbian, croatian, romanian, polish, slovak, hungarian
Similar materials for other Mitsubishi models
➤ Power unit: Engine overhaul Mitsubishi Lancer 9 (2000-2007, petrol)
➤ Power unit: Engine overhaul Mitsubishi Galant 6 and 7 (1987-1998)
Link in different formats to this section
TEXTHTMLBB Code
- General information
- User manual
- Specifications
- Gasoline engines
- 4G1 engines until 1995
- 4G1 engines since 1995
- Repair of 4G9 engines
- Cooling system
- Reduced exhaust gas toxicity
- Engine electrical equipment
- Injection system MPI
- Carburetors
- Transmission
- Clutch and drive shafts
- Manual gearbox F4M21/F5M21
- Manual gearbox F4M41
- Automatic gearbox F4A21
- Automatic gearbox F4A41
- Chassis and running gear
- Car suspension
- Steering
- Brake system
- Body
- Exterior (external elements)
- Electrical equipment
- Equipment and devices
- Electrical circuits
- General information
- Maintenance
- Power unit
- Engine in a car
- Engine repair (gasoline)
- Engine repair (diesel)
- Lubrication system
- Cooling system
- Carburetor
- Fuel injection MPI
- Fuel injection GDI
- Emission reduction
- Fuel system (diesel)
- Ignition system
- Exhaust system
- Transmission
- Clutch
- Manual gearbox
- Automatic gearbox
- Drive shafts
- Chassis and running gear
- Chassis malfunctions
- Front suspension
- Rear suspension
- Steering
- Wheels and tires
- Brake system
- Body and interior
- Body elements
- Electrical equipment
- Equipment and devices
- Power devices
- Heating and air conditioning
- Electrical circuits
- General information
- User manual
- Daily care
- Maintenance
- Power unit
- Engine in a car
- Engine overhaul
- Cooling system
- Heater and air conditioner
- Power and exhaust system
- Engine electrical equipment
- Emission reduction
- Transmission
- Mechanical gearbox
- Automatic gearbox
- Clutch and axles
- Chassis and running gear
- Brake system
- Car suspension
- Steering
- Body and interior
- Body and elements repair
- Electrical equipment
- Equipment and devices
- Electrical circuits